|
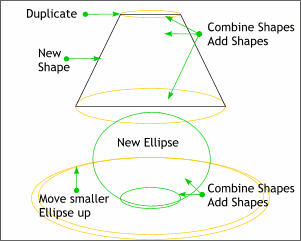
 We'll need only the ellipses shown
here. You can delete the rest. And we'll create a new ellipse for the lamp base. We'll need only the ellipses shown
here. You can delete the rest. And we'll create a new ellipse for the lamp base. Enable Snap To Objects (the red magnet icon) and use the Pen Tool to draw a four-sided shape connecting the
two ellipses for the lamp shade. Duplicate the top ellipse (Ctrl - K). Select the duplicate ellipse, the four sided shape and the middle ellipse and from Arrange, select Combine Shapes >
Add Shapes to create a single outline. Select the new ellipse for the lamp and the small center circle from the bottom group and Combine Shapes > Add Shapes. Finally select the smaller
of the two large ellipses and move it upwards as shown above.
|
|
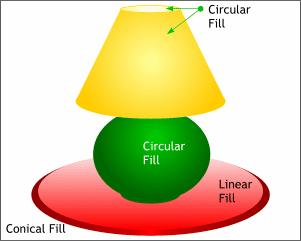
 Using the earlier tutorial for reference,
apply the fills as shown. There is only one part for the lamp base so use the circular fill that was used for the larger lamp shape in the beginner tutorial. Using the earlier tutorial for reference,
apply the fills as shown. There is only one part for the lamp base so use the circular fill that was used for the larger lamp shape in the beginner tutorial.The lightest area of the Conical Fill is
on the bottom center. The two colors used are dark red (RGB 102, 0, 0) and very dark red RGB 51, 0, 0,).
|

