|
||
|
|
|||||||||||||||||||||||||||
The number of blend steps has been changed to 25 producing 25 steps between each selected object. |
||||||
To remove the blend, with the
blend selected, press the Remove button. The target objects will remain. There are three Color Blend Effects: Fade, Rainbow and Alt Rainbow. Fade blends between the two selected colors.
Rainbow blends in the shortest distance around the color wheel. Alt Rainbow blends the longest distance around the color wheel. Using the same start and end color produces a complete rainbow. |
||||||
We will use a blend of outlines to create the glowing inside walls of the pumpkin. |
||||||
The two objects were grouped, and a 7-step
Alt Rainbow Blend applied producing the rainbow variations of the golden sphere. |
||||||
 |
 |
|||||
|
||||||
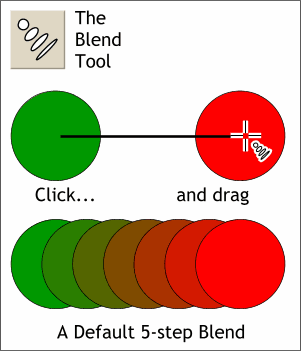 The Blend Tool is quite easy to
use. Simply select the Blend Tool on the Toolbar (the blend objects need not be selected), click upon the first blend object, drag over to the second blend object and release the mouse button.
The Blend Tool is quite easy to
use. Simply select the Blend Tool on the Toolbar (the blend objects need not be selected), click upon the first blend object, drag over to the second blend object and release the mouse button.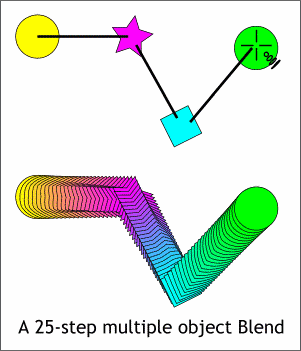 Xara can also create blends
between multiple objects as shown on the left. Click and drag, click and drag and click and drag.
Xara can also create blends
between multiple objects as shown on the left. Click and drag, click and drag and click and drag.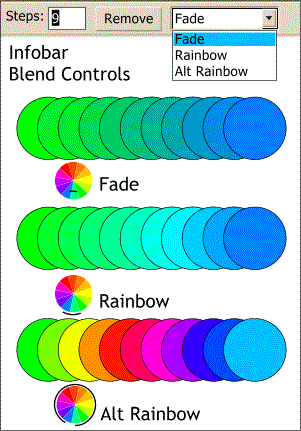 As with most of Xara's tools,
there are additional Infobar settings, three of which are illustrated on the left. To change the number of steps, enter a new number in the Steps: text entry box and press Enter.
As with most of Xara's tools,
there are additional Infobar settings, three of which are illustrated on the left. To change the number of steps, enter a new number in the Steps: text entry box and press Enter.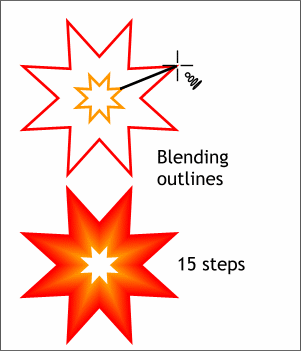 You can apply a blend to
outlines. Using the same process, drag from one outline to the other.
You can apply a blend to
outlines. Using the same process, drag from one outline to the other. Xara can blend groups of objects
as well. The golden sphere, shown on the left of the illustration, is a small 2-color, Circular-filled circle placed on top of a 15-step, Fade Blend of two circles.
Xara can blend groups of objects
as well. The golden sphere, shown on the left of the illustration, is a small 2-color, Circular-filled circle placed on top of a 15-step, Fade Blend of two circles.