|
|
|
NEW USERS - PLEASE READ FIRST. As always, we will be using Pixels as our units of measure. Right click on the screen and select Page Options... from the pop up menu. In the Units tabbed section, select Pixels for the Units and 0-255 for the Color Units. In the Grid and Ruler tabbed section set the Major Spacing to 100pix (key it in exactly like this please) and the Number of Subdivisions to 10 . Press OK to close the dialog and apply the changes. To see a tutorial on Xara Basics visit Workbook 20. NOTE: You will notice from time to time I apply arbitrary colors to objects. I do this to make the objects easier to see. If I do not specify a fill for an object, you do not have to apply a fill or outline color. When I show an ellipse or rectangle that has just been created, that has no fill, it is because I have set the fill to none before I exported the illustration. By default, all ellipses, rectangles and Quick Shapes have a black outline and a black fill. There is nothing wrong with your copy of Xara. Naming Conventions. I use bold face to indicate the names of tools, galleries, keyboard shortcuts, and dialogs. Items such as unnamed icons and drop down lists, which have names when you let your cursor rest over them for a moment, are displayed in italics. The Infobar is the context sensitive menu at the top of the screen and changes to reflect the options for the selected tool. Some of the tool icons have changed in Xara X1, and this may cause some confusion for new users. If you are using an older version of Xara, click here to see my Rosetta Stone for translating the old buttons into the new. New Users? I have created some quick start mini-tutorials to get you though the basics. Workbook 20, Workbook 30, and Workbook 31 cover the main things you need to know to get started. While you should be able to create all the steps in previous versions of Xara, some of the tool icons have changed, and this may cause some confusion for new users. If you are using an older version of Xara, click here to see my Rosetta Stone for translating the old buttons into the new. |
|||||
|
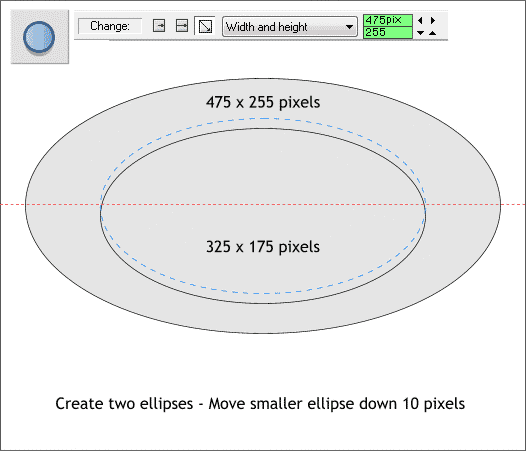
Using the Ellipse Tool (Shift F4 keyboard shortcut), create two ellipses to the sizes shown above. TIP: The fastest way to create an ellipse to an exact size is to first drag any size ellipse. Then enter the desired Width and Height in the text entry boxes on the Infobar at the top of the page. Press Enter to apply the change. This works with rectangles and QuickShape objects as well. Center the two ellipses (Arrange menu > Alignment) then move the smaller ellipse down about 10 pixels. TIP: I have my Nudge Size: (Utilities > Options > General) set to 1pix (1 pixel). Every click on one of the arrow keys on my keyboard moves the selected object 1 pixel. If you hold down the Shift key and click an arrow key, the selection moves 10 pixels at a time.
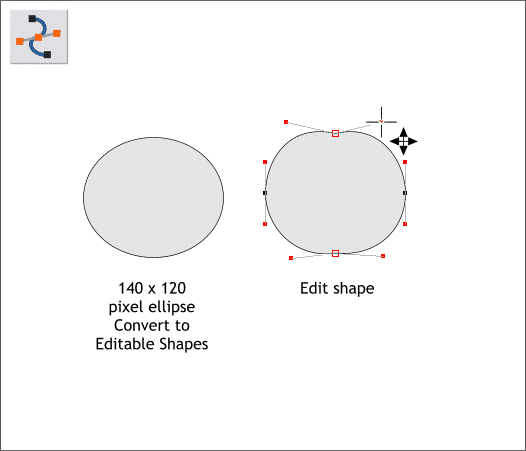
Create an ellipse to the size shown above on the left. With the ellipse selected, from the Arrange menu select Convert to Editable Shapes. Switch to the Shape Editor Tool (F4). Drag the side and control points a little bit to make the ellipse more tomato shaped. You can drag the sides of the ellipse and/or you can click on any of the control points and drag the Bezier control handles. If you are new to this, experiment a bit to see how these things work. If you drag on the ellipse with the Shape Editor Tool and nothing happens, then you probably did not Convert to Editable Shapes.
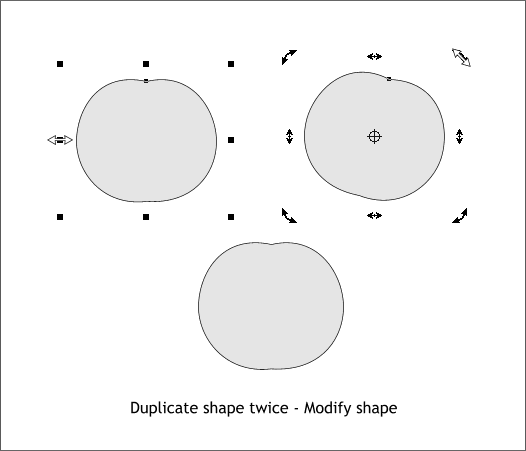
Make two duplicates (press Ctrl d as in Duplicate). Stretch and rotate the duplicates a little bit so the three tomato shapes are slightly different.
|
|
|


