|
 The cornea is a rounded, transparent lens that
sits on top of the iris and focuses images onto the retina in the inside, back portion of the eye. Because of its shape, the cornea reflects any light source it encounters. The cornea is a rounded, transparent lens that
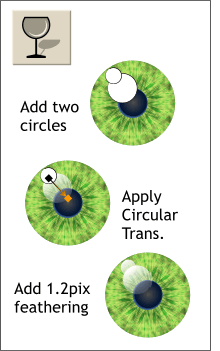
sits on top of the iris and focuses images onto the retina in the inside, back portion of the eye. Because of its shape, the cornea reflects any light source it encounters.We'll add two highlights to the cornea to add
depth and glossiness. Create two circles as shown. Apply Circular, Mix Transparency to each. Reposition the center of the circular fill to the upper left portion of the highlights.
Add a 1.2 pixel feathering to each highlight by modifying the Change the size of the Feathering Region (Couldn't Xara just have called it Feathering?) slider on the top right portion of the Infobar.
|

 Select the rectangle then select the Mould
Tool. Apply a Ceiling Perspective envelope to change the shape and fill to a wedge shape.
Select the rectangle then select the Mould
Tool. Apply a Ceiling Perspective envelope to change the shape and fill to a wedge shape.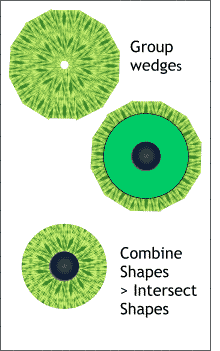 Select all the wedge shapes
and group them. Send the wedges to the back (Ctrl B).
Select all the wedge shapes
and group them. Send the wedges to the back (Ctrl B).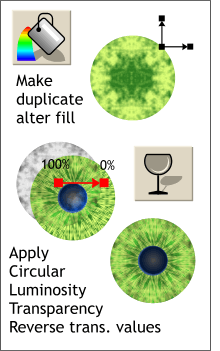 Select the duplicate iris circle and apply the same 2-color
Fractal Clouds fill. But this time leave the fill path arrows at a 90 degree angle and drag the center of the fill around until you have a pattern similar to the one shown top left. I doubt if you will get the exact same
pattern but basically we want a pattern that is darker in the center and lighter on the outside.
Select the duplicate iris circle and apply the same 2-color
Fractal Clouds fill. But this time leave the fill path arrows at a 90 degree angle and drag the center of the fill around until you have a pattern similar to the one shown top left. I doubt if you will get the exact same
pattern but basically we want a pattern that is darker in the center and lighter on the outside. Finally, just as the pupil is not a hard shape,
neither is the outer edge of the iris a hard shape.
Finally, just as the pupil is not a hard shape,
neither is the outer edge of the iris a hard shape.