|
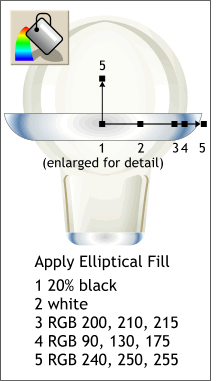
 Apply an Elliptical Fill using the colors and
positions shown in the illustration. Apply an Elliptical Fill using the colors and
positions shown in the illustration.
TIP: You can only drag and drop colors onto
one arm of the elliptical fill path. This will be the longest path. Drag and drop any color onto the fill path just to add the color stations to the fill path, then go back and use the Color Editor
to modify the colors using the color values shown.NOTE: When you drag and drop a color onto the fill path, the dropped color is not the selected color. The end color is automatically
selected. To edit a color on the fill path, click the color square to select it, then edit the color. RELATED NOTE: As the dragged color approaches the fill path the symbol to the right
of the cursor changes to indicate if the color is an outline color (thin vertical rectangle) or fill (a square). |

