On completing the image, I noticed some things I wanted to
change. Being too lazy to redo the entire tutorial, I decided we could change them together here.Reduce the iris and blood vessels to 90 percent.
Using the Shape Editor Tool, and with the bulb's outline
selected, round off the place where the round part of the bulb meets the bottom portion. The best way to do this is to add a point at either end of the area next to the black curved lines, which I added to illustrate the
shape of the curve. Delete any in-between points. The line will now be a straight line which you can gently shape with the Shape Editor Tool.
I also added a panel in the very center with a two color fill to add an
additional reflection to round the bottom portion of the bulb.
So what do you think? Is anybody here? Or has everybody run screaming into the night? If you finished this tutorial, or even if you didn't, I'd
appreciate hearing from you. If you encountered any problems, or mistakes, let me know these as well. (I'm only human).
On the next page is a slightly different version of the eyebulb image which lead to this tutorial.

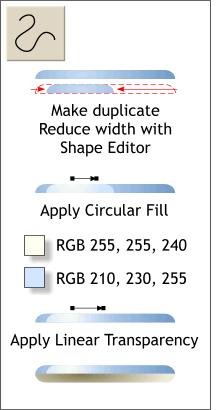 Make a duplicate of the top shape. Using the
Shape Editor Tool, drag the sides towards the middle as shown. Apply a 2-color Circular Fill with the center of the fill above the shape. Apply a Linear Transparency. This creates a warm highlight.
Make a duplicate of the top shape. Using the
Shape Editor Tool, drag the sides towards the middle as shown. Apply a 2-color Circular Fill with the center of the fill above the shape. Apply a Linear Transparency. This creates a warm highlight.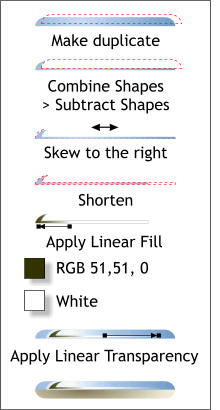 Make two more duplicates of the top shape and
place the top duplicate shape slightly above and slightly to the right of the other.
Make two more duplicates of the top shape and
place the top duplicate shape slightly above and slightly to the right of the other. 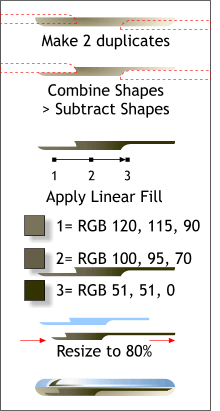 Make three duplicates of the bottom half and
position them as shown.
Make three duplicates of the bottom half and
position them as shown. Group the thread elements and center the
thread top and center over the cylinder shape.
Group the thread elements and center the
thread top and center over the cylinder shape.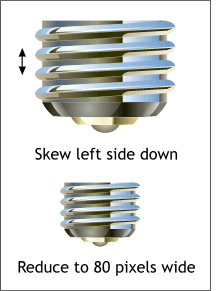 Select the four threads and click twice to enable
rotate/skew mode. Skew the right side of the threads down to the bottom of the cylinder.
Select the four threads and click twice to enable
rotate/skew mode. Skew the right side of the threads down to the bottom of the cylinder.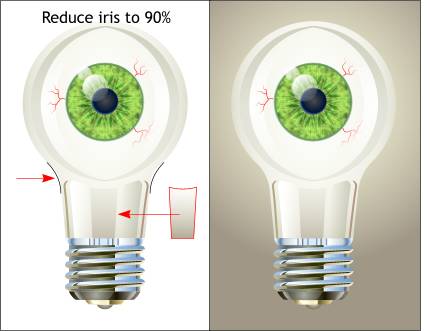 On completing the image, I noticed some things I wanted to
change. Being too lazy to redo the entire tutorial, I decided we could change them together here.
On completing the image, I noticed some things I wanted to
change. Being too lazy to redo the entire tutorial, I decided we could change them together here.