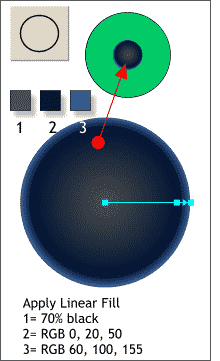
 The pupil, the black hole in the iris, is not a flat
shape, but more of a soft opening in the iris. The pupil, the black hole in the iris, is not a flat
shape, but more of a soft opening in the iris.So instead of applying a black fill and saying that will work, we'll create a subtle three color Circular Fill using the three colors shown.
Colors 2 and 3 will soften the outside edge of the pupil. The lighter gray will make the center of the pupil a tiny bit lighter.
TIP: Having trouble dragging and dropping colors onto the fill path? You can double click on the fill path with the Fill Tool cursor to add a color station as well. |

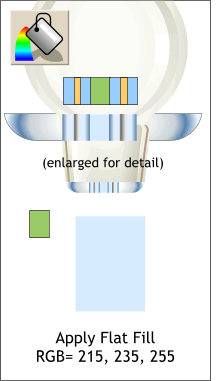 Select the center rectangle and apply a Flat
pale blue fill.
Select the center rectangle and apply a Flat
pale blue fill. The first part of the illustration is now
complete. Name and save your drawing and take a break.
The first part of the illustration is now
complete. Name and save your drawing and take a break.  Next we will add the eyeball element to the
light bulb. Why an eyeball in a light bulb, why to represent bright ideas of course.
Next we will add the eyeball element to the
light bulb. Why an eyeball in a light bulb, why to represent bright ideas of course.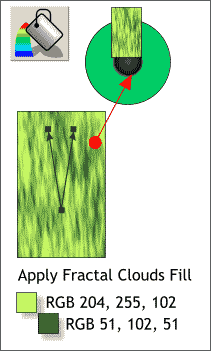 Steve Newport used this modification of a Fractal Clouds fill to create his image of flames. Ross Macintosh also used a Fractal Clouds
fill for the iris in his eyeball fill. So I'd be foolish to reinvent the wheel when Steve and Ross have laid such good groundwork.
Steve Newport used this modification of a Fractal Clouds fill to create his image of flames. Ross Macintosh also used a Fractal Clouds
fill for the iris in his eyeball fill. So I'd be foolish to reinvent the wheel when Steve and Ross have laid such good groundwork.