
|
||
|
|
Select the large ellipse and Copy it (Ctrl C
). Select the small ellipses and Paste the Fill Attributes (Shift Ctrl A or Edit > Paste Attributes). Set the outlines to none. NOTE: Copy and Paste Attributes copies all attributes of an object including fill, outline, text size and style, and transparency. |
|||||||
With the small circle selected, select Convert to Editable Shapes from the Arrange pull-down menu. With the small circle selected, switch to the Shape Tool (the tool
with the squiggly line) and select the top center node. Click the Smooth Join button. Using the arrow keys, or your mouse, drag the top node upwards about twice the height of the small circle.
Center the nose between the two cheeks. |
|||||||
NOTE: You won't be able to see the guidelines behind the filled shape as I have illustrated them here. Sliding the View Quality slider on the Infobar to the left will enable wireframe mode allowing you to see the guides behind the image. |
|||||||
 |
 |
||||||
|
|||||||
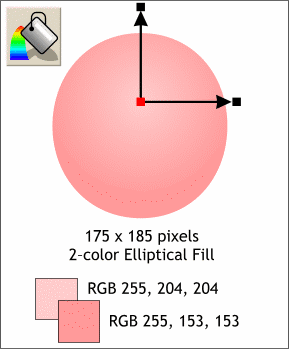 Using the Ellipse Tool,, draw an ellipse as shown on the left. You can enter the correct dimensions on the Infobar if need be.
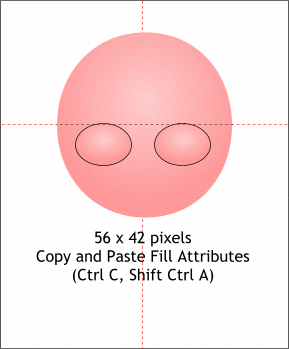 Make a small ellipse to the size
shown. Make a duplicate of the smaller ellipse and position them as shown so the tops of the small ellipses are tangent to the center of the large ellipse.
Make a small ellipse to the size
shown. Make a duplicate of the smaller ellipse and position them as shown so the tops of the small ellipses are tangent to the center of the large ellipse.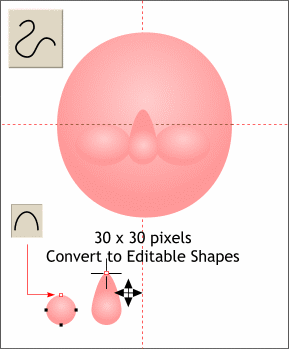 Make a duplicate of the ellipse and
change the size to 30 by 30 pixels.
Make a duplicate of the ellipse and
change the size to 30 by 30 pixels.