|
As always, we will be using Pixels as our units of measure. Right click on the screen and select Page Options...
from the pop up menu. In the Units tabbed section, select Pixels for the Units and 0-255 for the Color Units. In the Grid and Ruler tabbed section set the Major Spacing
to 100pix (key it in exactly like this please) and the Number of Subdivisions to 10. Press OK to close the dialog and apply the changes. NOTE:
You will notice from time to time I apply arbitrary colors to objects. I do this to make the objects easier to see. If I do not specify a fill for an object, you do not have to apply a fill or outline color.When I
show an ellipse or rectangle that has just been created, that has no fill, it is because I have set the fill to none before I exported the illustration. By default, all ellipses, rectangles and Quick Shapes
have a black outline and a black fill. There is nothing wrong with your copy of Xara. |
|
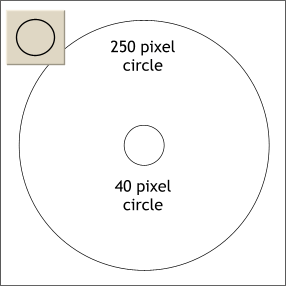 Using the Ellipse Tool, and holding down the Ctrl
key to constrain the ellipse to a circle, create a 250 pixel circle. (You can see the size of the circle displayed on the Infobar at the top of the screen. Using the Ellipse Tool, and holding down the Ctrl
key to constrain the ellipse to a circle, create a 250 pixel circle. (You can see the size of the circle displayed on the Infobar at the top of the screen.Draw a second circle 40 pixels in diameter.
TIP: Select the larger circle. Drag one of the corner bounding box handles towards the center
holding down the Shift key to constrain scaling from the center of the object and reduce the circle to about 40 pixels. Before you release the left mouse button, click the right mouse button
to make the smaller circle a duplicate, then release the left mouse button. Adjust the final size using the Height and Width settings on the Infobar. If you can't do the right-click duplicate
action thing, duplicate the big circle first (Ctrl K or Arrange > Clone) and then scale it down holding the Shift key. |

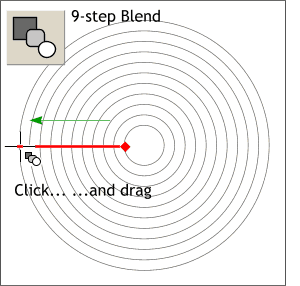 Set the fill for both circles to none by clicking on the
cross hatched box to the left of the screen palette.
Set the fill for both circles to none by clicking on the
cross hatched box to the left of the screen palette.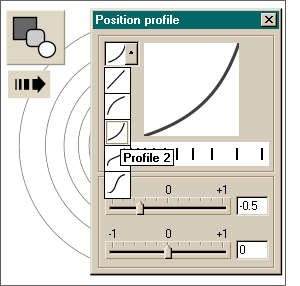 With the blend and the Blend Tool still selected,
click the black arrow on the Infobar to open the Position Profile dialog.
With the blend and the Blend Tool still selected,
click the black arrow on the Infobar to open the Position Profile dialog.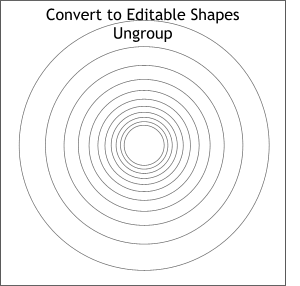 With the blend selected, select Convert to Editable Shapes (
Arrange menu) and then Ungroup the circles (Arrange menu or Ctrl U)
With the blend selected, select Convert to Editable Shapes (
Arrange menu) and then Ungroup the circles (Arrange menu or Ctrl U)