|
As always, we will be using Pixels as our units of measure. Right click on the screen and select Page Options...
from the pop up menu. In the Units tabbed section, select Pixels for the Units and 0-255 for the Color Units. In the Grid and Ruler tabbed section set the Major Spacing
to 100pix (key it in exactly like this please) and the Number of Subdivisions to 10. Press OK to close the dialog and apply the changes. NOTE:
You will notice from time to time I apply arbitrary colors to objects. I do this to make the objects easier to see. If I do not specify a fill for an object, you do not have to apply a fill or outline color.When I
show an ellipse or rectangle that has just been created, that has no fill, it is because I have set the fill to none before I exported the illustration. By default, all ellipses, rectangles and Quick Shapes
have a black outline and a black fill. There is nothing wrong with your copy of Xara. |

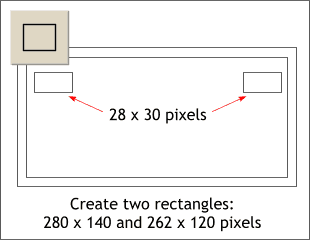 Using the Rectangle Tool
, create two large rectangles and two small rectangles to the sizes shown. It is very important that the rectangles be drawn pretty close to the actual size without resizing them with the Selector Tool
(the arrow cursor).
Using the Rectangle Tool
, create two large rectangles and two small rectangles to the sizes shown. It is very important that the rectangles be drawn pretty close to the actual size without resizing them with the Selector Tool
(the arrow cursor). 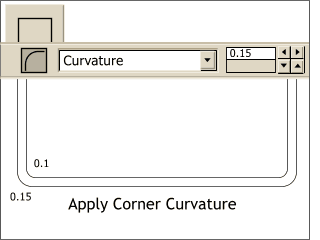 Select the largest rectangle with the Rectangle Tool
. Click the Curved Corners icon (the arc) on the Infobar.
Select the largest rectangle with the Rectangle Tool
. Click the Curved Corners icon (the arc) on the Infobar.