 |
 |
||||||||
| 0 1 2 3 4 5 6 7 8 9 10 11 Download Zipped Tutorial | |||||||||
|
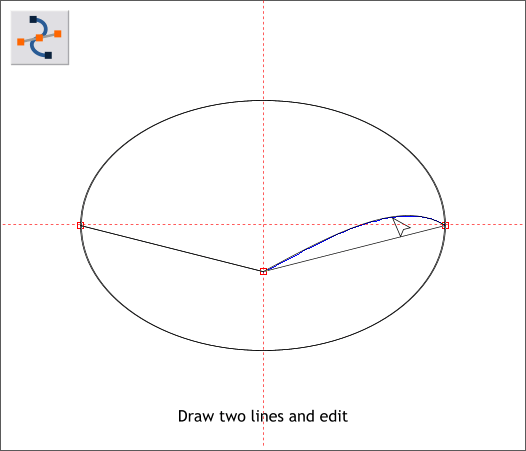
The enveloped dots are still here. I am not showing them to make the next steps easier to see. Select the Shape Editor Tool (F4). Click a start point on the left side of the ellipse at the vertical center, click about 1/3 of the way down the bottom half and then click the last point on the right side of the ellipse at the vertical center. Drag guidelines through the ellipse to help position your lines. Drag the right side of the line up into a graceful curve as shown.
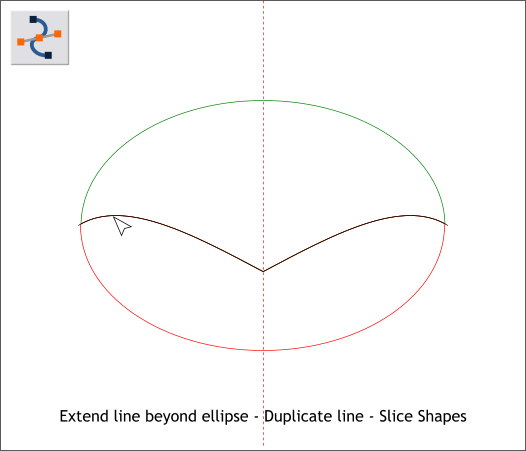
Drag the left line up in a matching curve. Make a duplicate copy of the double arc line and set it to the side. We will need later. TIP: The fastest way to rid the page of guidelines to right click on the screen rulers and select Delete All Guidelines. You can also right click on an individual guideline to delete one at a time. Extend the ends of the double arc line a small distance beyond the ellipse. Hold down the Shift key and click on the line and on the ellipse to multiple select both objects. From the Arrange menu, select Combine Shapes > Slice Shapes or press Ctrl 4, the keyboard shortcut. The ellipse will be sliced into two parts. I have changed the outline colors in the illustration above to show that the top and bottom are two different objects.
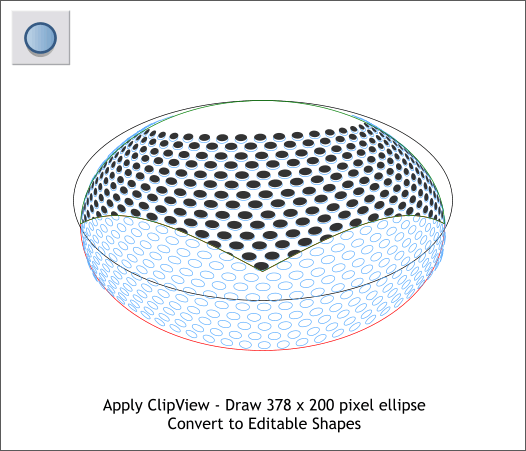
Select the dots and the top half of the ellipse. (Make sure the ellipse is in back of the dots (Arrange > Put to Back or Ctrl b). Select both the top shape and the enveloped dots and Arrange > Apply Clip View. The pale blue dots are now masked inside the top shape. Draw a new ellipse to the size shown and align the top of the new ellipse with the top of the dots shape. Convert the new ellipse to Editable Shapes (Arrange menu).
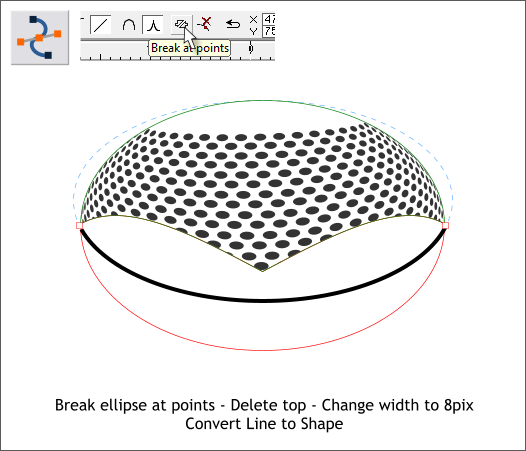
With the new ellipse selected, select the Shape Editor Tool (F4). Click on the part of the new ellipse that overlaps the bottom ellipse (shown in red) to add a control point. Do this for both sides. Hold down the Shift key and select both new control points. On the Infobar, click the Break at Points icon. Select the top half with the Selector Tool (the arrow pointer) and delete the top half. Change the line width to 8pix by selecting 8pix from the Width drop down list on the Infobar. Save your drawing and take a short break.
|
|||||||||
|
|
|||||||||


