|
|
|
As always, we will be using Pixels as our units of measure. Right click on the screen and select Page Options... from the pop up menu. In the Units tabbed section, select Pixels for the Units and 0-255 for the Color Units. In the Grid and Ruler tabbed section set the Major Spacing to 100pix (key it in exactly like this please) and the Number of Subdivisions to 10. Press OK to close the dialog and apply the changes. To see a tutorial on Xara Basics visit Workbook 20. NOTE: You will notice from time to time I apply arbitrary colors to objects. I do this to make the objects easier to see. If I do not specify a fill for an object, you do not have to apply a fill or outline color. When I show an ellipse or rectangle that has just been created, that has no fill, it is because I have set the fill to none before I exported the illustration. By default, all ellipses, rectangles and Quick Shapes have a black outline and a black fill. There is nothing wrong with your copy of Xara. Naming Conventions. I use bold face to indicate the names of tools, galleries, keyboard shortcuts, and dialogs. Items such as unnamed icons and drop down lists, which have names when you let your cursor rest over them for a moment, are displayed in italics. The Infobar is the context sensitive menu at the top of the screen and changes to reflect the options for the selected tool. Some of the tool icons have changed in Xara X1, and this may cause some confusion for new users. If you are using an older version of Xara, click here to see my Rosetta Stone for translating the old buttons into the new. New Users? I have created some quick start mini-tutorials to get you though the basics. Workbook 20, Workbook 30, and Workbook 31 cover the main things you need to know to get started. While you should be able to create all the steps in previous versions of Xara, some of the tool icons have changed, and this may cause some confusion for new users. If you are using an older version of Xara, click here to see my Rosetta Stone for translating the old buttons into the new. |
|||||||
|
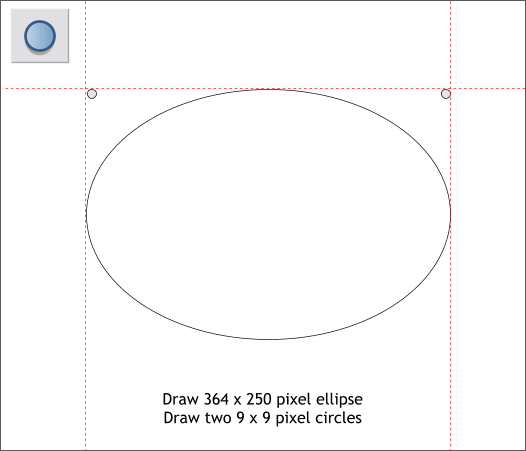
Using the Ellipse Tool (L) create an ellipse to the size shown above. Create two small circles to the size shown and align them to the top and sides of the ellipse. I snapped guidelines to the top and sides of the ellipse to make the alignment of the two small circles easier.
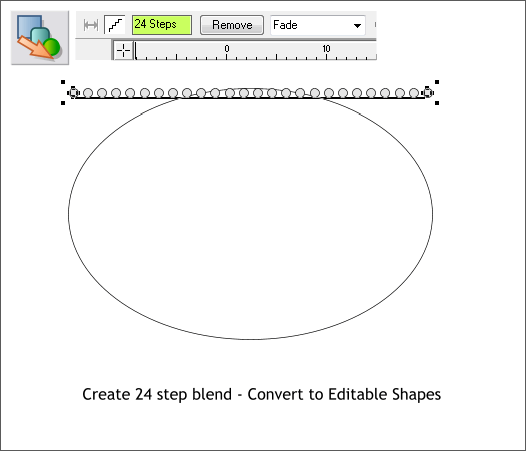
Select the Blend Tool (F7 or W). Click and drag from either of the small circles across to the other circle to create a blend. Change the number of Blend Steps to 24 on the Infobar and press Enter to apply the change.
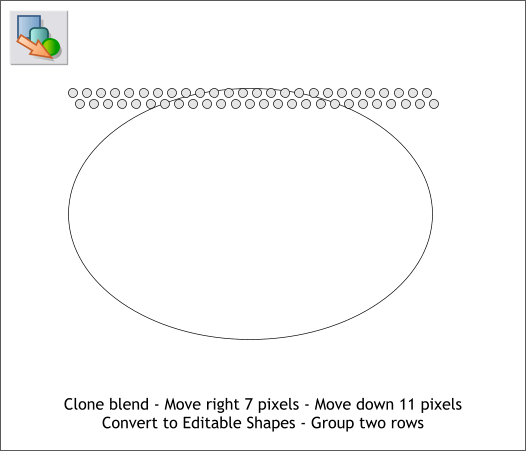
Clone the blend (Ctrl k). Move the clone to the right 7 pixels and down 11 pixels. NOTE: Clone (Ctrl k) makes a duplicate copy of the selection in the exact same location. Duplicate (Ctrl d) makes a duplicate copy of the selection and offsets it down and to the right. Select both blends and from the Arrange menu, select Convert to Editable Shapes (Shift Ctrl s). Group the two rows of circles (Ctrl g). TIP: I set my Nudge Size (distance an object is moved when you press an arrow key) to 1pix in the Page Options > General tabbed section. Press any arrow key to move a selection 1 pixel. Hold down the Shift key to move the selection 10 pixels.
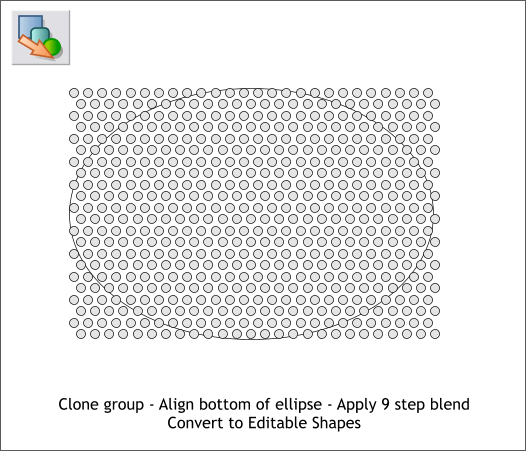
Clone (Ctrl k) the group and move the clone to the bottom of the ellipse. Create a 9 step blend between the two groups by dragging the Blend Tool from one group to the other. With the blend selected, Arrange > Convert to Editable Shapes.
|
|||||||
|
|


