|
As always, we will be using Pixels as our units of measure. Right click on the screen and select Page Options...
from the pop up menu. In the Units tabbed section, select Pixels for the Units and 0-255 for the Color Units. In the Grid and Ruler tabbed section set the Major Spacing
to 100pix (key it in exactly like this please) and the Number of Subdivisions to 10. Press OK to close the dialog and apply the changes. NOTE:
You will notice from time to time I apply arbitrary colors to objects. I do this to make the objects easier to see. If I do not specify a fill for an object, you do not have to apply a fill or outline color.When I
show an ellipse or rectangle that has just been created, that has no fill, it is because I have set the fill to none before I exported the illustration. By default, all ellipses, rectangles and Quick Shapes
have a black outline and a black fill. There is nothing wrong with your copy of Xara. |
|
 Using the Ellipse Tool,
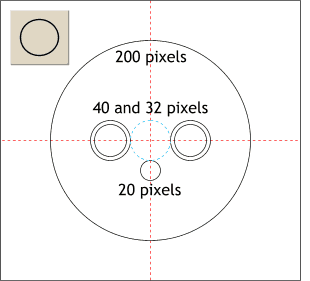
and holding down the Ctrl key to constrain the ellipse to a circle, drag a 200 pixel circle. Drag a horizontal and vertical guideline through the center of the circle for reference. Make five
additional circles to the sizes noted and space and align the circles as illustrated. Using the Ellipse Tool,
and holding down the Ctrl key to constrain the ellipse to a circle, drag a 200 pixel circle. Drag a horizontal and vertical guideline through the center of the circle for reference. Make five
additional circles to the sizes noted and space and align the circles as illustrated.
HOW TO: If you are new to Xara, to draw a circle, select the Ellipse Tool (icon shown top left) from the toolbar on the left of the page, click on the page and without releasing
the left mouse button, drag. The size of the ellipse or circle will appear on the Infobar at the top of the page as you draw. To make an ellipse or circle an exact size, you can enter new values in the Height and
Width text entry boxes that appear on the Infobar.To add guidelines, drag from the screen rulers onto the page. If you do not see any rulers on the screen, select Bars > Rulers from the
Window pull down menu. |

