 |
 |
|||||||
| 0 1 2 3 4 5 6 7 8 9 10 11 Download Zipped Tutorial | ||||||||
|
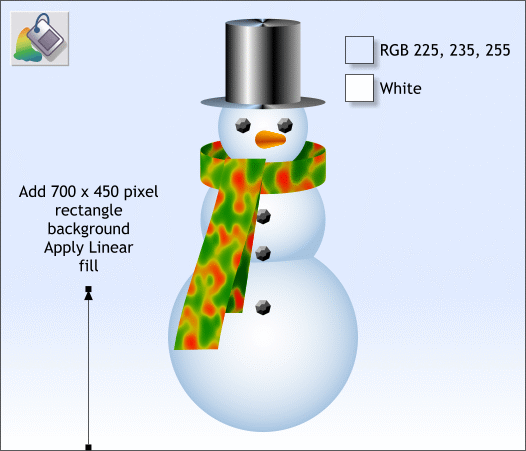
Finally add a 700 pixel wide by 450 pixel tall rectangle behind the snowman. (The rectangle will be wider than the illustration above). Select the Fill Tool (F5) and apply a Linear fill using the two colors shown and adjust the fill path arrow as shown. Remember, you can click and drag with the Fill Tool to create a fast Linear fill. This completes the color snowman image. Now we'll create the depth image. The depth image tells the stereogram software how to create the 3D effect.
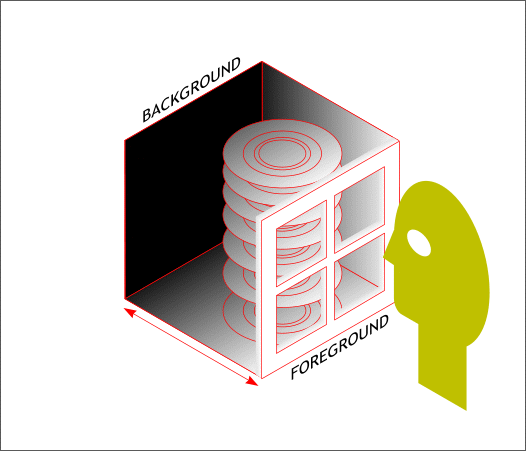
First, here is a brief explanation of how a depth image works. In the illustration above the green head (which represents the stereogram software) is looking through a window. The color in the very foreground is white. As we move back in space, there are 256 shades of gray until we reach black which is the farthest away from the viewer. The software uses this information to determine the depth of the object. The stacked circles represent the snowman. The part of the snowman closest to the viewer is made up of lighter shades of gray. As we move backward, the shades of gray get darker. The green head (the stereogram software) reads this grayscale information and uses the information to create the 3D object. For more information see The Stereogram Guide.
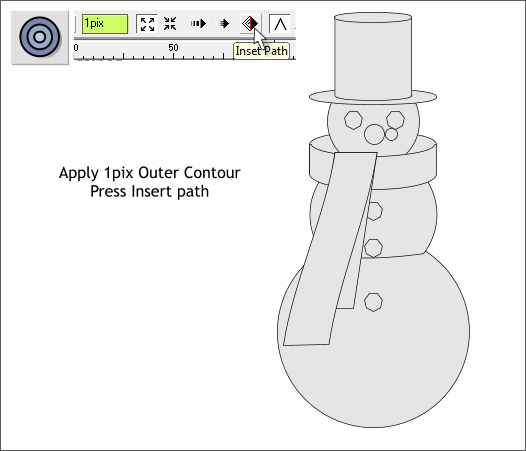
Switch to the duplicate image. To begin, fill all the shapes with a light gray with a black outline. For the Mapped Texture stereogram we will create, it is best if the depth image is slightly larger than the color image. This creates smoother edges. To accomplish this we will increase the size of each shape by one pixel. So, select all the shapes (drag a selection rectangle around all the objects with the Selector Tool - the arrow pointer). Switch to the Contour Tool (Ctrl F7). In the Contour Width text entry box, key in 1pix and press Enter. Press the Inset Path icon (the diamond shape). This automatically creates new shapes that are 1 pixel wider all around.
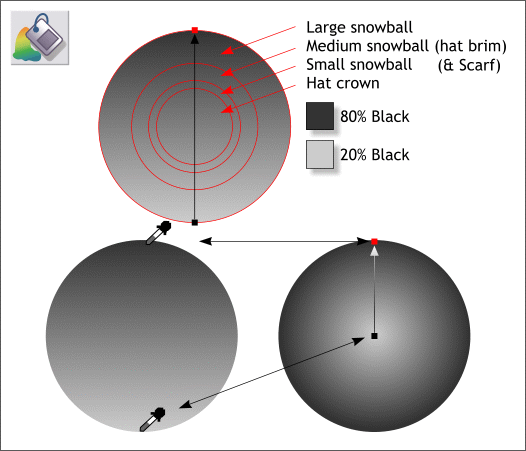
Create a new set of circles that are as wide as the different parts of the snowman and his hat. Center all the circles. Select the Fill Tool (F5). Apply a Linear fill that begins at 20% Black and ends with 80% Black. We will use these circles as depth reference. The bottom two circles demonstrate how we will sample these colors to create the different parts of the snowman using the Color Picker (the eyedropper tool ). The circle on the bottom right has a circular fill. The lightest part of the circle, which comes forward the most, is sampled from the lightest part of the linear filled circle. The darkest part of the circular fill, the part farthest away, is sampled from the back of the linear filled circle. Save your work and take a short break.
|
||||||||
|
|
||||||||


