
TIP: If you don't know the names of the tools or Property Bar icons, let the cursor rest over an icon for a few seconds and a Tool Tip will appear with the name of the tool or button. You can do this with colors on the onscreen palette as well.

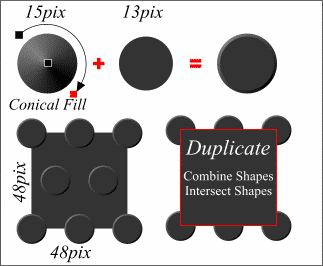
![]() Use the Ellipse Tool to create two circles, one 15 pixels in diameter and one 13 pixels in diameter. (The illustration has been enlarged for detail). Apply an 80% Black fill to both circles. With the larger circle selected, click the Fill Tool and from the drop-down list on the Property Bar, select Conical. Change the lighter color to 50% Black by clicking the small node opposite the light area, then clicking the 50% Black square on the on screen palette. Drag the node opposite the arrow until the highlight is in the upper left as shown. Center the two circles using the Object Alignment menu (Arrange menu).
Use the Ellipse Tool to create two circles, one 15 pixels in diameter and one 13 pixels in diameter. (The illustration has been enlarged for detail). Apply an 80% Black fill to both circles. With the larger circle selected, click the Fill Tool and from the drop-down list on the Property Bar, select Conical. Change the lighter color to 50% Black by clicking the small node opposite the light area, then clicking the 50% Black square on the on screen palette. Drag the node opposite the arrow until the highlight is in the upper left as shown. Center the two circles using the Object Alignment menu (Arrange menu).
Group (Ctrl-G) the two circles. Use the Rectangle Tool to construct a square 48 x 48 pixels and apply an 80% Black Fill, no outline. Create 2 duplicates of the circles (Ctrl-D) and position them centered on the top left and right corner (use Wireframe view). Make another duplicate and center it between the two. Use the Distribute Equi-spaced option on the Object Alignment menu.

![]() Make a duplicate of all three circles and center align them on the bottom section. Finally, make another duplicate of two circles, group them, and center them on the square as shown. Group all the circles. Make a duplicate of the 48 pixel square, and center it directly over the original. Select the group of circles, and the duplicate square, and from the Arrange menu, select Combine Shapes -- Intersect Shapes. This retains only the portion of the circles that were inside the square. The duplicate square is automatically deleted. Your final tile should look like the one shown here.
Make a duplicate of all three circles and center align them on the bottom section. Finally, make another duplicate of two circles, group them, and center them on the square as shown. Group all the circles. Make a duplicate of the 48 pixel square, and center it directly over the original. Select the group of circles, and the duplicate square, and from the Arrange menu, select Combine Shapes -- Intersect Shapes. This retains only the portion of the circles that were inside the square. The duplicate square is automatically deleted. Your final tile should look like the one shown here.