 |
 |
|||||||
| 0 1 2 3 4 5 6 7 8 9 10 11 Download Zipped Tutorial | ||||||||
|
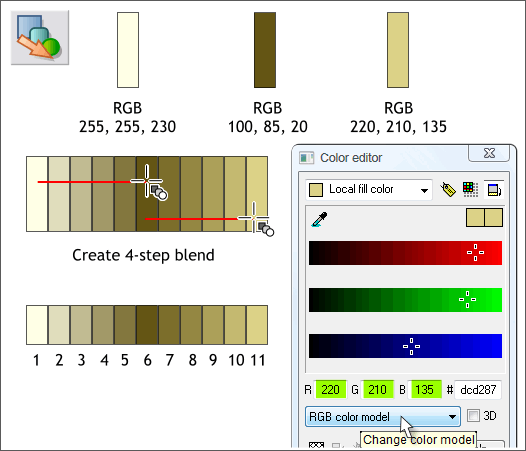
To create good metal effects, I like to make a palette of colors to work with. To create a palette of metallic colors, make three small rectangles and apply the colors shown at the top of the example above. This will give us a pale brass color, a dark brass color and a saturated brass color. Use the Color Editor (Ctrl e) to edit your colors in the RGB Color Model . Select the Blend Tool (F7). Click on the left rectangle and drag to the center rectangle, then click and drag from the center rectangle to the right rectangle. Change the number of Blend Steps on the Infobar to 4 and press Enter to apply the change. There is no magic number of colors, I chose 4 but you can have more if you want. I have assigned each color a number for easy reference.
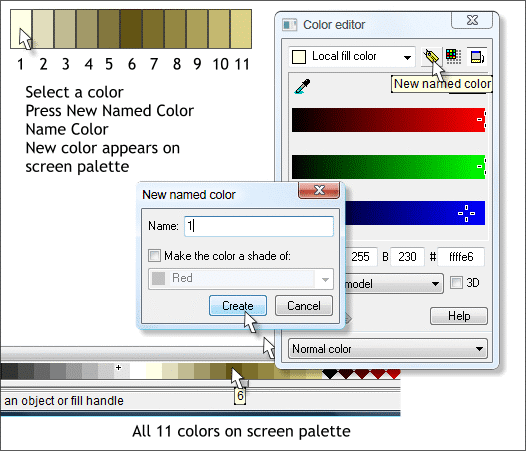
We will be working with these same colors to apply our fills. So it makes sense to name these colors so they will appear on the screen palette. Select the first color and in the Color Editor press the New Named Color yellow tag icon. Name the first color 1 and press Create. Repeat this step and create the other 10 named colors. The colors appear on the screen palette and if you let the cursor hover over any of the colors for a moment, the name of the color appears in a tool tip such as color #6 shown above.
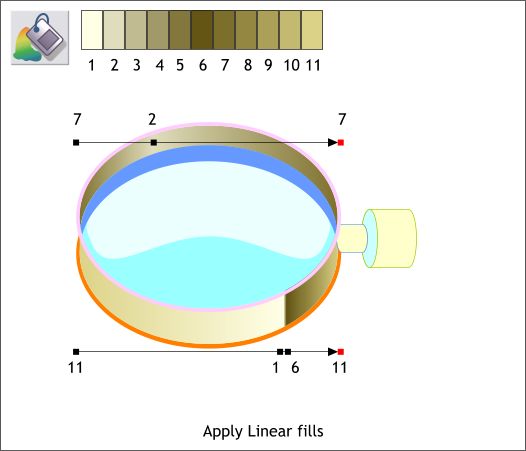
Using the Fill Tool (F5) apply two Linear fills as shown above. The simplest way to apply a Linear fill is click on the object to be filled with the Fill Tool to select it, then drag in the direction you want the fill to go. Hold down the Ctrl key to constrain the angle of the fill. Double click on the fill path arrow to add new colors. Select a color control point (the small boxes) then click the appropriate color on the screen palette. (You can also use the color picker, the eyedropper tool in the Color Editor to sample a color from the blend). In the top fill, the colors are spaced farther apart which creates a soft metallic effect. On the bottom fill the dark and pale colors, 1 and 6, are almost touching, which creates a polished brass effect.
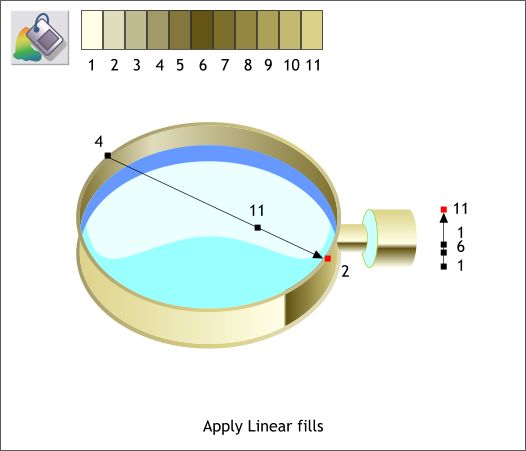
Select the rim, the O shape on top, and apply a Linear fill. Drag the fill path arrow on a diagonal as shown. Copy the fill to the clipboard (Ctrl c). Select the bottom O shape and from the Edit menu, select Paste Attributes or keyboard shortcut Shift Ctrl a. Apply a vertical Linear fill to the tubular shape on the right. Copy this fill and Paste Attributes the the smaller tubular shape.
|
||||||||
|
|
||||||||


