|
|
|
As always, we will be using Pixels as our units of measure. Right click on the screen and select Page Options... from the pop up menu. In the Units tabbed section, select Pixels for the Units and 0-255 for the Color Units. In the Grid and Ruler tabbed section set the Major Spacing to 100pix (key it in exactly like this please) and the Number of Subdivisions to 10. Press OK to close the dialog and apply the changes. To see a tutorial on Xara Basics visit Workbook 20. NOTE: You will notice from time to time I apply arbitrary colors to objects. I do this to make the objects easier to see. If I do not specify a fill for an object, you do not have to apply a fill or outline color. When I show an ellipse or rectangle that has just been created, that has no fill, it is because I have set the fill to none before I exported the illustration. By default, all ellipses, rectangles and Quick Shapes have a black outline and a black fill. There is nothing wrong with your copy of Xara. Naming Conventions. I use bold face to indicate the names of tools, galleries, keyboard shortcuts, and dialogs. Items such as unnamed icons and drop down lists, which have names when you let your cursor rest over them for a moment, are displayed in italics. The Infobar is the context sensitive menu at the top of the screen and changes to reflect the options for the selected tool. Some of the tool icons have changed in Xara X1, and this may cause some confusion for new users. If you are using an older version of Xara, click here to see my Rosetta Stone for translating the old buttons into the new. New Users? I have created some quick start mini-tutorials to get you though the basics. Workbook 20, Workbook 30, and Workbook 31 cover the main things you need to know to get started. While you should be able to create all the steps in previous versions of Xara, some of the tool icons have changed, and this may cause some confusion for new users. If you are using an older version of Xara, click here to see my Rosetta Stone for translating the old buttons into the new. |
|||||
|
For those of you who insist on knowing what is going on and don't like to be surprised, this tutorial will be in two parts. In the first part we will (actually you will, I've already finished) create a drawing of a magnifying glass, and in the last part, you will color the drawing to make turn the flat shapes into shiny brass and glass.
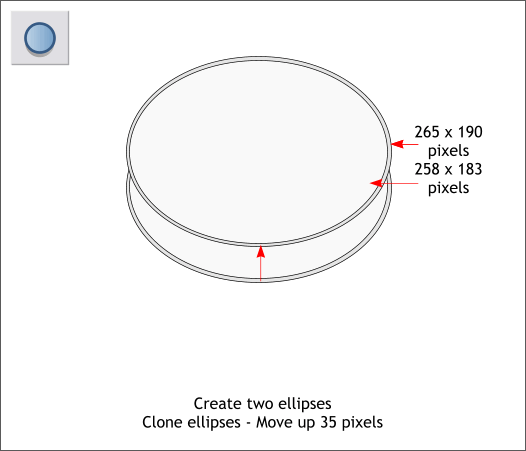
Select the Ellipse Tool (Shift F4) and create two centered ellipses to the sizes shown above. TIP: Create any size ellipse, the size does not matter, then with the Ellipse Tool still selected, change the Width and Height setting on the Infobar at the top of the page. Press Enter to apply the changes. Hold down the Shift key (to select multiple objects) and select each of the two ellipses. Press Ctrl k to create a clone of the two ellipses. Move the cloned ellipses up 35 pixels. TIP: If you set your Nudge Size: distance to 1pix (Utilities > Options... > General > Nudge Size), you can press the arrow keys on your keyboard to move a selection 1 pixel per click. Hold down the Shift key to move the selection 10 pixels per click.
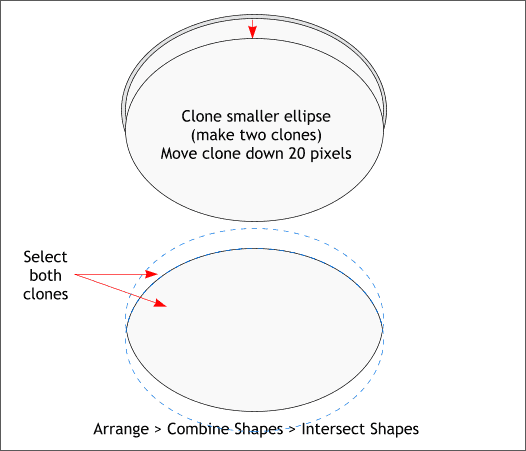
Clone the top smaller ellipse twice (Ctrl k to clone). Move the top clone down 20 pixels. Select both clones and from the Arrange menu, select Combine Shapes... Intersect Shapes or use the keyboard shortcut Ctrl 3. The two cloned ellipses will disappear leaving just the intersected shape.
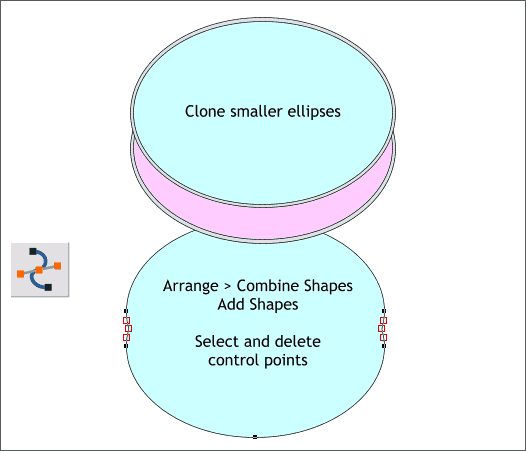
Clone the two smaller ellipses shown above in pale blue and pink. Arrange > Combine Shapes... > Add Shapes or Ctrl 1. With the combined shape selected, switch to the Shape Editor Tool (F4). Using the Shape Editor Tool, drag a selection rectangle about the six inside control points shown above with red outlines (the selected state) and delete them by pressing the Delete key on your keyboard.
|
|||||
|
|


