 Before I forget, we want to
have a black background behind our button bar. Hold down the Ctrl key and drag the color black from the screen palette onto the screen. This changes the page color to black. Before I forget, we want to
have a black background behind our button bar. Hold down the Ctrl key and drag the color black from the screen palette onto the screen. This changes the page color to black.Select the Button and Navbar Tool
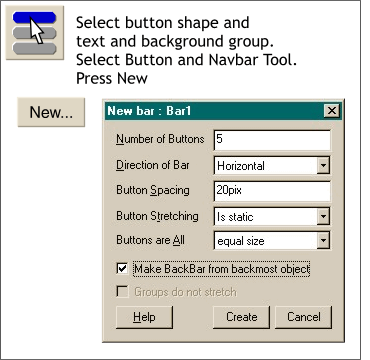
. Drag a rectangle around all the elements including the button. Press New... on the Infobar at the top of the screen. In the New Bar dialog make all the changes shown to the left and check
Make BackBar from Backmost Object. Two things happen here. Four additional buttons will be created and placed horizontally with 20 pixels between each button. The grouped
image becomes a button bar and exists along with the buttons.
NOTE:
If you grouped the text with the two button shapes, you will get an error message to this effect. If you received no error messages and now have five buttons,
congratulations, you are ready to move on to the next step. |

