|

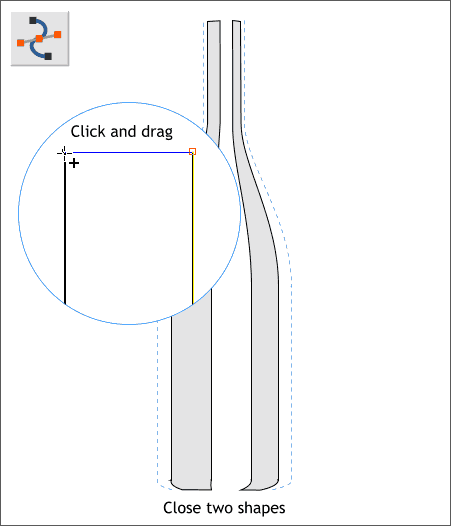
Select the two lines on the left side then switch to the Shape Editor Tool (F4).
Click on one of the top control points to select it, then click on the screen and drag the new line to other top control point. The cursor changes to a + to indicate the two lines are about to be joined.
Click on either of the bottom two control points and press Enter to automatically connect the two bottom points and to create a closed shape.
Repeat this step on the right side two lines to create a second closed shape. We'll use these two closed shapes for highlights on the bottle.

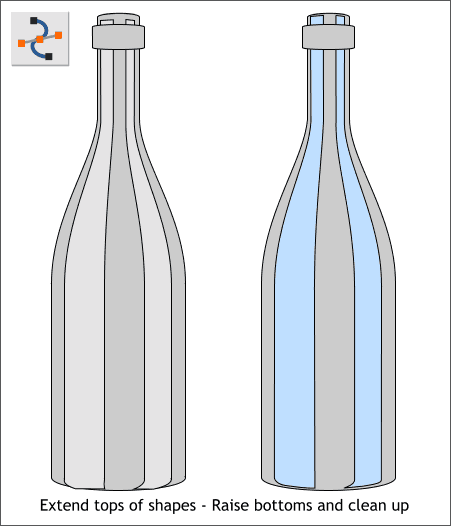
Position the highlight shapes over the bottle as shown on the left. Select the shapes then use the Shape Editor Tool to extend the top of the two shapes
as shown on the right. Clean up the bottom of the shapes as shown. We really won't see these in the final image but you will lie awake at night greatly
disturbed if you don't clean then up. Eventually this disturbance can lead to madness and it is not worth being locked up in the asylum just because you
got lazy and did not clean up the bottoms of these two shapes. Or looked at another way, having your shapes nice and tidy is a small price to pay for good mental health.

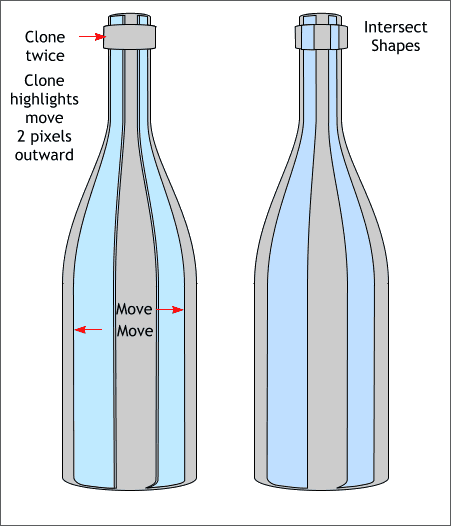
Clone the small rounded rectangle at the top of the neck two times (Ctrl k and Ctrl k). Clone each of those lovely tall highlight shapes one time.
Move each cloned highlight shape towards the edge of the bottle about two pixels.
NOTE: The difference between Clone (Ctrl k) and Duplicate (Ctrl d) is Clone creates a copy in the exact same place whereas Duplicate
creates a copy and offsets it down and to the right.
Select the cloned small rectangle and bring it to the front (Ctrl f). Select the highlight and the cloned small rectangle and from the Arrange menu, select Combine Shapes >
Intersect Shapes (or press Ctrl 3). (You won't see the result because it is hidden beneath the second rectangular shape).
Select the second cloned small rounded rectangle and bring it to the front (Ctrl f). Select the cloned small rectangle and the right highlight and Arrange > Combine Shapes >
Intersect Shapes.
With any luck you should have two highlights on the top of the neck as shown above right.
|