|
|
|
As always, we will be using Pixels as our units of measure. Right click on the screen and select Page Options... from the pop up menu. In the Units tabbed section, select Pixels for the Units and 0-255 for the Color Units. In the Grid and Ruler tabbed section set the Major Spacing to 100pix (key it in exactly like this please) and the Number of Subdivisions to 10. Press OK to close the dialog and apply the changes. To see a tutorial on Xara Basics visit Workbook 20. NOTE: You will notice from time to time I apply arbitrary colors to objects. I do this to make the objects easier to see. If I do not specify a fill for an object, you do not have to apply a fill or outline color. When I show an ellipse or rectangle that has just been created, that has no fill, it is because I have set the fill to none before I exported the illustration. By default, all ellipses, rectangles and Quick Shapes have a black outline and a black fill. There is nothing wrong with your copy of Xara. Naming Conventions. I use bold face to indicate the names of tools, galleries, keyboard shortcuts, and dialogs. Items such as unnamed icons and drop down lists, which have names when you let your cursor rest over them for a moment, are displayed in italics. The Infobar is the context sensitive menu at the top of the screen and changes to reflect the options for the selected tool. Some of the tool icons have changed in Xara X1, and this may cause some confusion for new users. If you are using an older version of Xara, click here to see my Rosetta Stone for translating the old buttons into the new. New Users? I have created some quick start mini-tutorials to get you though the basics. Workbook 20, Workbook 30, and Workbook 31 cover the main things you need to know to get started. While you should be able to create all the steps in previous versions of Xara, some of the tool icons have changed, and this may cause some confusion for new users. If you are using an older version of Xara, click here to see my Rosetta Stone for translating the old buttons into the new. |
|||||
|
This tutorial is in two parts. In the first part, we will create the objects for the Flash animation. In the second part we'll create the Flash animation. We will create the animation objects in Xara Xtreme's default drawing window. PART 1 - CREATING THE ANIMATION OBJECTS
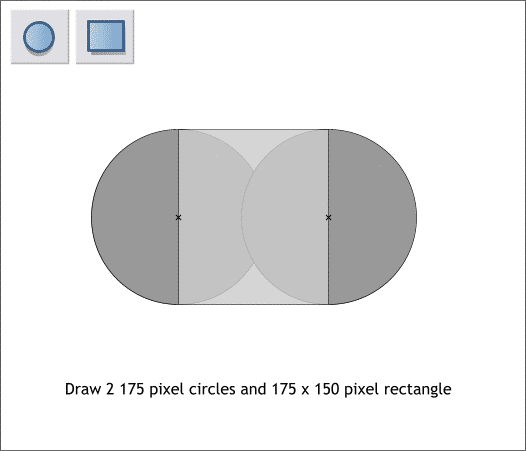
Using the Ellipse Tool (Shift F4) draw two 175 pixel ellipses. Using the Rectangle Tool (Shift F3), draw a 175 (width) by 150 (height) pixel rectangle. Align the circles and rectangle as shown so the center of each circle is aligned to the left and right edges of the rectangle. TIP: Once drawn, select the circle with the Ellipse Tool and a small X will appear in the center of the circle. Move the circle until the small X is aligned to the left or right edge of the rectangle. TIP: To draw ellipses and rectangles to an exact size, first draw any size rectangle or ellipse. Do not switch tools. On the Infobar at the top of the screen, change the Width setting to the desired width and press Enter (or Return) to apply the change. Then key in the Height and press Enter. Your rectangle or ellipse will now be the exact size.
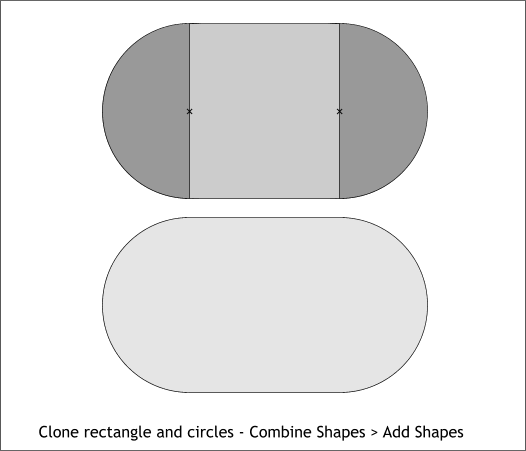
Hold down the Shift key (to select multiple objects) and click the two circles and the rectangle. Press Ctrl k (or Edit > Clone) to place a copy of these objects directly on top. With the three cloned objects selected, from the Arrange menu, select Combine Shapes > Add Shapes or you can use the keyboard shortcut Ctrl 1. The two circles and rectangle are now one object.
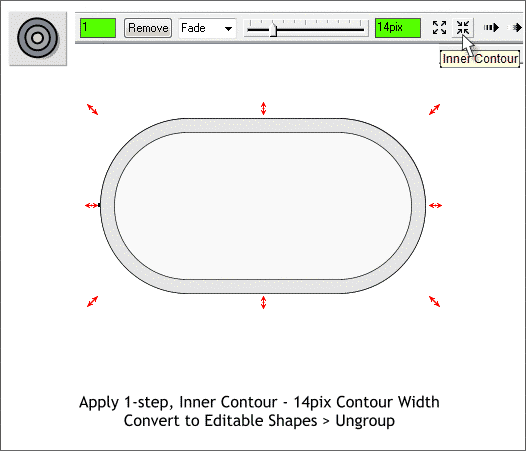
Select the combined shape then select the Contour Tool (Ctrl F7). Drag any of the red arrow control handles towards the center a short distance to apply an Inner Contour. Change the number of Contour Steps on the Infobar to 1 and press Enter to apply the change. Change the Contour Width setting slider to 14. NOTE: If you key in a number in a text entry box, you need to press Enter (or Return) to apply the change. If you use the slider to set the setting you do not need to press Enter (or Return ). Select the contour. From the Arrange menu, select Convert to Editable Shapes. Then Arrange > Ungroup.
|
|
©2007 Gary W. Priester
|


