|

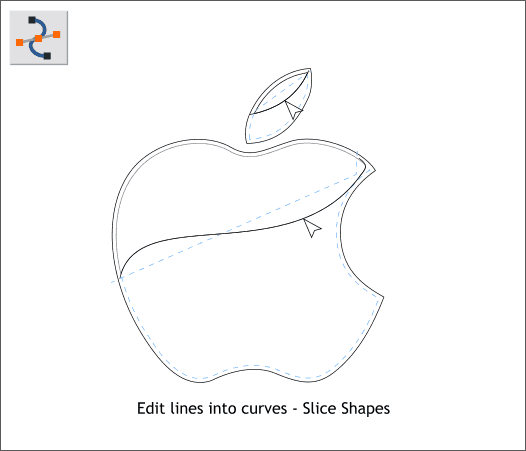
Edit the two lines into curves as shown with the Shape Editor Tool. Curve the top right of the long line as shown. Both lines should extend a short distance beyond the inside shape.
Select the longer line and the inside apple contour shape. From the Arrange menu, select Combine Shapes > Slice Shapes (or use the keyboard shortcut Ctrl 4
). Delete the bottom half of the shape shown in blue dashed outline.
Repeat this step for the leaf shape.

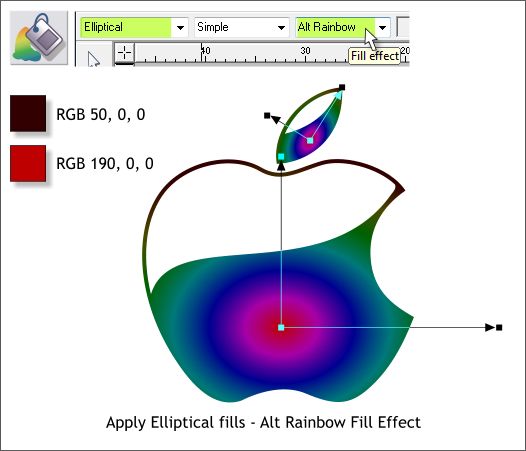
Select the apple shape then select the Fill Tool (F5). From the drop down list of Fill Types on the Infobar, select Elliptical. Move the center of the fill down
and stretch the fill path arrows as shown. Click on either of the two outside control points at the ends of the arrows, then open the Color Editor (Ctrl e).
Select the RGB Color Model and change the color to RGB 50, 0, 0.
Change the inside color (where the arrows meet) to RGB 190, 0, 0.
NOTE: If the color values in the Color Editor are in percent instead of 0-255 you need to change your Color Units to 0-255 in the Utilities > Options menu in the
Units tabbed section.
From the drop down Fill Effect menu, select Alt Rainbow.
Apply the same fill to the leaf.
TIP: Select the apple shape, and copy it to the Clipboard (Ctrl c). Select the leaf shape and Edit > Paste Attributes or press Shift Ctrl a.
Adjust and rotate the fill path arrows as shown.
|