|
|
|
As always, we will be using Pixels as our units of measure. Right click on the screen and select Page Options... from the pop up menu. In the Units tabbed section, select Pixels for the Units and 0-255 for the Color Units. In the Grid and Ruler tabbed section set the Major Spacing to 100pix (key it in exactly like this please) and the Number of Subdivisions to 10. Press OK to close the dialog and apply the changes. To see a tutorial on Xara Basics visit Workbook 20. NOTE: You will notice from time to time I apply arbitrary colors to objects. I do this to make the objects easier to see. If I do not specify a fill for an object, you do not have to apply a fill or outline color. When I show an ellipse or rectangle that has just been created, that has no fill, it is because I have set the fill to none before I exported the illustration. By default, all ellipses, rectangles and Quick Shapes have a black outline and a black fill. There is nothing wrong with your copy of Xara. Naming Conventions. I use bold face to indicate the names of tools, galleries, keyboard shortcuts, and dialogs. Items such as unnamed icons and drop down lists, which have names when you let your cursor rest over them for a moment, are displayed in italics. The Infobar is the context sensitive menu at the top of the screen and changes to reflect the options for the selected tool. Some of the tool icons have changed in Xara X1, and this may cause some confusion for new users. If you are using an older version of Xara, click here to see my Rosetta Stone for translating the old buttons into the new. New Users? I have created some quick start mini-tutorials to get you though the basics. Workbook 20, Workbook 30, and Workbook 31 cover the main things you need to know to get started. While you should be able to create all the steps in previous versions of Xara, some of the tool icons have changed, and this may cause some confusion for new users. If you are using an older version of Xara, click here to see my Rosetta Stone for translating the old buttons into the new. |
||||||
|
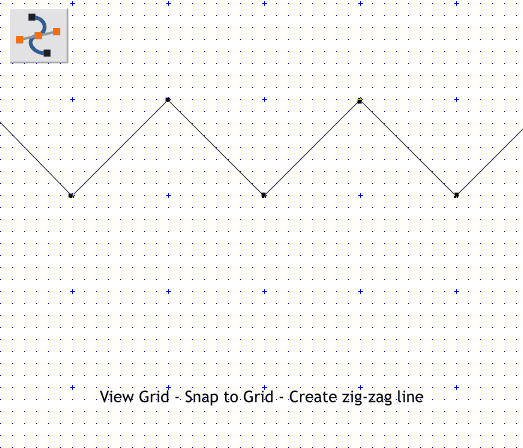
From the Window menu, select Show Grid (#). Also select Snap to Grid (Num Pad .) (The symbols or keys shown in parentheses are the keyboard shortcuts). Select the Shape Editor Tool (F4). Click a series of lines on the + part of the grid to make a zig zag line. Disable Snap to Grid and Show Grid (Window menu).
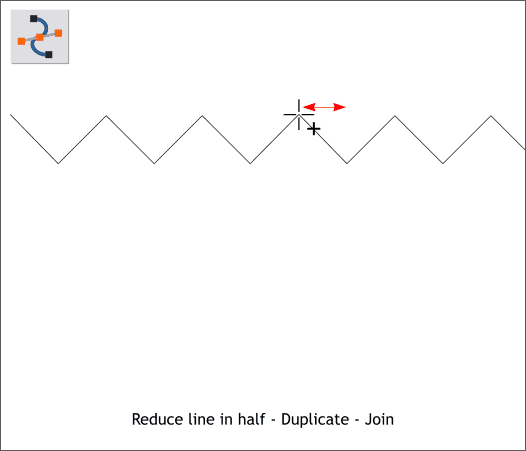
Reduce the width of line to 50%. Duplicate the zig zag line and move the lines together aligning the end of one line with the start of the other. Hold down the Shift key (to select multiple objects) and click on both lines. Switch to the Shape Editor Tool (F4). Click where the two lines come together. Drag the control point away a short distance and then back to the origin. The cursor will change to a + to indicate the two lines will be joined. Sounds kind of romantic.
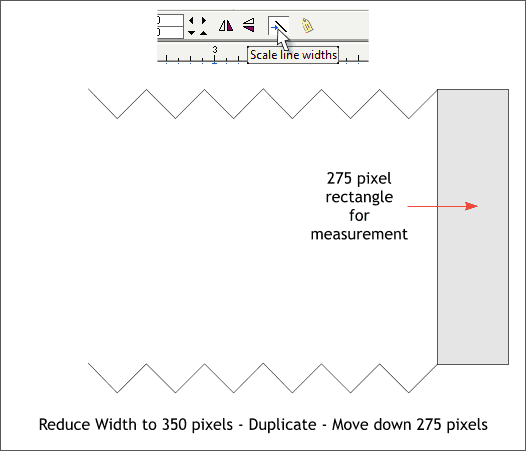
Select the Rectangle Tool (keyboard shortcut M or Shift F3). Drag a rectangle that is 275 pixels tall. You can see the height in the Height text entry box on the Infobar as you draw. (You can also draw a rectangle to any size, key in 275 in the Height text entry box on the Infobar, and press Enter to apply the change). Using the rectangle for a guide, duplicate the zig zag line (Ctrl d) and align the two lines with the left corners of the rectangle as shown above.
|
||||||
|
|
||||||


