


 Whoever created the MacDonald’s logo probably got paid a ton of
money to do what we will now do here in two steps!
[On the other hand, it’s like what Monty Python said about novel
writing, “The words are all there, you just have to get them in the right
order!” Same thing applies to designing a logo.]
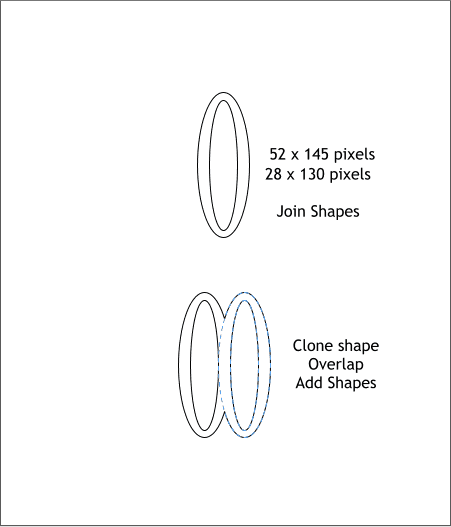
Select the Ellipse Tool (L) and create two centered ellipses to the sizes
shown above. Select both shapes and Arrange > Join Shapes (Ctrl j).
Clone the shape (Ctrl k). Overlap the two O-shapes and Arrange >
Combine Shapes > Add Shapes or press Ctrl 1.
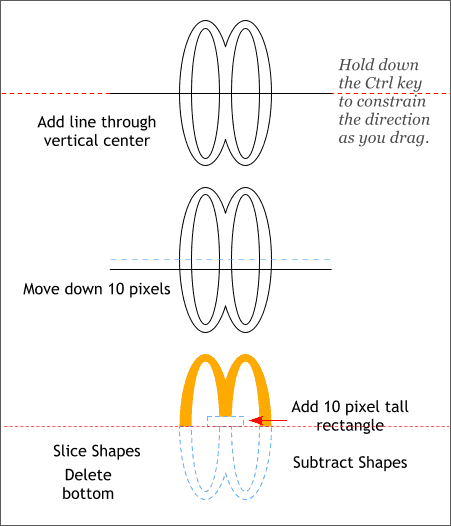
Select the Straight Line Tool and add a horizontal line through the
center of the OO. Move the line down 10 pixels.
Select the line and the OOs and Arrange > Combine Shapes > Slice
Shapes (Ctrl 4). Delete the bottom W shape.
Create a 10 pixel tall rectangle and align it to the bottom of the M
shape. Select the rectangle and the M shape and Arrange > Combine
Shapes > Subtract Shapes (Ctrl 2). There, you are now a logo designer!
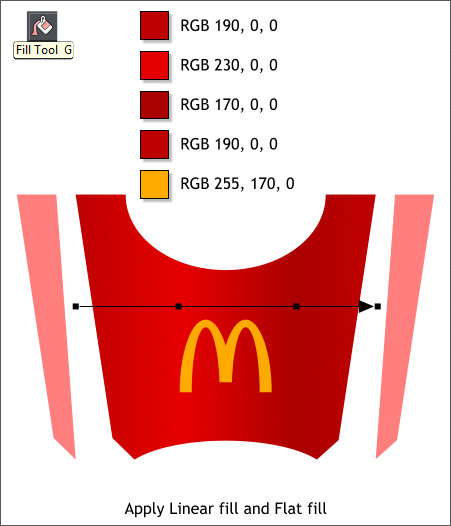
Now we get to color. Move the side panels away from the box. Select
the Fill Tool (g) and apply a Linear fill. (Click on the shape with the Fill
Tool, hold down the Ctrl key and drag from one side to the other).
Double click on the fill path arrow to add two new colors. Apply the
four red colors shown above using the Color Editor (Ctrl e) to edit the
RGB values. You can move the added colors along the fill path by
dragging or with new color selected, with the arrow keys.
Apply the flat deep yellow color to the logo.
Whoever created the MacDonald’s logo probably got paid a ton of
money to do what we will now do here in two steps!
[On the other hand, it’s like what Monty Python said about novel
writing, “The words are all there, you just have to get them in the right
order!” Same thing applies to designing a logo.]
Select the Ellipse Tool (L) and create two centered ellipses to the sizes
shown above. Select both shapes and Arrange > Join Shapes (Ctrl j).
Clone the shape (Ctrl k). Overlap the two O-shapes and Arrange >
Combine Shapes > Add Shapes or press Ctrl 1.
Select the Straight Line Tool and add a horizontal line through the
center of the OO. Move the line down 10 pixels.
Select the line and the OOs and Arrange > Combine Shapes > Slice
Shapes (Ctrl 4). Delete the bottom W shape.
Create a 10 pixel tall rectangle and align it to the bottom of the M
shape. Select the rectangle and the M shape and Arrange > Combine
Shapes > Subtract Shapes (Ctrl 2). There, you are now a logo designer!
Now we get to color. Move the side panels away from the box. Select
the Fill Tool (g) and apply a Linear fill. (Click on the shape with the Fill
Tool, hold down the Ctrl key and drag from one side to the other).
Double click on the fill path arrow to add two new colors. Apply the
four red colors shown above using the Color Editor (Ctrl e) to edit the
RGB values. You can move the added colors along the fill path by
dragging or with new color selected, with the arrow keys.
Apply the flat deep yellow color to the logo.