


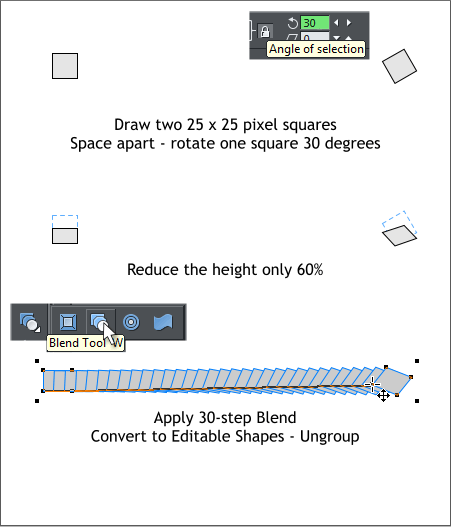
 Select the Rectangle Tool, hold down the Ctrl key to constrain the
rectangle to a square, and create a 25 pixel square. Clone the square
(Ctrl k) and move the clone to the right a few inches. Select both
squares and reduce the height only to 60%. (Click the padlock icon on
the Infobar so that it is in the raised position, then enter 60 in the H %
text entry box and press Enter to apply the change).
Select the Blend Tool (w). Click on one square and drag across to the
other square to create a blend. Change the number of Blend Steps on
the Infobar to 30 and press Enter (or Return) to apply the change.
With the blend selected, from the Arrange menu, click Convert to
Editable Shapes (Shift Ctrl s) and then Arrange > Ungroup (Ctrl u).
Select the Rectangle Tool, hold down the Ctrl key to constrain the
rectangle to a square, and create a 25 pixel square. Clone the square
(Ctrl k) and move the clone to the right a few inches. Select both
squares and reduce the height only to 60%. (Click the padlock icon on
the Infobar so that it is in the raised position, then enter 60 in the H %
text entry box and press Enter to apply the change).
Select the Blend Tool (w). Click on one square and drag across to the
other square to create a blend. Change the number of Blend Steps on
the Infobar to 30 and press Enter (or Return) to apply the change.
With the blend selected, from the Arrange menu, click Convert to
Editable Shapes (Shift Ctrl s) and then Arrange > Ungroup (Ctrl u).
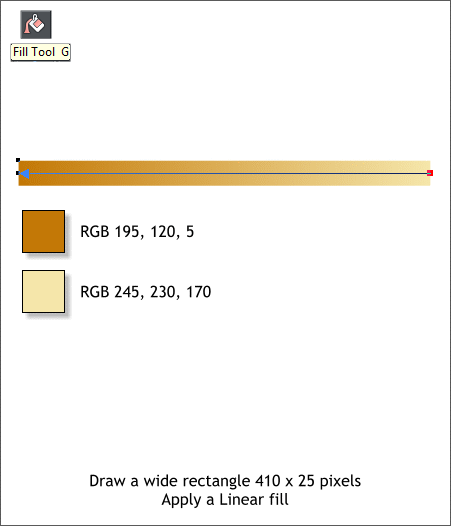
 Draw a wide rectangle with the Rectangle Tool. Select the Fill Tool (g).
Click on on end of the rectangle and drag to the other end to apply an
interactive gradient fill. Open the Color Editor (Ctrl e), click on the
small square on either end of the fill path arrow, then select RGB Color
Model and edit the color values as shown. Then edit the opposite color.
We will use this as the range of dark to light French fry colors.
Select the Shape Tool (F4). Click on the page, release the mouse
button then click and drag upwards to create a diagonal line. Drag the
center of the line to create a gentle curve as shown above. Resize the
height of the lines as shown. Repeat this step and create another
curved line. Space the two lines apart about the distance shown.
Draw a wide rectangle with the Rectangle Tool. Select the Fill Tool (g).
Click on on end of the rectangle and drag to the other end to apply an
interactive gradient fill. Open the Color Editor (Ctrl e), click on the
small square on either end of the fill path arrow, then select RGB Color
Model and edit the color values as shown. Then edit the opposite color.
We will use this as the range of dark to light French fry colors.
Select the Shape Tool (F4). Click on the page, release the mouse
button then click and drag upwards to create a diagonal line. Drag the
center of the line to create a gentle curve as shown above. Resize the
height of the lines as shown. Repeat this step and create another
curved line. Space the two lines apart about the distance shown.


