

To create the fur for our bear we will begin by creating a series of fiber shapes. We can create a series of freehand lines and then use one of Xara's Existing Stroke Shapes to taper each fiber.
Select the Freehand and Brush Tool. Move the Smoothness slider to the left to about 20%. Draw several gently undulating (wavy) lines as shown in the enlarged example above. The actual height of the lines should be around 15 pixels tall. Set the Line Width to 1pt.
Select the lines and then select the Freehand and Brush Tool and from the second drop down list on the Infobar (Select and Existing Stroke Shape) scroll down a few lines and select the Dab stroke shape. The fly out menu on the right shows a larger example of the shape and lists the name in the title bar as shown in the screen shot above.
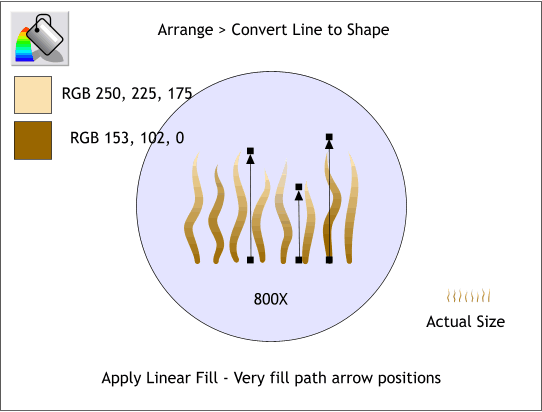
Zoom in close on the wavy lines. Select all the lines and from the Arrange menu, select Convert Line to Shape. This changes the tapered lines into shapes to which we can apply gradient fills.
Select the first shape and then select the Fill Tool. From the drop down list of Fill Types on the Infobar select Linear. Drag the ends of the fill path arrow so that they are straight up and down. Click on either control handle (the tiny box at the ends of the arrow) and change the colors as indicated above. (Use the RGB Color Model in the Color Editor (Ctrl e ) to modify the colors to those shown above.
Copy the filled shape (Ctrl c). Marquee select all the other shapes (drag a rectangle around the shapes with the Selector Tool) and press Shift Ctrl a to apply the attributes from the first shape to the others. Or you can select Paste Attributes from the Edit menu. Select each of the shapes individually with the Fill Tool and vary the length of the fills as shown.
|
|
|
|
|
|
|
|
|
|
|
|