 |
 |
||||||
| 0 1 2 3 4 5 6 7 8 9 10 11 Download Zipped Tutorial | |||||||
|
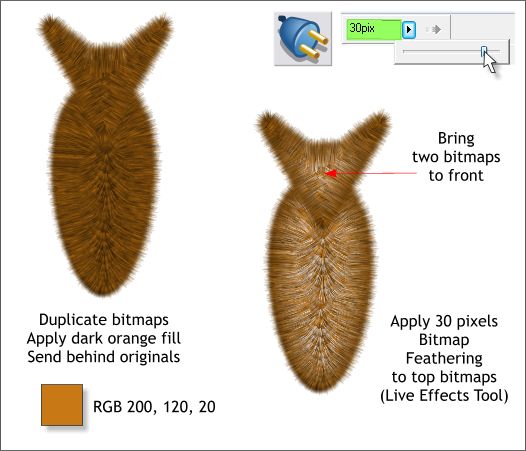
Clone (Ctrl k) the head and body bitmaps. Select both clones and open the Color Editor (Ctrl e). Change the fill color as shown above. This creates a darker version of the fur. Send the darker clones to the back (Ctrl b). Select the two lighter bitmaps. Select the Live Effects Tool (Ctrl F5). Click New on the left side of the Infobar. From the New drop down list select Bitmap Feather. On the top right side of the Infobar, change the Feather Region slider to 30pix. I recently discovered this function when Phil from Xara pointed it out in the Xtreme Conference. It ignores the rectangle surrounding the transparent bitmap and applies feathering only to the visible outer edge of the image. Thanks Phil. What a great tip! This bitmap feathering softly reveals the darker edge of the cloned fur and adds the appearance of depth to the head and body.
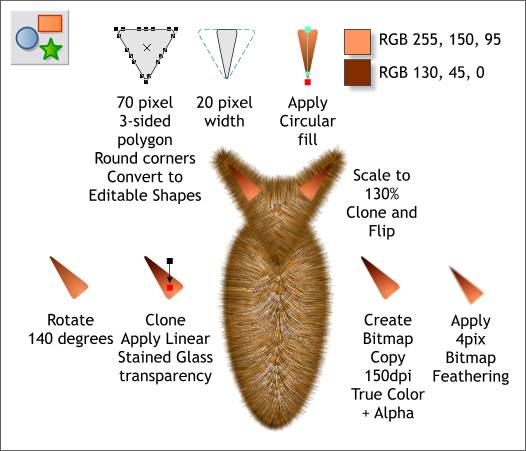
Ack! Another step-intensive step. I apologize but there are a lot of nitsy little details like this. If they are driving you nuts, just remember who had to figure all these nitsy steps out. Create a triangle to the size shown. Double click on an end point to round the corners. Reduce the width to about 20%. Apply a Circular fill using the two colors shown. Center the center of the fill over the widest part of the triangle. Rotate the triangle about 140 degrees. Create a clone (Ctrl k) and apply a Linear, Stained Glass transparency. Select both triangles, Create Bitmap Copy, and apply 4 pixels feathering. Use the bitmap not the original shapes and position the bitmap triangle over the left ear. Rotate a bit if needed. Clone the bitmap and flip it and position it over the other ear. Use the Flip Horizontally icon on the Infobar (the two up pointing triangles just under the orange magnet icon).
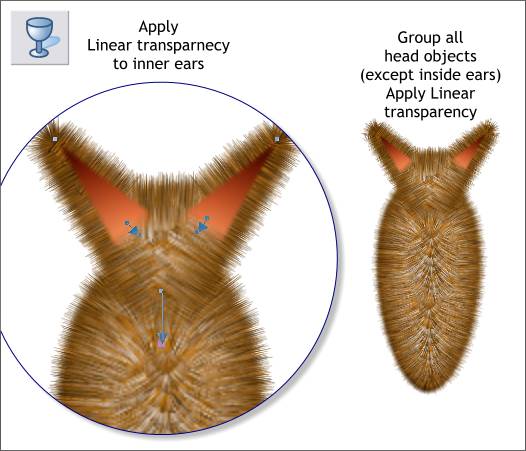
Select all the head objects (except the insides of the ears) and group them. Apply a Linear, Mix transparency to the bottom of the head as shown in the enlargement above to blend the head into the chest. Apply short Linear, Mix transparencies to the inner ears as shown to blend them into the fur. TIP: Select the object to which you wish to apply Linear transparency with the Transparency Tool (F6). Click on the object where you want the transparency to start, and drag to apply the transparency. Drag either end of the fill path arrow as needed.
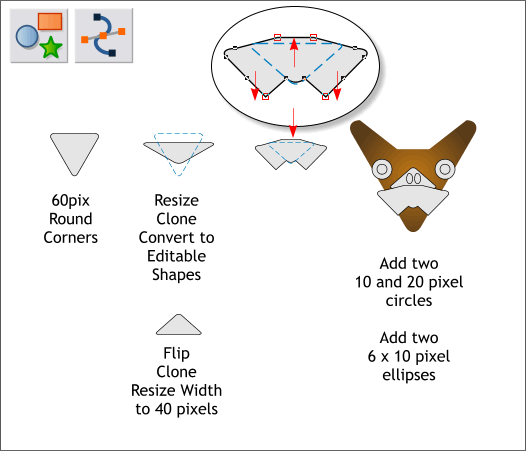
More nitsy steps. Create two triangle shapes and edit them to create the mouth and nose. Create two eyes and two nostrils as shown.
|
|||||||
|
|
|||||||


