 |
 |
||||||
| 0 1 2 3 4 5 6 7 8 9 10 11 Download Zipped Tutorial | |||||||
|
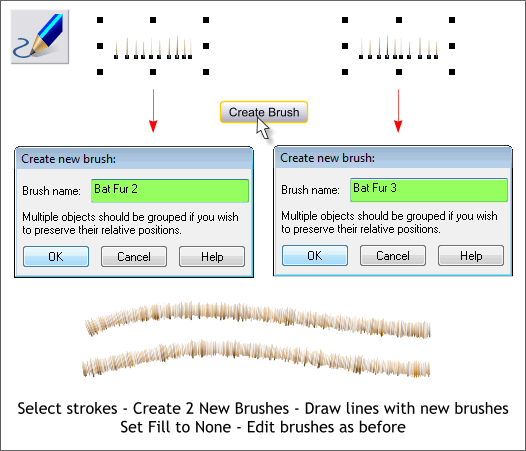
Select the second set of lines and create a new brush. Name this brush Bat Fur 2. Draw a line with the new brush and make the same edits as with Bat Fur 1. Save this brush Select the last set of lines and create Bat Fur 3. Make the same random brush edits and Save this brush. The idea here is to have three very different brushes.
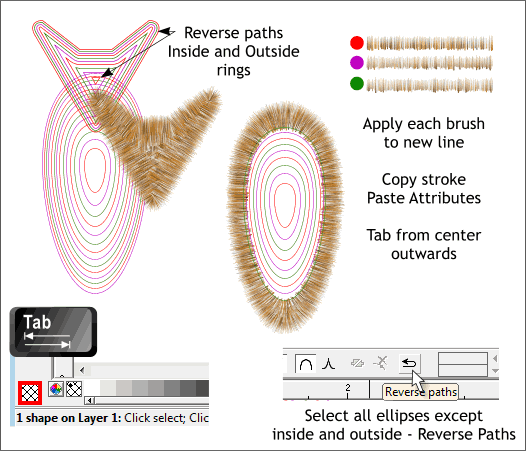
OK This next step is very, very anal, I freely admit. But bear with me there is a certain logic to it. First select the head and body objects and set the fill to none by cleft clicking the cross hatched box to the left of the screen palette colors (and to the right of the Color Editor color wheel icon). Create 3 horizontal lines and apply a different brush to each line (Open the Line Gallery, open the New Brush Stokes folder, changed the Width to 24pix, select a brush and press Apply ). Place a red, purple or green dot next to each line. Now color every third line red, purple or green. The easiest way to do this is to start in the center and press the Tab key to move outward. Right click to apply a line color, red for example, press Tab three times, right click on red, press Tab three more times, right click on red, etc. IMPORTANT: Select the outside and inside ellipse, select the Shape Editor Tool, then press the Reverse Paths icon. For reasons best known to Xara's engineers the outside and inside paths go in one direction whilst the blend rings go in the opposite. Do the same for the head rings. We want all the fur to taper outward. Select the outside ring and apply the appropriate brush stroke depending on the color. TIP: You can apply a custom brush stroke from within the Line Gallery, but you have to change the Width each time before you apply the stroke. An easier way is copy the stroked line to the clipboard ( Ctrl c) then select a line to which you want to apply the stroke and Edit > Paste Attributes or use the keyboard shortcut, Shift Ctrl a. Select one of the outlines close to the outside ring and then press the Tab key to move outward until the next to the outside ring is selected. You can see the outline color of the selected line on the Status Bar shown above lower left. Repeat this until you have applied fur to both the body and the head. The reason for the color coding is I have a very short memory and when doing repetitive tasks like this I always get the sequence messed up about about the fourth repetition. Also, selecting a ring under an existing brush stroke is not easy. So tabbing outward and seeing the color on the status bar makes the labor-intensive routine worth the extra effort.
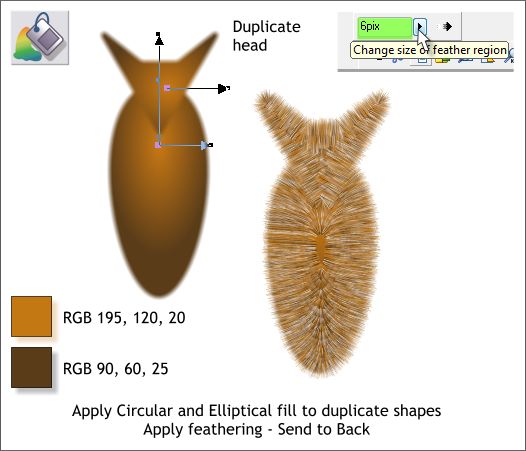
Find the cloned head and body that you made earlier. Select the Fill Tool (F5) and apply a Circular fill to the head and an Elliptical fill to the body ellipse using the colors shown. Drag the center of the elliptical fill up to just below the point of the head. Select both filled shapes and apply 6 pixels feathering using the Change Size of Feather Region slider found in the upper right area of the Infobar. TIP: If you are not sure what a certain button or icon or text entry box is, let your cursor rest over the icon, tool, or text entry box for a second or two and a tool tip will appear, such as the one shown above top right, that will provide the identity. Send both to the back (Ctrl b) and center them behind the fur. Even with the Elliptical-filled ellipse, the fur has a bald spot in the center (Male Bat Pattern Baldness?). We'll fix that in the next step.
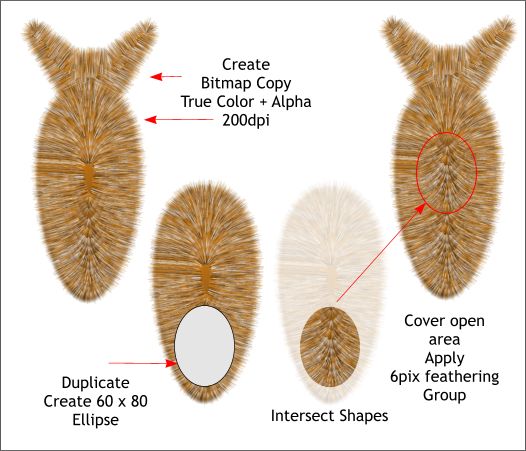
Marquee select the two head shapes. From the Arrange menu, select Create Bitmap Copy... Use the True Color + Alpha (transparent background) color depth option. From the Bitmap Size tabbed section, select 200dpi from the drop down list. Press Create. Repeat this step for the body and elliptical filled body shape. Make a duplicate of the elliptical fur bitmap (Ctrl d). Create an ellipse to the size shown and center it over the bottom area of the fur. Select the ellipse and the bitmap (hold down the Shift key to select multiple objects), and Arrange > Combine Shapes > Intersect Shapes or press Ctrl 3. Center this hair toupee over the bald spot on the chest. Apply 6 pixels of feathering to soften the edges. Group (Ctrl g) all the body objects. Save your drawing and take a short break.
|
|||||||
|
|
|||||||


