|
 In case you were wondering why we needed
the duplicate flag shape, this is the reason. In case you were wondering why we needed
the duplicate flag shape, this is the reason.We will use this duplicate shape to add shading to the flag to give it depth. We will color the shading to make it appear to be illuminated by the setting sun. Using the
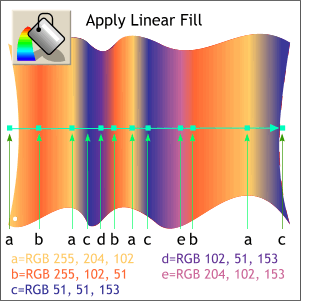
Fill Tool, apply a multicolor Linear Fill. Use the colors and positions shown here. The left sides of the flag, facing the setting sun are orange,
the shadow sides, facing away from the sun, are the color wheel opposite, blue purple.
HOW TO: To apply a Linear Fill to an object, select the object then select Linear from the drop down list of Fill Types on the
Infobar. Drag either end of the Fill Path arrow to change the angle of the fill. Double click on the fill path to add additional color stations.TIP: Create five rectangles and change the colors to the five
shown above. Select a color station (the small squares along the Fill Path arrow) then use the Color Picker (the eyedropper tool) in the Color Editor to copy the colors from the colored
rectangles to the color stations along the fill path arrow. |

