|
||
|
|
With the two shapes selected, select Combine Shapes > Add Shapes
from the Arrange menu. NOTE: Xara's Combine Shapes options are path commands. Add Shapes creates one continous outline and eliminates all overlapping lines as you can see. |
||||||||
Select the black outline for the smaller square and from the Arrange menu, select Convert Line to Shape. This changes the outline into a closed path that can be filled with solid or other kinds
of fills. This is a powerful new feature for Xara X. Select the black outline shape and the two balloon shapes and from the Arrange menu select Join to make one continuous shape. |
||||||||
 |
 |
 |
||||||
|
||||||||
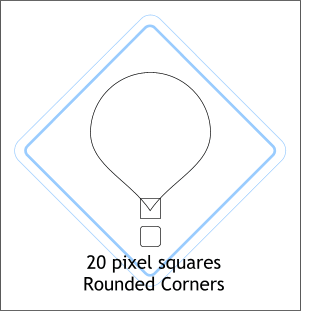 Using the Rectangle Tool and
holding down the Ctrl key, draw two 20 pixel squares and center them as shown under the inverted teardrop shape. Select the bottom rectangle and the Rectangle Tool, and click the Curved Corners
icon to round the corners a little bit.
Using the Rectangle Tool and
holding down the Ctrl key, draw two 20 pixel squares and center them as shown under the inverted teardrop shape. Select the bottom rectangle and the Rectangle Tool, and click the Curved Corners
icon to round the corners a little bit. Using the Selector Tool (the
arrow) select the inverted teardrop shape and the small square. (You can marquee select or hold down the Shift key to multiple select objects).
Using the Selector Tool (the
arrow) select the inverted teardrop shape and the small square. (You can marquee select or hold down the Shift key to multiple select objects).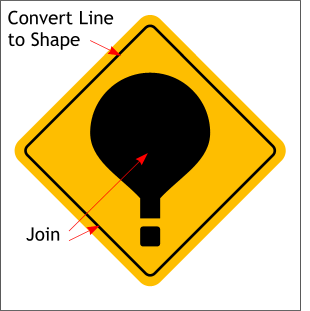 I've restored the color to show the
sign as it looks now.
I've restored the color to show the
sign as it looks now.