|
 Next we shall decorate the new
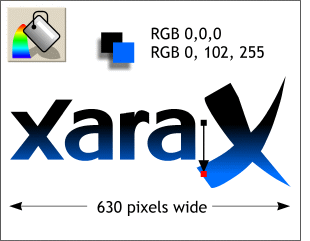
Xara X logo by adding a bevel and different fountain fill. Next we shall decorate the new
Xara X logo by adding a bevel and different fountain fill.The logo is included in the Zipped tutorial (XaraX_logo.XAR) or you can
click here to download the logo from the Web.The logo in the Zipped file is the size we need it to be, but is shown here about 1/2 size.
Select the logo, then the Fill Tool. From the drop down list of Fill Types on the Infobar at the top of the screen, select Linear. Reposition the fill path arrow as shown above so
the beginning point is near the top of the a and the end point is slightly below the bottom of the a. Change the end color to RGB 0, 102, 255 by
clicking the bottom square of the fill path, then opening the Color Editor (click the small color wheel icon to the left of the screen palette). Select RGB Color Model from the drop down list and key in 0
for red, 102 for green and 255 for blue.
|


 Select the logo then select the Bevel Tool
. Select Chiseled from the drop down list of Bevel Types. On the Infobar, select Outer Bevel (the four arrows pointing outwards icon). From the Slider Type drop down list select Size and change
the size to 9 pix. Select Miter Join by pressing the small button on the Infobar with the inverted V.
Select the logo then select the Bevel Tool
. Select Chiseled from the drop down list of Bevel Types. On the Infobar, select Outer Bevel (the four arrows pointing outwards icon). From the Slider Type drop down list select Size and change
the size to 9 pix. Select Miter Join by pressing the small button on the Infobar with the inverted V. 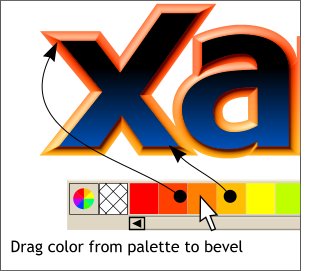 One of the really cool things about
Xara's new Bevel effects is you can either leave the bevel effect as is, or independently change the bevel color. But that's not all. You can also change the top and bottom colors separately.
One of the really cool things about
Xara's new Bevel effects is you can either leave the bevel effect as is, or independently change the bevel color. But that's not all. You can also change the top and bottom colors separately.