|
|
|
As always, we will be using Pixels as our units of measure. Right click on the screen and select Page Options... from the pop up menu. In the Units tabbed section, select Pixels for the Units and 0-255 for the Color Units. In the Grid and Ruler tabbed section set the Major Spacing to 100pix (key it in exactly like this please) and the Number of Subdivisions to 10. Press OK to close the dialog and apply the changes. To see a tutorial on Xara Basics visit Workbook 20. NOTE: You will notice from time to time I apply arbitrary colors to objects. I do this to make the objects easier to see. If I do not specify a fill for an object, you do not have to apply a fill or outline color. When I show an ellipse or rectangle that has just been created, that has no fill, it is because I have set the fill to none before I exported the illustration. By default, all ellipses, rectangles and Quick Shapes have a black outline and a black fill. There is nothing wrong with your copy of Xara. Naming Conventions. I use bold face to indicate the names of tools, galleries, keyboard shortcuts, and dialogs. Items such as unnamed icons and drop down lists, which have names when you let your cursor rest over them for a moment, are displayed in italics. The Infobar is the context sensitive menu at the top of the screen and changes to reflect the options for the selected tool. Some of the tool icons have changed in Xara X1, and this may cause some confusion for new users. If you are using an older version of Xara, click here to see my Rosetta Stone for translating the old buttons into the new. New Users? I have created some quick start mini-tutorials to get you though the basics. Workbook 20, Workbook 30, and Workbook 31 cover the main things you need to know to get started. While you should be able to create all the steps in previous versions of Xara, some of the tool icons have changed, and this may cause some confusion for new users. If you are using an older version of Xara, click here to see my Rosetta Stone for translating the old buttons into the new. |
|||||||
|
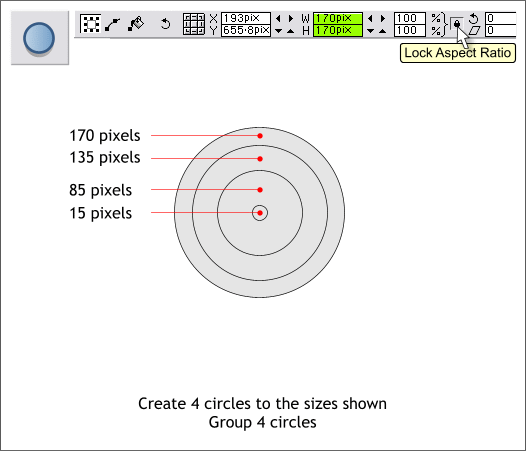
Select the Ellipse Tool (keyboard shortcut Shift F4). Hold down the Ctrl key to constrain the ellipse to a circle and drag a circle 170 pixels in diameter. You can see the diameter on the Infobar at the top of the screen as you drag. Clone the circle, and change the width in the W text entry box to 135pix and press Enter to apply the change. The tiny black padlock icon (Lock Aspect ratio) on the Infobar needs to be enabled (in the down position). If your circle did not scale proportionately, click the black padlock icon. Repeat this last step to create the two smaller circles. Group (Arrange > Group or Ctrl g) the 4 circles.
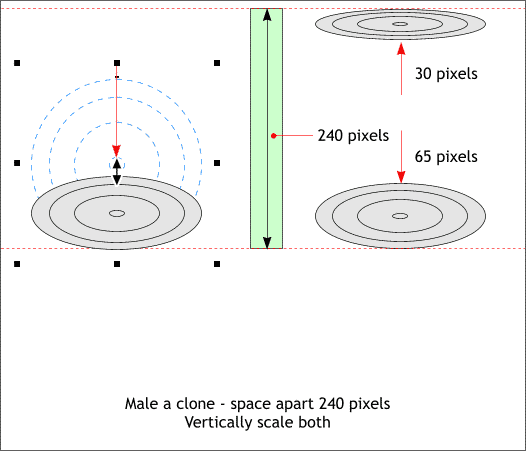
Using the Rectangle Tool (Shift F3) draw a rectangle that is 240 pixels tall (the width does not matter). Drag a guideline from the top screen ruler (Ctrl L to display rulers) to the top and bottom of the rectangle. Delete the rectangle. Select the 4 circles and drag them down to the bottom guideline. Drag the top center control handle (the black box) downward until the height of the group is 65 pixels. Clone the group (Ctrl k), reduce the height to 30 pixels, and drag the group up to the top guideline. TIP: You can reduce the height of the group: Disable Lock Aspect Ratio (the black padlock icon on the Infobar should be in the up position), Key in the size in the H text entry box and press Enter .
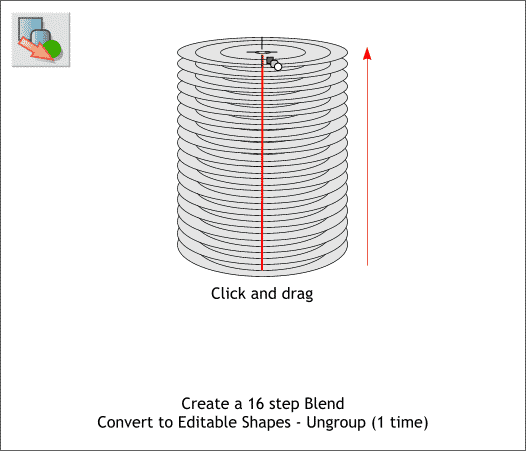
Select the Blend Tool (F7). Click on the bottom group of ellipses and drag upwards to the top group to apply a Blend. On the Infobar, change the number of Blend Steps from 5 to 16 and press Enter. From the Arrange menu, select Convert to Editable Shape, and then from the Arrange menu, select Ungroup. This will result in 18 groups of ellipses.
|
|||||||
|
|
|||||||


