|
 Select the wedge shape, then the Fill Tool
. Select Linear from the drop down list of Fill Types on the Infobar at the top left of the screen. Select the wedge shape, then the Fill Tool
. Select Linear from the drop down list of Fill Types on the Infobar at the top left of the screen.Drag the fill path arrow as shown so that the fill is parallel to the right side of the wedge. Click on the tiny
square on the left of the fill path arrow, then open the Color Editor (press the small color wheel icon to the left of the screen palette) and change the color to RGB 255, 102, 0. Do the same to the right square
on the fill path arrow and change the color as shown on the left. Xara X can apply a multicolor Linear fill as you can see above. To add colors to the fill path, simply find a color on the screen palette that is
close to the ones shown above, then drag that color from the screen palette and drop it onto the fill path arrow. Once you have your colors dropped onto the fill path arrow, click on each color's square and edit the colors in the
Color Editor as described above. Slide the squares to reposition the colors.
|

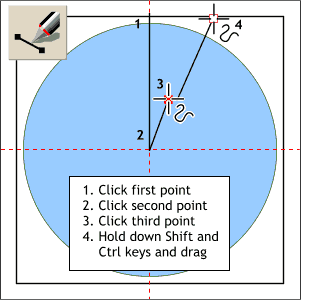 We need to create a V-shape with a
spread of 30 degrees. Drawing straight lines in Xara is not quite as easy as some other applications, but here is the easiest way to do it.
We need to create a V-shape with a
spread of 30 degrees. Drawing straight lines in Xara is not quite as easy as some other applications, but here is the easiest way to do it.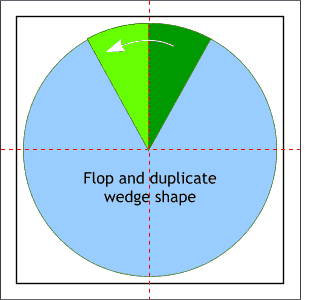 Select the V-shape and the circle and press Ctrl 4
(the keyboard shortcut for Arrange > Combine Shapes > Slice Shapes).
Select the V-shape and the circle and press Ctrl 4
(the keyboard shortcut for Arrange > Combine Shapes > Slice Shapes). 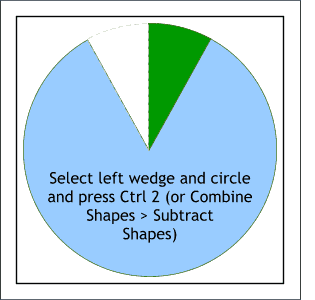 Select the left wedge shape and the circle and press
Ctrl 2 to subtract the wedge shape from the circle.
Select the left wedge shape and the circle and press
Ctrl 2 to subtract the wedge shape from the circle.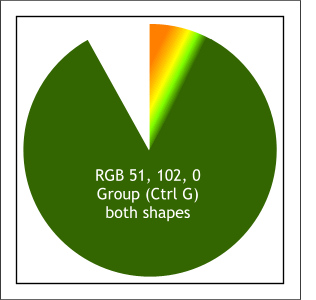 Select the larger circular shape and
apply the RGB fill shown on the left.
Select the larger circular shape and
apply the RGB fill shown on the left.