|
As always, we will be working in Pixels. If you have forgotten how to do this, open the Page Options
dialog (right click on an empty portion of the screen and select Page Options). In the Units tabbed section, select Pixels from the drop down list, and set the Color Units: to 0-255. (You mostly
use Percentage when working with CMYK colors).In the Grid and Ruler tabbed section set the Major Spacing: to 100pix (key it in exactly like this with no spaces) and the Number of Subdivisions: to 10
. If you do not see your screen rulers, go to the Window pull down menu and select Bars > Rulers. Because Flash uses the Macintosh 72 dpi for its screen resolution, and Xara uses the Windows 96 dpi
screen resolution, we need to make sure both programs are reading from the same page, or screen as it were. We need to adjust the scaling option to accommodate for this difference. Open the Scaling tabbed section in the
Page Options dialog. Check the Use Scale Factor: check box. In the Drawing: box enter 96pix, in the Real World: box enter 72pix. Press OK
to exit the dialog and apply these settings. (I question whether 72 pix (Macintosh screen resolution) is real world, but I quibble). |

 In this tutorial, we will to create a radar
screen effect, which is what I started out to do when I created the XaraXone animated title graphic. Except at that time, I was unable to figure out how to do it.
In this tutorial, we will to create a radar
screen effect, which is what I started out to do when I created the XaraXone animated title graphic. Except at that time, I was unable to figure out how to do it.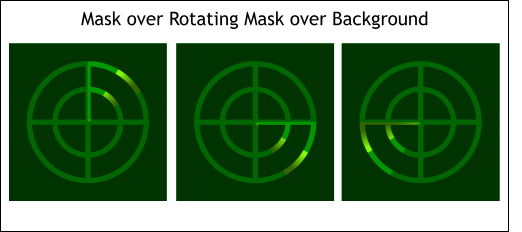 When the circle mask rotates under the cut out mask, the
effect of a scanning radar screen is achieved.
When the circle mask rotates under the cut out mask, the
effect of a scanning radar screen is achieved.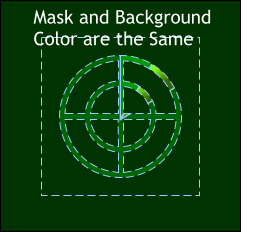 If we place the animation on a web page
with the same color background as the mask, the animation will appear to be floating on the page.
If we place the animation on a web page
with the same color background as the mask, the animation will appear to be floating on the page. Right click on an empty section of the screen and select
Snap to Grid from the pop up menu.
Right click on an empty section of the screen and select
Snap to Grid from the pop up menu. Right click on an empty section of
the screen and once again select Snap to Grid from the pop up menu to disable the feature.
Right click on an empty section of
the screen and once again select Snap to Grid from the pop up menu to disable the feature.