|
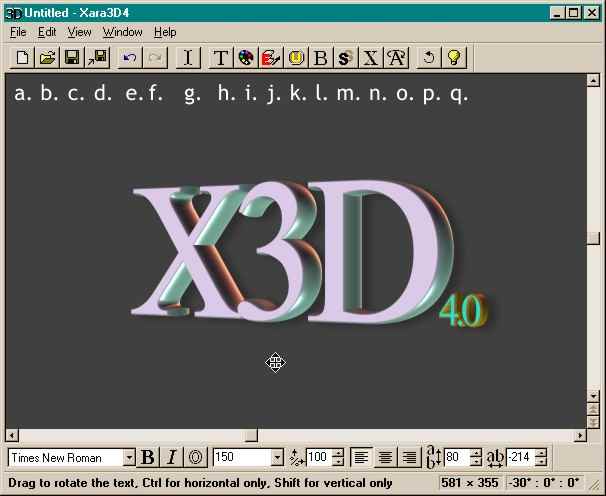
This is the main window for Xara 3D 4. The buttons across the top of the screen are as follows: a. New, b. Open, c. Save, d
. Export Animation, e. Undo, f. Redo, g. Show/Hide Cursor, h. Text Options, i. Color Options, j. Extrusion Options, k. Button Options, l. Bevel Options, m
. Shadow Options, n. Texture Options, o. Animation Options, p. Start/Stop Animation, and q. lighting options. |
|
|
The easiest way to get started in Xara 3D 4
is to open the application, and then open one of the sample files and find a style you like. Then edit the text and/or import a XAR
file and all the lighting and effects will be applied to the text or imported file. It's easy.In this tutorial we will be working with the Show/Hide Cursor (g.) feature. The difference between this and the
Text Options is Show/Hide lets you edit on the actual image on the screen whereas Text Options opens a separate text editing window. We will be using several typographic controls that may not be familiar to all,
so I will cover these briefly here.
- Line Spacing
is the space between two lines of text. This setting can be increased or decreased and can even be set to a negative number where the lines of text run into one another.
- Baseline Shift
(found only in the Text Options
menu) moves a word, or letter, or selected text up and down. This is different from Line Spacing as it can move individual characters or words. Line Spacing applies to all lines of text.
- Tracking
uniformly increases or decreases the amount of space between characters and spaces. Text must be selected before Tracking can be adjusted.
- Kerning
controls the spacing between two individual adjoining characters. The cursor must be inserted between two characters before the Kerning Options are available.
Kerning and Tracking can be in negative numbers and characters can overlap or even be transposed. We will be using these spacing techniques to position the elements in this tutorial. |