 When I created by first Champagne glass illustration in 1997, I had to resort to CorelDRAW
to create my strings of bubbles. We can do this in Xara now using a custom brush stroke instead of blending along a path.
When I created by first Champagne glass illustration in 1997, I had to resort to CorelDRAW
to create my strings of bubbles. We can do this in Xara now using a custom brush stroke instead of blending along a path.
We'll create a large bubble and then reduce it before converting the bubble to a brush.
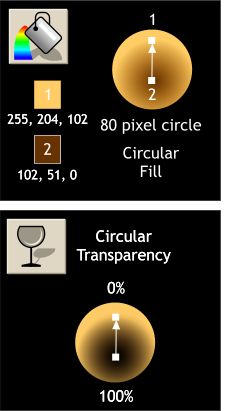
Create an 80 pixel circle and apply a two color Circular Fill dragging the center of the fill down a bit from the center of the circle.
Now select the Transparency Tool and apply a Circular Transparency. Select the center node and change the Transparency slider setting to 100%. Select the outside node and change the setting to 0% (no transparency).
Drag the center of the transparency down a bit as we did with the center of the Circular Fill.
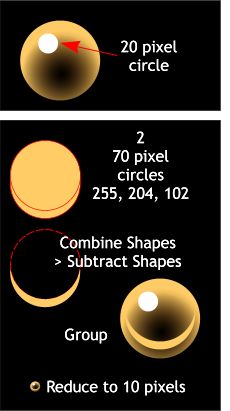 Create a small 20 pixel circle, fill it white, and position it to the upper left as a highlight.
Create another circle, 70 pixels in diameter. Duplicate the circle and position the duplicate over and up a little bit from the original.
Select both circles and Combine Shapes > Subtract Shapes. This will produce an upturned crescent shape which we'll use for a reflection. Apply a solid fill using RGB 255, 204, 102.
Position the crescent shape over the other bubble elements and group the all the bubble elements.
Reduce the bubble to 10 pixels (that's it in the lower left corner).
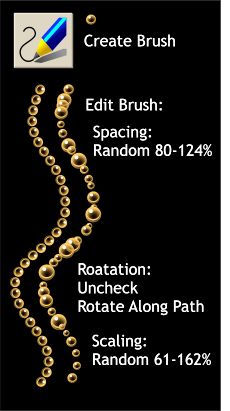 Select the bubble then select the Brush and Freehand Tool. Click the Create Brush button
on the Infobar. Name your brush Bubbles and press OK.
Select the bubble then select the Brush and Freehand Tool. Click the Create Brush button
on the Infobar. Name your brush Bubbles and press OK.
Drag a swirly line with the Brush and Freehand Tool as shown on the far left.
Click Edit Brush on the Infobar.
In the Spacing tabbed section, move the Random slider to the right so that the setting is somewhere around 80-124%.
In the Rotation tabbed section, remove the check mark on Rotate Along Path.
In the Scaling tabbed section, move the Random slider towards the center to somewhere around 61-162%.
The results are shown on the right. Press Save to save these settings.
|
|
|
|
|
|
|
|
|
|
|
|