
 Make two more ellipses (shown in red to distinguish them from the two previously created ones) and position them as shown.
The top ellipse (red) will be the inside of the rim of the glass and needs to touch the inside of the two larger ellipses. It should be a bit closer to the top of the ellipse in which it is centered.
The other ellipse represents the bottom of what will be the foam (called mousse actually) that results from the bubbles in the champagne.
Next we need to separate the two larger ellipses. Select the contour group and from the Arrange menu select Convert to Editable Shapes. Ungroup the two ellipses (Ctrl U or Arrange > Ungroup ). Make a clone duplicate of the inside ellipse (Ctrl K) and select the clone and the largest ellipse and Combine Shapes > Subtract Shapes. (You could also use Join Shapes ). This creates an oval shape which will represent the thickness of the champagne glass. Another way to accomplish this oval shape is to give a single oval a line width of 6 points and Convert Line to Shape (Arrange menu). Your choice.
 Drag two horizontal guidelines from the ruler at the top of the screen (Window > Bars > Rulers
). The first guideline goes though the center of the top ellipse and the second guideline goes though the second group of ellipses as shown on the left.
Drag two horizontal guidelines from the ruler at the top of the screen (Window > Bars > Rulers
). The first guideline goes though the center of the top ellipse and the second guideline goes though the second group of ellipses as shown on the left.
Using either the Pen Tool or the Shape Editor Tool, make two horizontal lines that are snapped to the guides and pass though the center of the ellipses.
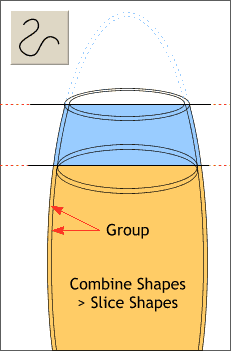
Group (Ctrl G) the two largest ellipses.
Select the first line and the group we just made and Combine Shapes > Slice Shapes.
Repeat this step with the group and the second line. Delete the top portion of the group. You should be able to apply apply different fills to the two sliced groups.
 Ungroup the two sliced groups we produced in the last step (Ctrl U).
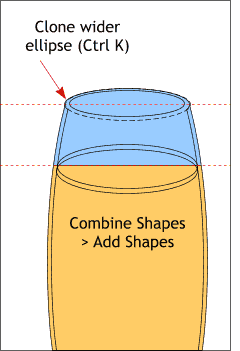
Clone the wider of the top two ellipses. Hold down the Shift key (to select multiple objects) and click on the wider ellipse and the wider of the two blue shapes. Combine Shapes > Add Shapes (Arrange menu).
Because the top most of these two shapes was unfilled, the resulting shape will take on the characteristics of the top most shape and be unfilled. Apply a blue fill to help distinguish the new combined shape.
|
|
|
|
|
|
|
|
|
|
|
|