 |
 |
||||||||
| 0 1 2 3 4 5 6 7 8 9 10 11 Download Zipped Tutorial | |||||||||
|
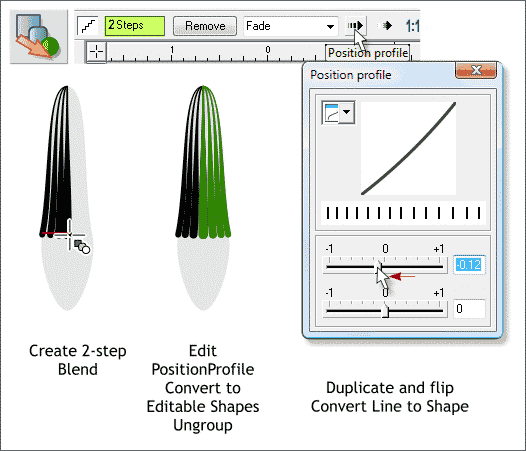
Create a new blend and change the number of Blend Steps to 2. Press the Position Profile arrow icon on the Infobar to open the Position Profile dialog. Move the top slider to the left to —0.12. This bunches the blended lines slightly to the left and when we are done will create a rounded perspective effect. Arrange > Convert to Editable Shapes. Arrange > Ungroup. Duplicate the lines (Ctrl d). Flip them horizontally and align them to the right as shown. The green lines represent the flipped lines. TIP: I like to flop-and-drop. Select the lines on the left, hold down the Ctrl key and drag the left middle control handle (the black box) to the right. As the selection nears the right edge of the selection, it will flop over. Before you release the left mouse button, click the right mouse button to drop the duplicate. Select all of the lines and Arrange > Convert Line to Shape.
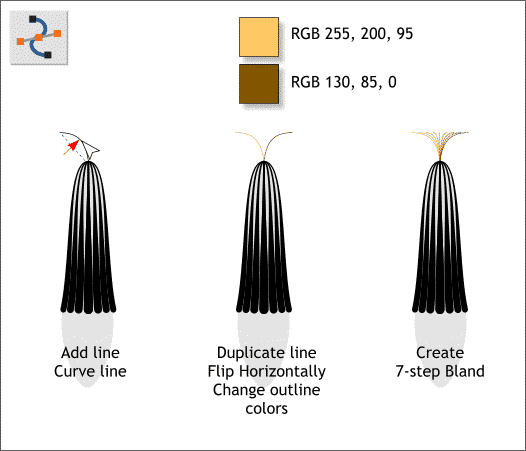
Using the Shape Editor Tool (F4) create a short diagonal line on top. Drag the line into a curve. Flip the line as shown in the center illustration above and apply the two outline colors. Leave the line width at .67pix or 5pt for older versions of Xara. Using the Blend Tool (F7) create a 7-step blend. These fine lines represent the tips of the seeds that appear at the opening of the bud, not unlike the silk at the end of an ear of corn.
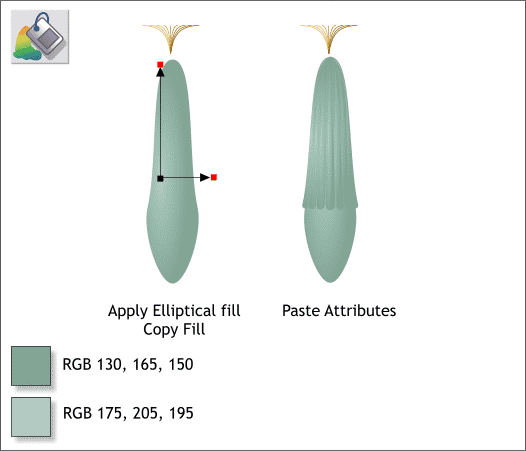
Select the original teardrop shape with the Fill Tool (F5). From the drop down list of Fill Types on the Infobar, select Elliptical. Drag the center of the fill up and to the left as shown above. Apply the two colors shown with the lighter color in the center. Copy the fill to the clipboard (Ctrl c). Marquee select the bigger lines with the Selector Tool) but not the thin lines on top, and Edit > Paste Attributes or press Shift Ctrl a. Group these shapes which will be the seed head flower bud. Select the thin lines and Arrange > Convert to Editable Shape. Then Arrange > Ungroup and finally Arrange > Convert Line to Shape.
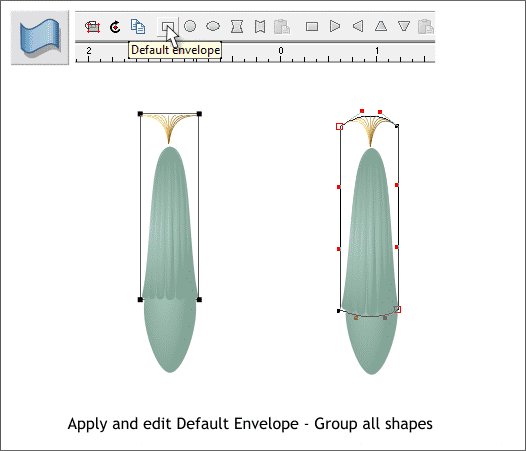
The crenelated top of the bud and the little top knot are too flat. Unless our eye level is exactly in the center of the shape it should have some roundness. We can add this easily with a Default Envelope. Select just the top areas including the little top knot with the Selector Tool. Switch to the Mold Tool (Shift F6). Click the Default Envelope icon. An edit rectangle appears with 4 control points. Click on either of the top corner points and drag the inside control handles upwards. Click on either of the bottom corner points and drag the control handles downwards a short distance and shown above.
|
|||||||||
|
|
|||||||||


