|

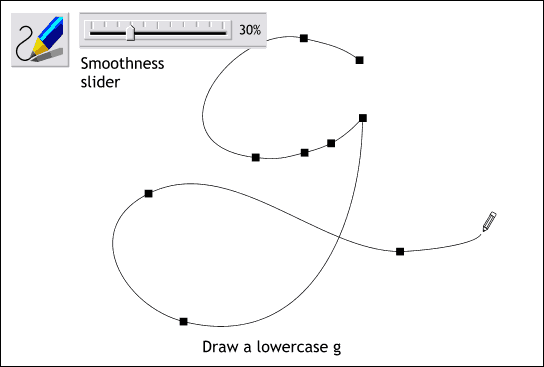
Select the Freehand and Brush Tool. Set the Smoothness slider on the Infobar at the top of the screen somewhere between 30-40%. This makes it easier to draw a smooth freehand shape. Draw a lowercase g
about the same size as the example shown here. It may take a few tries to get the shape right. The main thing is to keep the curves round and open.

Don't worry if your shape is not picture perfect. You can use Xara's editing tools to smooth out the wrinkles.
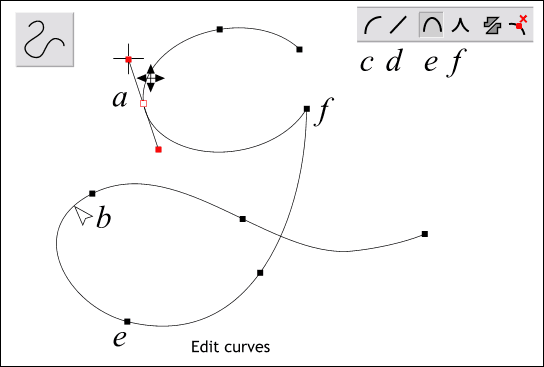
There are two basic ways to edit a path: a) click a control point with the Shape Editor Tool (with the path selected with the Selector Tool first). A set of lines
with red squares on the ends will appear directly behind the selected control points, and the adjacent control points too. These are known as Bezier control handles and you can drag the red squares out or in towards the control point or
drag the red squares to change the direction of the curve. Or b), drag on the selected path with the Shape Editor Tool. In this second and easier method the
line acts like a rubber band and you can shape it any way you like.
Xara provides additional editing options on the Shape Editor Tool Infobar at the top of the screen (when the Shape Editor Tool is selected). c) Make Curve, and d) Make Line. If two adjoining control points on a path are selected, pressing the Make Line icon flattens the curve into a straight line. Dragging any selected
straight line with the Shape Editor Tool, automatically makes the line a curve.
In addition there are two controls that determine how a control point will behave: e) Smooth Join and f) Cusp Join. If you drag a path segment next to a
Smooth Join control point, the other section of the path on the other side of the control point is effected too. This is useful for creating smooth transitions between joins. A Cusp Join enables the segments of a line on either side of the
control point to be manipulated separately.
At any rate, edit your g so it looks as smooth as you can make it.
TIP: If drawing elegant curves with the mouse is just too hard, try this. Draw a series of straight line segments that make an angular lowercase g. Then drag the
straight lines into graceful curves with the Shape Editor Tool. (You can also draw your straight line segments with the Shape Editor Tool and edit your lines as you draw.
|

