|
As usual, we will be using Pixels
for our units of measurement. If you have not been paying attention in the past tutorials here's what you need to do. Right click on the page and select Page Options from the pop up menu. In the Units
tabbed section, select Pixels from the drop down list. Select 0-255 for the Color Units. In the Grid and Ruler tabbed section, set the Major Spacing to 100pix
(don't get fancy, key it in exactly like this) and the Number of Subdivisions to 10. Press OK to apply your changes and to exit the dialog. |
|
 We'll begin with a raggedy line (my
hand is still shaking from all the Champagne toasts). But first, using the Rectangle Tool, draw a rectangle 300 pixels wide by 240 pixels tall. We'll begin with a raggedy line (my
hand is still shaking from all the Champagne toasts). But first, using the Rectangle Tool, draw a rectangle 300 pixels wide by 240 pixels tall.Select the Freehand Tool. Set the
smoothness slider almost all the way to the left. This will help you produce a raggedy line as shown. (Higher settings produce a smoother line).
|


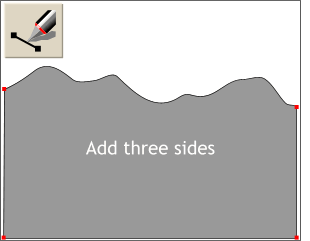 With the raggedy line selected, select the
Pen Tool. Click on the left end of the raggedy line, then click on the bottom left corner of the rectangle (remember the 300 x 240 rectangle I asked you to draw?) then click on the bottom right
corner, and then click on the right end of the raggedy line. The cursor should change to a + indicating you are about to create a closed shape. if the shape fills in black, you are successful. Resize the shape to fill
the entire width of the rectangle.
With the raggedy line selected, select the
Pen Tool. Click on the left end of the raggedy line, then click on the bottom left corner of the rectangle (remember the 300 x 240 rectangle I asked you to draw?) then click on the bottom right
corner, and then click on the right end of the raggedy line. The cursor should change to a + indicating you are about to create a closed shape. if the shape fills in black, you are successful. Resize the shape to fill
the entire width of the rectangle. 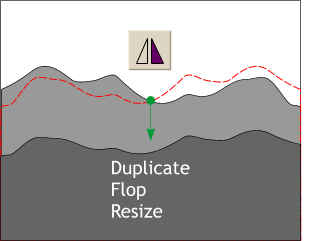 Select the filled shape. Drag the
top center control handle (the small black box) down a ways and before you release the left mouse button, click the right mouse button to drop a duplicate. Press the Flip Horizontally button on the Infobar
at the top of the screen to flop the duplicate image. Apply a darker gray fill. Don't worry about the colors, we'll be changing them later.
Select the filled shape. Drag the
top center control handle (the small black box) down a ways and before you release the left mouse button, click the right mouse button to drop a duplicate. Press the Flip Horizontally button on the Infobar
at the top of the screen to flop the duplicate image. Apply a darker gray fill. Don't worry about the colors, we'll be changing them later.