 |
 |
 |
 |
 |
|
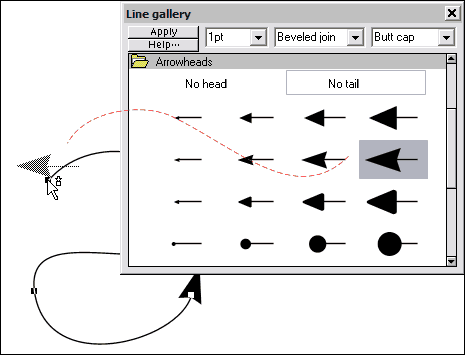
Drag-and-drop arrowhead TIP: Mike Engles came up with this tip: To add arrowheads to either end of a path, simply drag the desired arrowhead from the Line Gallery > Arrowheads section and drop it onto the path end. And for that matter, anything in the Line Gallery can be applied to a path via drag-and-drop including special brushes, and dashed line patterns.
|
|
|
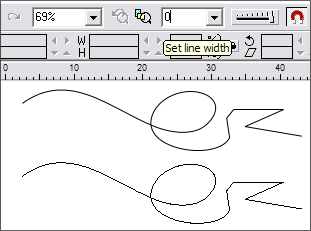
Line thickness TIP: Alex W. points out in the Xara X Conference that “setting the width to 0 will remove the antialiasing and give you a perfect 1 px border. In the two examples above, the top line was set to .75pt (1 pixel) and Xara has anti-aliased (smoothed) the line. The same line on the bottom was set to 0pt and the line is not anti-aliased.
|
|
|
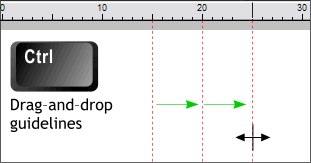
I discovered this tip by accident. I have a bad habit of holding down the Ctrl key, which I use a lot to constrain lines to certain angles and when to constrain objects when dragging them to a new location.
I was absent-mindedly holding down the Ctrl key while I was dragging a guideline and low and behold, a duplicate was left behind.
You can augment this by enabling Snap to Grid, then you can drag-and-drop a series of evenly spaced guidelines.
|
|
|
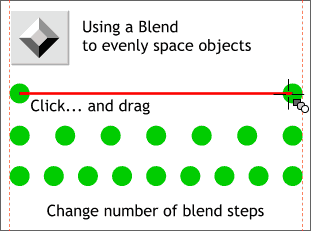
Evenly spacing objects TIP: While Xara lacks CorelDRAW’s Ctrl R (repeat) capability, this does not mean you cannot evenly space objects or groups of objects. There are at least three ways to do this. Place the object or group in the start position and a duplicate in the end position and using the Blend Tool, create a blend. Change the number of Blend Steps to the desired number.
Another method involves placing the number of objects in rough order then using the Align menu (Arrange > Alignment) and the Distribute Equi-spaced option to align the objects vertically, horizontally, or diagonally (using both the horizontal and vertical Distribute Equi-spaced options.
The third method, which comes closest to DRAW’s Ctrl R, is to change the Duplication distance in the Page Options menu (right click on page and select Page Options...). Set the duplication distance for the Horizontal, and Vertical offset to the desired distances then select the object you want to duplicate and move and press Ctrl d (duplicate) the desired number of times. Do remember to reset the distance when you are done.
|
|
|
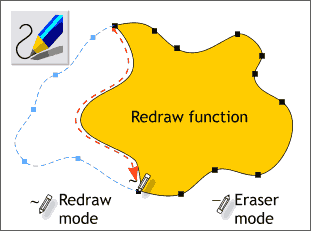
Xara’s eraser function TIP: Many new users ask if Xara has an eraser tool. The answer is not as such. But there is a “Redraw” function that has the same effect. With a shape selected, select the Freehand and Brush Tool. When you move the cursor over a control point a small tilde (~) appears. Click and drag from any control point to any other control point. The smaller of the two shapes will be erased as shown above. Xara also has an “Eraser” function that works when drawing with the Freehand and Brush Tool. While your line is still active, hold down the Shift Tool and the Pencil icon flips over to the eraser side and as you move the eraser back over the line, it is erased.
|
|
|

Creating invisible editable text over a bitmap image
Su Lawrence suggests: To match text with a bitmap background automatically and keep it as text (that can be edited), Import the bitmap (but don't resize it). Type the text and use Arrange > Alignment to center the text to the bitmap. With the text selected, select the image in the Bitmap Gallery and click Fill. The text will match perfectly the bitmap background and you can add a shadow, bevel, or other effect etc.
If you drag the text while holding down the minus key (-) on the Numeric keyboard and drag the text to a new location, the fill will match the new position.
|
|
|
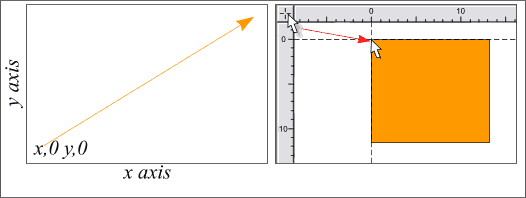
Changing the point of origin TIP: Xara measures from the lower left corner of the page. Vertical distance is measured on the y axis, horizontal distance is measured on the x axis. The x and y coordinates in the lower left corner are 0,0 and increase in value as they go up and to the right.
You can change the point of origin (the x,0 y,0) by dragging the cross hair from the intersection of the two screen rulers (Ctrl L to display the rulers) to the desired new location. The increments on the screen rulers will change accordingly.
|
|
|
|
 Gradient fill shortcut TIP: You can apply a gradient (Linear) fill or transparency by clicking on the target object with the Fill Tool or the Transparency Tool and dragging in the direction you want the fill or transparency to go. Gradient fill shortcut TIP: You can apply a gradient (Linear) fill or transparency by clicking on the target object with the Fill Tool or the Transparency Tool and dragging in the direction you want the fill or transparency to go.
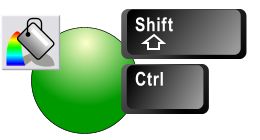
You can create a Circular Fill or Circular Transparency by click on the target object with either of the two tools, then holding down the Shift and Ctrl keys and dragging the desired radius.
|
|
|
|
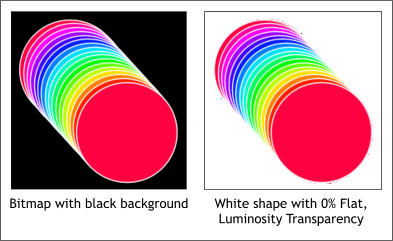
Changing a black background to white TIP: John Clements gets credit for this cool transparency tip. To change a black background to white, place a white rectangle over the bitmap and apply a Flat, 0%, Luminosity transparency.
|
|
|
|
 ROTATION TIP: When you free rotate an object and move the center of rotation bulls eye, the next time you free rotate an object it will rotate around this last rotation position. This can be very frustrating. But here is a simple way to reset the center of rotation to your currently selected object. In the resize mode (the small square resizing handles instead of the rotation/skew arrows) click the center of the Set Origin Position icon on the Infobar. Now when you click again to enable rotate/skew mode, the center of rotation bulls eye with be centered on your selection. ROTATION TIP: When you free rotate an object and move the center of rotation bulls eye, the next time you free rotate an object it will rotate around this last rotation position. This can be very frustrating. But here is a simple way to reset the center of rotation to your currently selected object. In the resize mode (the small square resizing handles instead of the rotation/skew arrows) click the center of the Set Origin Position icon on the Infobar. Now when you click again to enable rotate/skew mode, the center of rotation bulls eye with be centered on your selection.
Clicking the different area squares on the Set Origin Position icon changes both the scaling position as well as the rotation position.
|
|
|
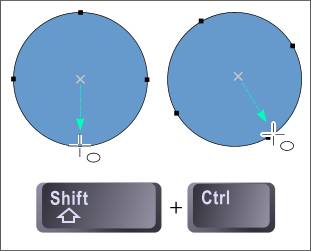
TIP of Interest if nothing more Holding down the Shift key constrains ellipses, rectangles and QuickShapes to be drawn from the center outward. Holding down the Shift and Ctrl key constrains these shape to be drawn from the center out and proportionately. (This has been covered elsewhere)
When drawing circles, dragging straight down aligns the control points to the cardinal points of the compass while dragging from to the right or left causes the control points to be rotated to the angle you drag.
|
|
|
Converted bitmap editing TIP: If you modify a bitmap, for example, you Combine Shapes... Intersect Shapes with the bitmap and another shape, the Bitmap Effects and Plug-ins option is not available when you right click on the modified bitmap. However, you can still access these controls by going through the Utilities menu.
|
|
|
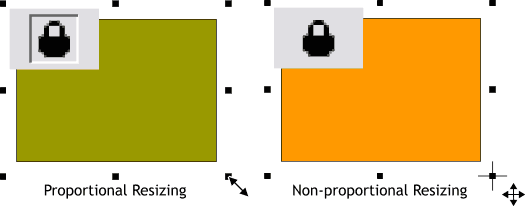
Cursor Feedback when Resizing TIP: The tiny lock icon (Lock Aspect Ratio) on the Infobar determines if scaling an object will be proportional or non-proportional. In the down position, objects scaled using the outside control handles, or entering a dimension or percentage on the Infobar will scale proportionately (they will retain their aspect ratio). When the lock icon is not in the down position, objects will scale non-proportionately. Hence if you enter a value in the Infobar for width size or percentage, only the width of the selection will change. When the lock icon is in the down position, the cursor when placed over any corner control handle changes to a diagonal arrow. When the lock icon is not in the down position, the cursor becomes a cross hair with a four-way pointing arrow.
|
|
|
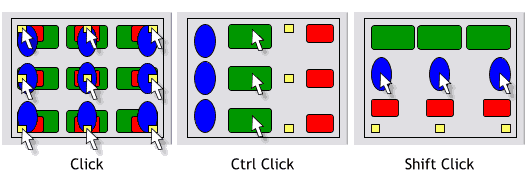
Object Alignment TIP: Xara’s Object Alignment dialog (Arrange > Alignment...) gives you a quick way to align a selection of objects. The four colored shapes in the preview window show how the selected objects will align when you press Align.
(Left) Click in any of the nine locations indicated and objects will align as indicated by the icons.
(Center) Hold down the Ctrl key and click on the top, center of bottom to vertically align objects top, center, or bottom.
(Right) Hold down the Shift key and click left, center, or right to align objects horizontally left, center, or right. In addition selecting the Selection Bounds (the default setting) aligns objects within the selection. Selecting the Page option aligns the selection to the bounds of the page size. And selecting Spread aligns the selection to the bounds of the two page spread.
Purging Bitmaps from the Bitmap Gallery Xara places a copy of every bitmap you create, import, or use as a fill in the Bitmap Gallery. Even if you delete the bitmap on the screen the copy remains in the Bitmap Gallery. You can delete unused bitmaps in the Bitmap Gallery but if you delete one accidentally the deletion is not reversible and the bitmap is replaced with the gray default Xara X bitmap. To avoid losing images you are using but to purge the Bitmap Gallery of all unused bitmaps, save and close your document. When you reopen it, only the bitmaps in use in your document will remain in the gallery. All others will be deleted.

|
|
|
©The Xara Xone
|
|