 |
|
|
|
|
|
|
|
|
|
|
|
|
 Removing a color control point on a gradient fill TIP: Phillip Rutledge writes, “I was just wandering through the tips and testing them out and found that after I’ve dropped additional colors on a Linear Fill, I could remove them again by simply right-clicking on the fill colour I wish to remove. It only removes the “intermediate” fill colors and does nothing to alter the two end colors. Removing a color control point on a gradient fill TIP: Phillip Rutledge writes, “I was just wandering through the tips and testing them out and found that after I’ve dropped additional colors on a Linear Fill, I could remove them again by simply right-clicking on the fill colour I wish to remove. It only removes the “intermediate” fill colors and does nothing to alter the two end colors.
|
|
|
|
Son of More Mouse Wheel TIPS: Here is a quickie wheel mouse tip. Press and hold the wheel down and you cycle into Push Tool mode and can drag the page around inside the screen. Release the wheel to revert back to your last selected tool.
More Mouse Wheel TIPS: Jessica S offers this observation/tip: I've been trying out Egg's (Eric Bramhill) trace and bevel techniques in previous threads, and I got frustrated trying to get the exact settings used in the dialogs, especially bitmap tracer, until I noticed that once you click on a slider, the mouse wheel can be used to cycle up and down through the values. Further bonus- still works if the mouse pointer moves away from the slider.
Another less useful discovery- In the selector tool toolbar, where you can adjust the size and position of a selected object one unit at a time by clicking on triangular arrow icons, clicking with the mouse wheel will change the values by two units (instead of one).
Click here for more mouse wheel tips.
|
|
|
|

Tab and Arrow keys TIP: When working with a gradient fill, pressing the Tab key cycles though the color stations on the fill path. This is a quick way to select various color stations, especially when they appear close together or are difficult to see over the filled background. Pressing the up or down arrow keys when a color station other than the starting or ending control handle is selected moves the color station up and down the fill path. This is useful when you want two stations to be very close together as shown above right. When the fill is vertical use the up and down arrows. When the fill is horizontal use the left and right arrows. If the fill is on an angle, you can use either the up and down or the left and right arrows. Hold down the Alt key to constrain the movement to 1 pixel increments.
|
|
|
|
 Making a outline to the exact size TIP: The outline shown to the left in blue is exactly 2 pixels wide and the size of the rectangle is exactly 200 x 240 pixels. Making a outline to the exact size TIP: The outline shown to the left in blue is exactly 2 pixels wide and the size of the rectangle is exactly 200 x 240 pixels.
If you create a rectangle to the exact size and add a 2 point outline, the Infobar shows a size of 200 x 240 pixels. But when you go to export the rectangle the Bitmap Export dialog shows the size to be 203 x 243 pixels.
If you make your object to the exact size, then add an Inner 1-step Contour with the step distance 2 points, Convert to Editable Shapes (Arrange menu), Ungroup and then Join Shapes (Arrange) you have a rectangle that is exactly 200 x 240 pixels with a 2 pixel outline.
|
|
|
|
Cropping Image TIP: If you convert a bitmap image to Editable Shapes (Arrange menu), you can use the Shape Editor Tool to crop the image without loosing the actual image. Extend the shape of the image with the Shape Editor Tool and the original image is still there. For more cropping with the Shape Editor Tool tips, see the second entry on Tip of the Week 1.
|
|
|
|
Disappearing Act TIP: I was working with a client supplied image of a silver bracelet that had been photographed on a gray background. I wanted the object to appear over a patterned background and wanted the gray background to be invisible. So I started playing around with Xara’s transparency and found a Luminosity or Brightness setting of 50% dropped out most of the gray (some in the bracelet too but that looks kind of cool). The image shown here was sliced diagonally and Luminosity 50% transparency was applied to the lower right slice. I duplicated the slice and changed the transparency to Brightness 50%.
|
|
|
|

Different Points of View TIP: If you are working on a detailed image, such as this stop watch image, and you need to work in close up on an area then zoom out to the whole image and then back, use Xara’s New View (Window > New View) feature. This creates a new page in which you can zoom in on a specific area for close work. You can open an number of New Views. To cycle through the views either press Ctrl and the Tab key, or select the view from the bottom of the Window pull down menu.
 Artless Artifacts TIP: Sometimes, depending upon your graphics card, you may notice bits of detritus on your screen that are not not selectable and in reality not real. These are called artifacts. And while they don’t print, and are fugitive, they are aestetically unpleasing to the eye. Getting rid of these artifacts is really simple. Press the Zoom to Previous View button on the Infobar twice. When you return, the artifacts will be gone. Artless Artifacts TIP: Sometimes, depending upon your graphics card, you may notice bits of detritus on your screen that are not not selectable and in reality not real. These are called artifacts. And while they don’t print, and are fugitive, they are aestetically unpleasing to the eye. Getting rid of these artifacts is really simple. Press the Zoom to Previous View button on the Infobar twice. When you return, the artifacts will be gone.
Artless Artifacts TIP II: Marc Fisher appends this to the above tip:
There is an alternative to your solution for forcing a redraw of the page. Just hold down CTRL Shift T. Xara X redraws the actual view and then informs you of the duration of that process.
|
|
|
|
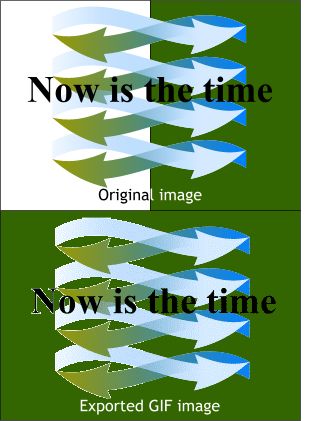 You Can Never Say it Often Enough Transparent GIF Background TIP: If you are creating a web graphic with a transparent background that will appear over a dark colored background, place your image over a similarly colored background. Select all the objects, but do not select the background, and export your image. Xara will anti-alias (smooth the edges) the elements to the dark background resulting in a clean and fringeless image as seen bottom right. Because the left side was exported over white, that side is fringed. You Can Never Say it Often Enough Transparent GIF Background TIP: If you are creating a web graphic with a transparent background that will appear over a dark colored background, place your image over a similarly colored background. Select all the objects, but do not select the background, and export your image. Xara will anti-alias (smooth the edges) the elements to the dark background resulting in a clean and fringeless image as seen bottom right. Because the left side was exported over white, that side is fringed.
|
|
|
|
DOWNLOADING LARGE FILES TIP: If you are downloading a large file and your connection gets dropped, you have to start all over again, right? Not so. Edward Portas, Webmaistro for Xara.com says “One way to certainly solve the problem is to get a download manager such as GetRight (www.getright.com), a small really useful program which manages all Internet downloading. You can stop, start and resume downloads really easily. It's shareware too!”
|
|
|
|
 |
|
|
|
 |
|
|
|
 |
|
|
|
NOTE: Sean Sedwards’ Emboss filter is no longer available. Use the Emboss effect in the Live Effects Tool > New > Stylization Filters > Emboss.
|
|
|
|
Creating a 3D Fill TIP: Here is a technique for creating a 3D bitmap fill that you can use for a multitude of things.
Start with two Fractal Cloud-filled squares. Place one filled square over the other and apply a Fractal Cloud, Mix transparency.
Make a bitmap copy (Arrange > Create Bitmap Copy) of the two fills and reduce the color depth to grayscale. (Utilities > Bitmap Effects and Plug-ins > Bitmap Effects > Color Depth).
Increase the Brightness and Contrast settings (also in Bitmap Effects).
Create a new bitmap copy and apply and Emboss effect using the Live Effects Tool.
Place embossed grayscale image over colored images and apply Brightness transparency.
Create a new bitmap and apply it as a bitmap fill from the Bitmap Gallery. (Select the object to be filled, open the Bitmap Gallery and select the 3D bitmap and press Fill.
The Q in the illustration above has a Rounded Bevel applied.
|
|
|
|
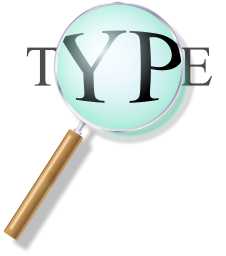 Type Detective TIP: Sometimes you see a font that you would like to use, but have no idea what the font is called, let alone where to buy it. Type Detective TIP: Sometimes you see a font that you would like to use, but have no idea what the font is called, let alone where to buy it.
This question came up recently in the Xara Conferences where, as usual, there were lots of really good suggestions as to where to go to discover the name and origins of a font. The following links to web sites that can help tract down this information are courtesy of carygee (who started the topic) and madbat and cyberdao, two helpful citizens of the Xara X Conference:
What the Font, Identifont.com, and Fontexplorer.com. In some cases you can upload a bitmap image of the font and the font experts at these sites will try to help you identify its origins.
|
|
|
|

Can you place text inside of a circle? I would have said no, but Mickie Mason says, you bet you can! Add a series of evenly spaced lines that are the same width as the sides of the circle. Join the lines (Arrange > Join Shapes).
With the lines selected. click the Text Tool cursor in the top left corner of the first line and begin keying in your text. Xara may split some words where they do not want to split, simply place the text cursor before the split word and press the Spacebar a few times to move the word to the next line.
|
|
|
|
Ross Macintosh observes, when you add a rounded bevel to a shape, you will often see a noticeable difference in color between the object itself and the rounded beveled edge. If you reduce the Light Elevation setting to somewhere between 30-35, the difference between the bevel and the object will be reduced as you can see in this illustration.
NOTE: This rounded bevel problem has been remedied automatically in Xtreme.

|
|
|
©The Xara Xone
|
|


