 |
 |
 |
 |
 |
 |
|
A collection of useful tips and tricks as well as many undocumented features.
If you have a TIP you think should be covered here, Click Here to e-mail me your tip.
|
|
|
|
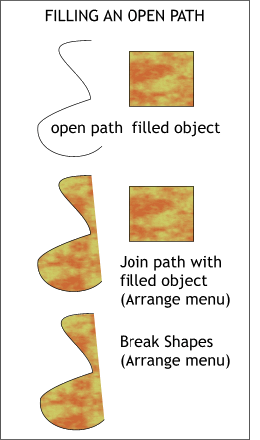 Sean Sedwards, Xara Conference moderator, and contributer of many cool shareware utilities in the Shareware Page, remembered seeing this cool tip: Sean Sedwards, Xara Conference moderator, and contributer of many cool shareware utilities in the Shareware Page, remembered seeing this cool tip:
To fill an open path, create an object (such as a rectangle) and apply the desired fill to it. Select the open path and the filled object and join (Arrange > Join). The open path fills. Now break the shapes apart (Arrange > Break Shapes) and delete the rectangle.
|
|
|
|
Here is an alternative to using Xara’s Apply Clip view to modify the shape of a bitmap which maintains the entire image should you need to go back and modify the shape.
Convert the bitmap to editable shapes (Arrange > Convert to Editable Shapes. Now you can modify the shape’s outline just as you would edit a rectangle converted to editable shapes. You can add points, delete points, and curve line segments.
If you want to edit the shape of a converted bitmap to a shape such as this quick shape star, enable Snap To Objects (press the red magnet icon on the Infobar), add points to the bitmap’s rectangular outline, and drag the points and snap them to the star (or other object). Even though the bitmap is masked to the new shape, if you modify the star (or other object) you will discover the bitmap is still there in its entirety.
|
|
|
|
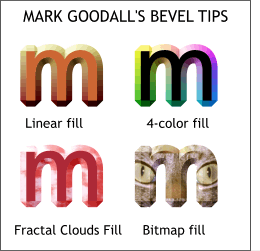 Xara’s man of many hats, Mark Goodall reminds us that bevels can be filled with any of Xara’s 11 fill types including bitmaps. Xara’s man of many hats, Mark Goodall reminds us that bevels can be filled with any of Xara’s 11 fill types including bitmaps.
And bevels and objects can be independently filled. Hold down the Ctrl key when selecting in select the object or just the bevel.
|
|
|
|
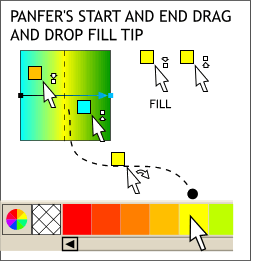 Panfer must have great eyesight to suggest this next tip. In addition to the square and vertical rectangle fill and outline indicators to the right of the Fill Tool cursor when you drag and drop a color onto a Linear fill path, their are two additional icons: a tiny box with an up facing arrow and one with a down facing arrow. Dropping a color onto the object when either of these arrow/box icons is present changes the start or the end fill color depending upon which half of the filled object you drop the fill color. As long as you are over the object but not over the fill path, this will work. Panfer must have great eyesight to suggest this next tip. In addition to the square and vertical rectangle fill and outline indicators to the right of the Fill Tool cursor when you drag and drop a color onto a Linear fill path, their are two additional icons: a tiny box with an up facing arrow and one with a down facing arrow. Dropping a color onto the object when either of these arrow/box icons is present changes the start or the end fill color depending upon which half of the filled object you drop the fill color. As long as you are over the object but not over the fill path, this will work.
|
|
|
|
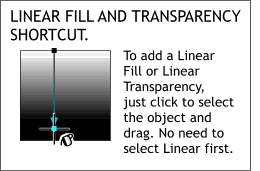 When you want to convert a Flat Fill or Transparency to Linear, there is no need to select Linear from the drop down list on the Infobar. When you want to convert a Flat Fill or Transparency to Linear, there is no need to select Linear from the drop down list on the Infobar.
Just click on the filled object with the Fill Tool and drag.
|
|
|
|
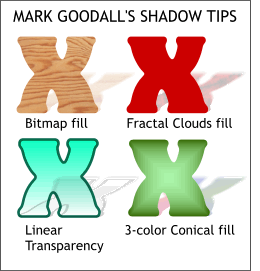 Most of us have learned you can drag and drop a color onto a shadow to change the shadow’s color. Most of us have learned you can drag and drop a color onto a shadow to change the shadow’s color.
But did you know you can also apply any of Xara’s 10 other fill types, including bitmaps?
Not a tip, but interesting to note, if the object to which you apply a shadow has transparency, the shadow will reflect the transparency as shown above, lower left corner.
|
|
|
|
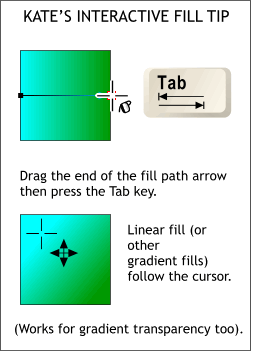 Kate Moir from Xara opened my eyes on this one. Kate Moir from Xara opened my eyes on this one.
To create truly interactive gradient (fountain) fills, create a Linear fill (select the Fill Tool then select Linear from the Fill Type drop down list on the Infobar). With the Fill Tool cursor drag the end of the fill path then tap the Tab key on your keyboard. The fill will now follow the cursor as you drag. The fill path arrow will only be visible if you pause.
If you don’t like this method, ”Some love it, some hate it!”, Kate tells me, hold down the Tab key and drag the fill path arrow and you’re back to the default method.
|
|
|
|
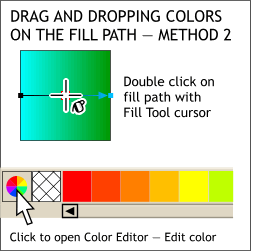 bcdeb’s TIP: This is my week for learning new tricks! bcdeb opened my eyes with this great tip. To add additional color stations to a fill path, double click on the fill path with the Fill Tool cursor. bcdeb’s TIP: This is my week for learning new tricks! bcdeb opened my eyes with this great tip. To add additional color stations to a fill path, double click on the fill path with the Fill Tool cursor.
To edit the color, open the Color Editor. To move a color station, drag it with the Fill Tool cursor. To delete a color station, right click it.
|
|
|
|
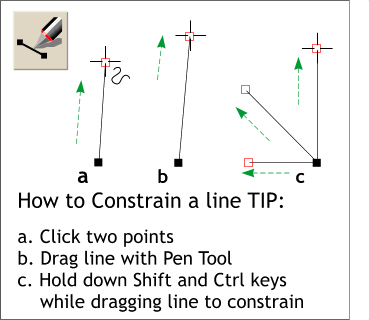 New users are often frustrated when they attempt to draw a horizontal or vertical line. New users are often frustrated when they attempt to draw a horizontal or vertical line.
Here’s an easy way to constrain a line to a horizontal, vertical, or angle.
|
|
|
|
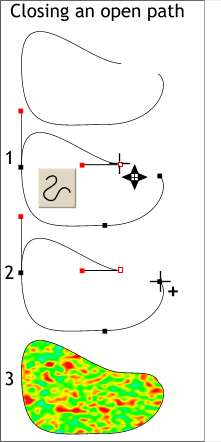 This is not a new tip but one I seem to forget. This is not a new tip but one I seem to forget.
If you want to automatically close a filled path, select the path with the Selector Tool, select the Shape Editor Tool, click one of the end points, and press Enter on your keyboard. The path is closed and can be filled.
|
|
|
|
Jason Collins-Webb provided this Tip for the lines gallery: If you normally double click to apply an arrowhead for example, and you want to create a double ended arrow (i.e. arrowhead at each end of the line, or even a double ended tail!), then first select the line, select the appropriate arrowhead and double click to get one end. Then hold the CTRL key and double click again to get the arrow at the other end of the line.
|
|
|
|
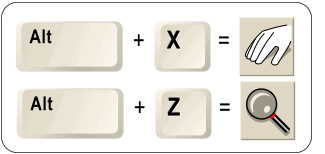 There are dozens of keyboard shortcuts in Xara. Here are two of my favorites. Alt X enables and disables the Push Tool (the severed hand icon) which can be used to move the page around the screen. Alt Z brings up the Zoom Tool. Pressing the spacebar on your keyboard reverts to the previously selected tool in all cases except when using the Text Tool. There are dozens of keyboard shortcuts in Xara. Here are two of my favorites. Alt X enables and disables the Push Tool (the severed hand icon) which can be used to move the page around the screen. Alt Z brings up the Zoom Tool. Pressing the spacebar on your keyboard reverts to the previously selected tool in all cases except when using the Text Tool.

|
|
|
©The Xara Xone
|
|