|
||
|
|
|||||||||||||||||||||||||
NOTE: Many of Xara's features are live effects, blends, envelopes, and so forth. These effects can be edited at any time unless you disable the effect using Convert to Editable Shapes. |
The easiest way to do this is select the mesh and change the size on the Infobar. Select the mesh, then select the Transparency Tool. Select Stained Glass
from the drop down list (normally Mix) and move the slider to 60%. |
||||||||||
Select the duplicate mesh and move it upwards about a point. Using the Transparency Tool, change the transparency to Bleach from the drop down list. Leave the slider to 60%.
The two transparencies give the mesh the appearance of depth. |
||||||||||
NOTE: By default Ctrl D offsets a duplicate down and to the right (unless you change the values in Page Options > General). Ctrl K (Edit > Clone) places the duplicate in the exact same place. |
||||||||||
 |
 |
 |
||||||||
|
||||||||||
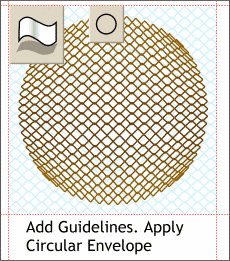 Drag guidelines to the edges of the
blended rows of rotated squares. (You can delete the guides we created earlier)
Drag guidelines to the edges of the
blended rows of rotated squares. (You can delete the guides we created earlier)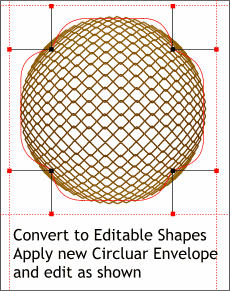 Select the envelope and from the Arrange
menu, select Convert to Editable Shapes to disable the envelope.
Select the envelope and from the Arrange
menu, select Convert to Editable Shapes to disable the envelope. Resize the enveloped shape (let's call it
the mesh) to the size of the balloon.
Resize the enveloped shape (let's call it
the mesh) to the size of the balloon.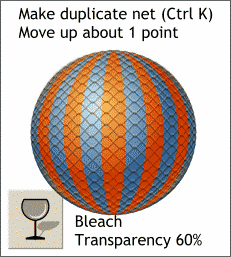 Select the mesh and make a duplicate (Ctrl
K)
Select the mesh and make a duplicate (Ctrl
K)