|
||
|
|
|||||||||||||||||||||||||
NOTE: To change the colors to the RGB values shown here, click the color wheel icon to the left of the screen palette to open the Color Editor. Select RGB from the Color Model drop down list and key in the values shown here. The color will change as you change the colors. |
|||||||||
Select the circle and Copy it to the clipboard (Ctrl C or Edit > Copy
). Select the rest of the ellipses and Paste Attributes (Edit menu or Shift Ctrl A). |
|||||||||
 |
 |
 |
|||||||
|
|||||||||
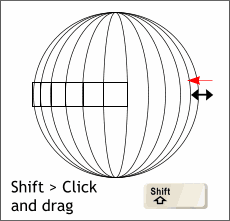 Select the circle with the Selector Tool
. Wile holding down the Shift key to constrain movement from the center of the circle, drag the right middle vertical control handle towards the center of the circle until the outline reachs the right
side of the outside small rectangle. Before releasing the left mouse button, click the right mouse button to drop a duplicate.
Select the circle with the Selector Tool
. Wile holding down the Shift key to constrain movement from the center of the circle, drag the right middle vertical control handle towards the center of the circle until the outline reachs the right
side of the outside small rectangle. Before releasing the left mouse button, click the right mouse button to drop a duplicate. Select the circle then select the Fill Tool
. From the drop down list of Fill Types, select Circular. Drag the center of the fill up and to the left as shown here.
Select the circle then select the Fill Tool
. From the drop down list of Fill Types, select Circular. Drag the center of the fill up and to the left as shown here.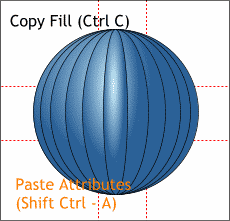 One of Xara's most useful features is the
ability to copy the attributes from one object and to paste these attributes, fill, outline, transparency, etc. to another object.
One of Xara's most useful features is the
ability to copy the attributes from one object and to paste these attributes, fill, outline, transparency, etc. to another object.