


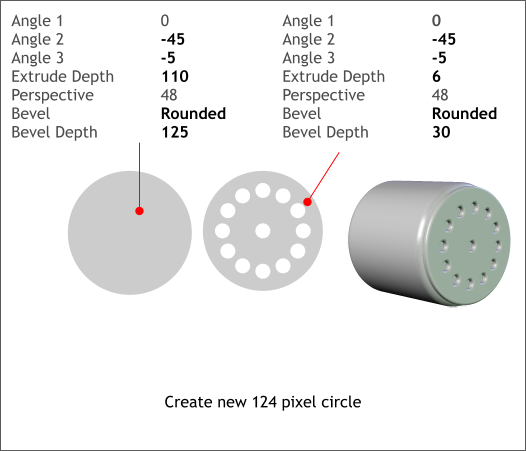
 OK, I lied about not needing any more circles. We need one more.
Create a 124 pixel circle. Apply the Extrude options shown above.
Position the circle with the circular holes over the cylinder shapes. This
will be the engine for the fan.
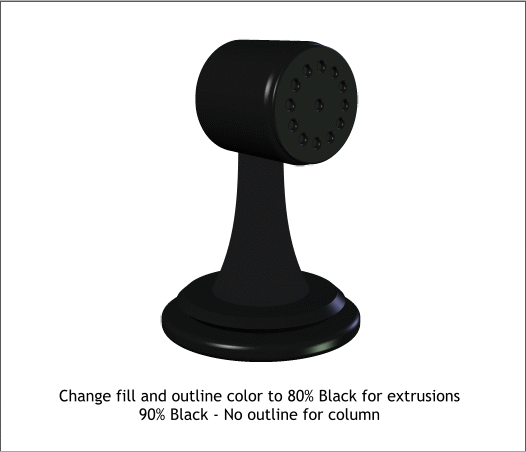
Change the fill and outline color for the extruded shapes to 80% Black.
Change the fill for the tapered column to 90% Black, with no outline.
The extruded shapes look rather dull. We can change this using the
lighting controls. Each light (you can see the lights by pressing the
Show Lights light bulb icon). Again you really owe me, because I have
painstakingly determined the angles and colors for you. Each light can
rotate on two elliptical orbits (Angle 1 and Angle 2). Very confusing.
Select the top two objects and change the light angles and colors as
shown. Edit the Light colors in the Color Editor (Ctrl e) in the top drop
down list. You will have had to select 0-255 for your Color Units as I
instructed earlier. If you did not, we will all wait while you go back and
do it! Edit the lights for the bottom two extruded ellipses as indicated
in the second set of settings. And make the same changes to the colors.
That looks better but the column looks flat. We’ll change that next.
OK, I lied about not needing any more circles. We need one more.
Create a 124 pixel circle. Apply the Extrude options shown above.
Position the circle with the circular holes over the cylinder shapes. This
will be the engine for the fan.
Change the fill and outline color for the extruded shapes to 80% Black.
Change the fill for the tapered column to 90% Black, with no outline.
The extruded shapes look rather dull. We can change this using the
lighting controls. Each light (you can see the lights by pressing the
Show Lights light bulb icon). Again you really owe me, because I have
painstakingly determined the angles and colors for you. Each light can
rotate on two elliptical orbits (Angle 1 and Angle 2). Very confusing.
Select the top two objects and change the light angles and colors as
shown. Edit the Light colors in the Color Editor (Ctrl e) in the top drop
down list. You will have had to select 0-255 for your Color Units as I
instructed earlier. If you did not, we will all wait while you go back and
do it! Edit the lights for the bottom two extruded ellipses as indicated
in the second set of settings. And make the same changes to the colors.
That looks better but the column looks flat. We’ll change that next.
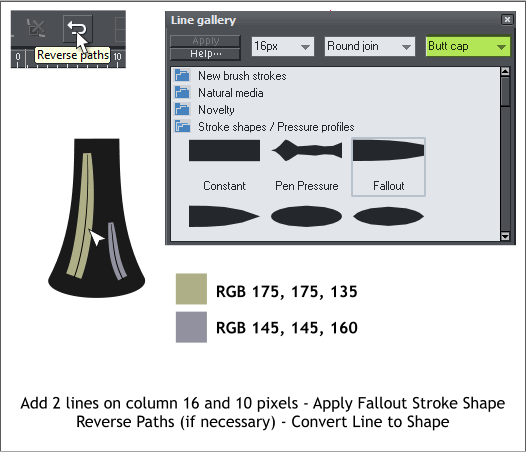
 Select the Shape Editor Tool (F4) and draw two lines. Drag the lines
into graceful curves as shown in the black outlines.
Open the Line Gallery (the icon with the two opposing arrows). Open
the Stroke Shapes folder. Select and apply the Fallout shape to both
lines. Change the line widths to 16px and 10px. If your lines taper
downwards rather than upwards, switch to the Shape Editor Tool and
click the Reverse Paths icon. Change the outline colors as shown.
Select both lines and from the Arrange menu select Convert Line to
Shape.
Select the Shape Editor Tool (F4) and draw two lines. Drag the lines
into graceful curves as shown in the black outlines.
Open the Line Gallery (the icon with the two opposing arrows). Open
the Stroke Shapes folder. Select and apply the Fallout shape to both
lines. Change the line widths to 16px and 10px. If your lines taper
downwards rather than upwards, switch to the Shape Editor Tool and
click the Reverse Paths icon. Change the outline colors as shown.
Select both lines and from the Arrange menu select Convert Line to
Shape.