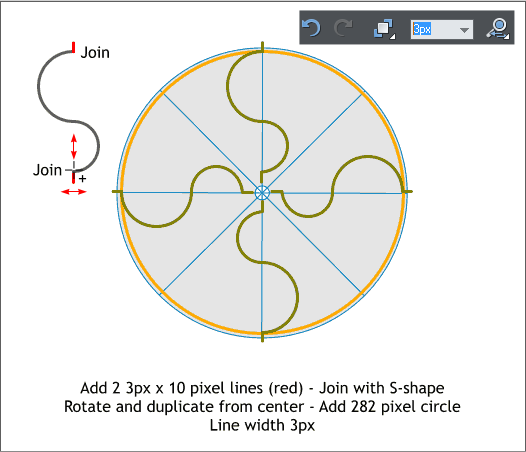


 Select the Shape Editor Tool (F4), hold down the Ctrl key and create a
vertical line 10 pixels tall (shown in red). Duplicate the line. Position
one line at each end of the S-shape. Select the S-shape and the top line
then switch back to the Shape Editor Tool. Drag the end out and back a
short distance until the cursor shows a small +. Select the S-shape and
the bottom line and repeat this step.
Change the width to 3px (highlight the outline width value in the Width
text entry box, change the number to 3 and press Enter.
Create a new 282 pixels circle (shown in yellow). Change the outline
width to 3px and the fill to none (click the small cross hatched box to
the left of the screen palette and select No Fill Color from the pop up
menu).
Position the S-shape at the top of the circle. Click twice to enable
rotate/skew mode. Drag the center of rotation to the center of the
intersecting lines. Hold down the Ctrl key and hold down the RIGHT
mouse button and rotate and drop three duplicate S-shapes.
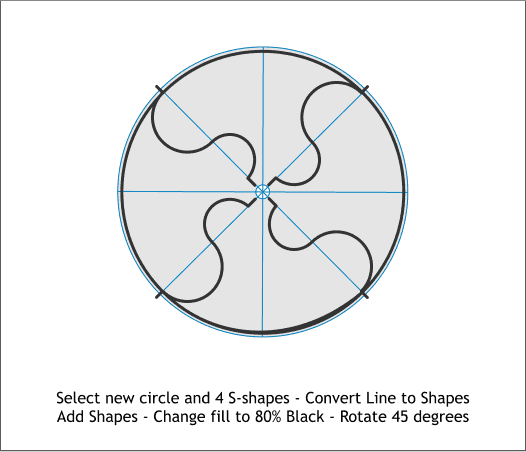
Hold down the Shift key (to select multiple objects) and select the
yellow circle and the four S-shapes. From the Arrange menu select
Convert Line to Shape. With the five shapes still selected, Arrange >
Combine Shapes > Add Shapes. This creates one combined shape.
Click twice to enable rotate/skew mode, hold down the Ctrl key and
rotate 45 degrees.
TIP: You can also rotate and skew a selection without enabling
rotate/skew mode. Simply place the cursor to the inside of the
four outside square resizing handles. The cursor arrows change
direction to indicate rotation mode. Drag an arrow to rotate.
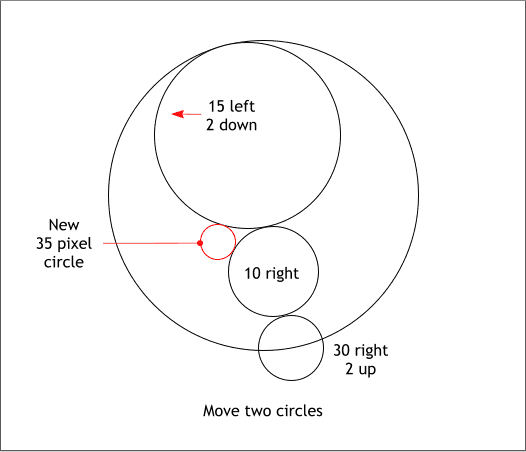
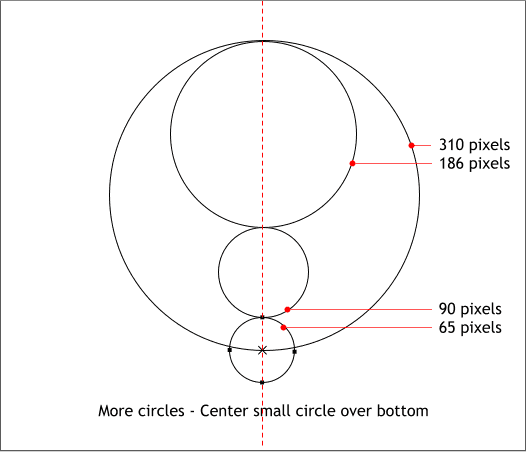
Draw four new circles and align them as shown above.
If you followed my instructions and changed the Nudge Size to 1px this
next step will be easy. If you ignored my instructions you may have to
fake it.
Select the large circle and move it 15 pixels to the left and 2 pixels
down. You can do this by pressing the left arrow key and the down
arrow key. Each click moves the selection 1 pixel. If you hold down the
Shift key, each arrow key click moves the selection by 10 pixels.
Move the other two circles as shown.
Add a new circle (shown in red). This new circle has to precisely
overlap the other two circles as shown. It helps if you zoom in closer.
(Press 2 or 3 on your keyboard to zoom to 200% or 300%. Press 1 to
return to 100%).
Select the Shape Editor Tool (F4), hold down the Ctrl key and create a
vertical line 10 pixels tall (shown in red). Duplicate the line. Position
one line at each end of the S-shape. Select the S-shape and the top line
then switch back to the Shape Editor Tool. Drag the end out and back a
short distance until the cursor shows a small +. Select the S-shape and
the bottom line and repeat this step.
Change the width to 3px (highlight the outline width value in the Width
text entry box, change the number to 3 and press Enter.
Create a new 282 pixels circle (shown in yellow). Change the outline
width to 3px and the fill to none (click the small cross hatched box to
the left of the screen palette and select No Fill Color from the pop up
menu).
Position the S-shape at the top of the circle. Click twice to enable
rotate/skew mode. Drag the center of rotation to the center of the
intersecting lines. Hold down the Ctrl key and hold down the RIGHT
mouse button and rotate and drop three duplicate S-shapes.
Hold down the Shift key (to select multiple objects) and select the
yellow circle and the four S-shapes. From the Arrange menu select
Convert Line to Shape. With the five shapes still selected, Arrange >
Combine Shapes > Add Shapes. This creates one combined shape.
Click twice to enable rotate/skew mode, hold down the Ctrl key and
rotate 45 degrees.
TIP: You can also rotate and skew a selection without enabling
rotate/skew mode. Simply place the cursor to the inside of the
four outside square resizing handles. The cursor arrows change
direction to indicate rotation mode. Drag an arrow to rotate.
Draw four new circles and align them as shown above.
If you followed my instructions and changed the Nudge Size to 1px this
next step will be easy. If you ignored my instructions you may have to
fake it.
Select the large circle and move it 15 pixels to the left and 2 pixels
down. You can do this by pressing the left arrow key and the down
arrow key. Each click moves the selection 1 pixel. If you hold down the
Shift key, each arrow key click moves the selection by 10 pixels.
Move the other two circles as shown.
Add a new circle (shown in red). This new circle has to precisely
overlap the other two circles as shown. It helps if you zoom in closer.
(Press 2 or 3 on your keyboard to zoom to 200% or 300%. Press 1 to
return to 100%).