


 I hope you like drawing circles because this tutorial has a ton of them.
Select the Ellipse Tool (L). Hold down the Ctrl key to constrain the
ellipse to a circle, and drag a circle 200 pixels wide. The Infobar at the
top of the screen will show the size as you drag.
TIP: Create any size circle, then enter the exact height and width
on the Infobar. Press Enter after you key in each dimension.
Clone the circle (Ctrl k) and change the Width on the Infobar to 170px
and press Enter to apply the change. Repeat this step to create the two
smaller circles. (The padlock icon needs to be in the down position).
Select the Shape Editor Tool (F4). Make sure the Infobar setting is set
to Make Line. Hold down the Ctrl key (to constrain the angle), click at
the bottom of the circle then drag up to the top of the circle to add a
vertical line. Repeat this step to add a horizontal line. Clone (Ctrl k or
Edit > Clone) the horizontal line and on the Angle of Selection text
entry box on the Infobar, key in -45 and press Enter to create a
diagonal line.
Before we go to the next step, right click on a blank area of the page
and select Page Options.... In the General tabbed section set the
Angle Constraint to 15. Set the Nudge Size to 1px.
Click the Units tab. Make sure your Page Units are set to Pixels and the
Color Units 0-255. Click OK to close the dialog.
I hope you like drawing circles because this tutorial has a ton of them.
Select the Ellipse Tool (L). Hold down the Ctrl key to constrain the
ellipse to a circle, and drag a circle 200 pixels wide. The Infobar at the
top of the screen will show the size as you drag.
TIP: Create any size circle, then enter the exact height and width
on the Infobar. Press Enter after you key in each dimension.
Clone the circle (Ctrl k) and change the Width on the Infobar to 170px
and press Enter to apply the change. Repeat this step to create the two
smaller circles. (The padlock icon needs to be in the down position).
Select the Shape Editor Tool (F4). Make sure the Infobar setting is set
to Make Line. Hold down the Ctrl key (to constrain the angle), click at
the bottom of the circle then drag up to the top of the circle to add a
vertical line. Repeat this step to add a horizontal line. Clone (Ctrl k or
Edit > Clone) the horizontal line and on the Angle of Selection text
entry box on the Infobar, key in -45 and press Enter to create a
diagonal line.
Before we go to the next step, right click on a blank area of the page
and select Page Options.... In the General tabbed section set the
Angle Constraint to 15. Set the Nudge Size to 1px.
Click the Units tab. Make sure your Page Units are set to Pixels and the
Color Units 0-255. Click OK to close the dialog.
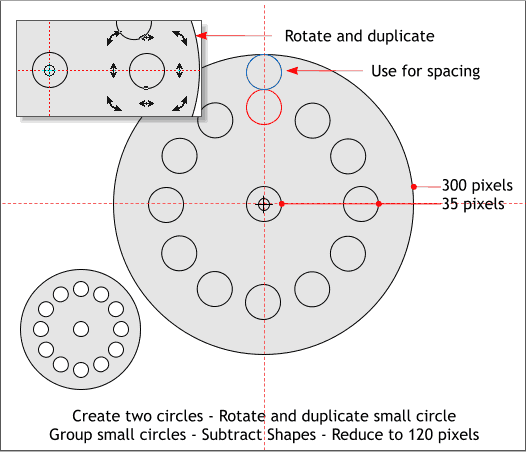
 Make a large 300 pixel circle. Clone the circle and reduce the size to 35
pixels. Duplicate the small circle (Ctrl Alt d or Edit > Duplicate) and
move it to the top center of the large circle. Duplicate the circle again
and move it just below the small circle (shown in red). Delete the top
small circle shown above in blue.
Select the large circle with the Ellipse Tool. (A small X will appear in
the center of the circle). Drag guidelines from the screen rulers (Ctrl L
to display rulers) through the small x in the center of the large circle.
Make sure the small circle is center aligned with the large circle. Click
the small circle (shown in red) two times to enable rotate/skew mode.
A small bulls eye (called the Center of Rotation) will appear. Drag this
to the intersection of the two guidelines.
For new users this next step takes a bit of getting used to. But this is
how we will duplicate the small circles around the center of the large
circle. With the small circle selected (shown above in red), and in
rotate/skew mode (remember to click twice), hold down the Ctrl key
and drag/rotate the top rounded corner arrow with the RIGHT mouse
button until it snaps into place. Dragging with the right mouse button
drops a duplicate as soon as you release the right mouse button. Repeat
right mouse button dragging and dropping until you have 12 small
circles as shown (plus the small circle in the very center).
With the Selector Tool (the arrow pointer), drag a selection rectangle
(called a marquee) around all the small circles (but not the large
circle). The status bar in the lower left side of the screen should read
“13 Shapes on Layer 1”. Group all of these small circles (Ctrl g).
With the small circles group selected, hold down the Shift key and click
select the large circle. From the Arrange menu select Combine Shapes
> Subtract Shapes or press Ctrl 2. This removes all the small circles.
Change the Width on the Infobar to 120px and press Enter.
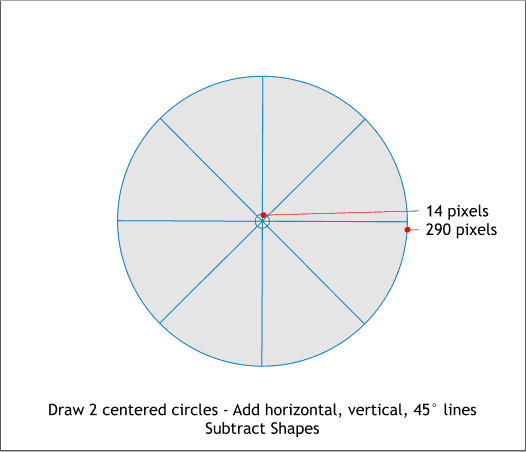
Create two new circles and four lines as shown. Select the two circles
and from the Arrange menu, select Combine Shapes > Subtract Shapes
or press Ctrl 2 the keyboard shortcut, to remove the small circle.
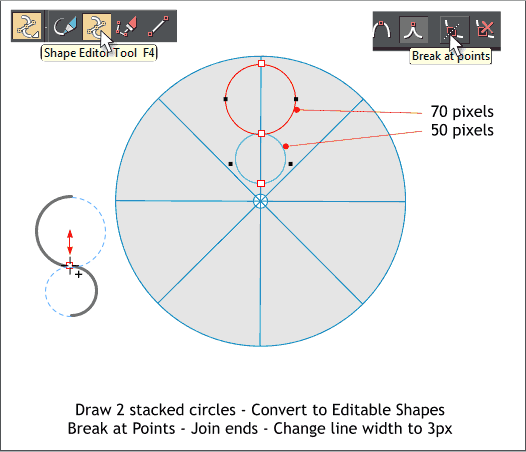
Draw two small, stacked and center-aligned circles to the sizes shown.
Hold down the Shift key and select both circles. From the Arrange
menu, select Convert to Editable Shapes (or Shift Ctrl s).
Switch to the Shape Editor Tool (F4). Drag a selection rectangle around
the center control points (the points will change to a red outline) to
select them. Press the Break at Points icon on the Infobar.
Delete the top right and bottom left half circles. Change the line width
to 3px (highlight the current width setting, key in 3 and press Enter).
Hold down the Shift key and with the Selector Tool, select both half
circles. Switch back to the Shape Editor Tool (F4). Drag the center
control point away from the center and then back. The cursor will
change to display a plus sign (+) to indicate the two lines are joined.
I don’t know about you, but I am exhausted. And we’re just getting
started. Take a short break and save your work.
Make a large 300 pixel circle. Clone the circle and reduce the size to 35
pixels. Duplicate the small circle (Ctrl Alt d or Edit > Duplicate) and
move it to the top center of the large circle. Duplicate the circle again
and move it just below the small circle (shown in red). Delete the top
small circle shown above in blue.
Select the large circle with the Ellipse Tool. (A small X will appear in
the center of the circle). Drag guidelines from the screen rulers (Ctrl L
to display rulers) through the small x in the center of the large circle.
Make sure the small circle is center aligned with the large circle. Click
the small circle (shown in red) two times to enable rotate/skew mode.
A small bulls eye (called the Center of Rotation) will appear. Drag this
to the intersection of the two guidelines.
For new users this next step takes a bit of getting used to. But this is
how we will duplicate the small circles around the center of the large
circle. With the small circle selected (shown above in red), and in
rotate/skew mode (remember to click twice), hold down the Ctrl key
and drag/rotate the top rounded corner arrow with the RIGHT mouse
button until it snaps into place. Dragging with the right mouse button
drops a duplicate as soon as you release the right mouse button. Repeat
right mouse button dragging and dropping until you have 12 small
circles as shown (plus the small circle in the very center).
With the Selector Tool (the arrow pointer), drag a selection rectangle
(called a marquee) around all the small circles (but not the large
circle). The status bar in the lower left side of the screen should read
“13 Shapes on Layer 1”. Group all of these small circles (Ctrl g).
With the small circles group selected, hold down the Shift key and click
select the large circle. From the Arrange menu select Combine Shapes
> Subtract Shapes or press Ctrl 2. This removes all the small circles.
Change the Width on the Infobar to 120px and press Enter.
Create two new circles and four lines as shown. Select the two circles
and from the Arrange menu, select Combine Shapes > Subtract Shapes
or press Ctrl 2 the keyboard shortcut, to remove the small circle.
Draw two small, stacked and center-aligned circles to the sizes shown.
Hold down the Shift key and select both circles. From the Arrange
menu, select Convert to Editable Shapes (or Shift Ctrl s).
Switch to the Shape Editor Tool (F4). Drag a selection rectangle around
the center control points (the points will change to a red outline) to
select them. Press the Break at Points icon on the Infobar.
Delete the top right and bottom left half circles. Change the line width
to 3px (highlight the current width setting, key in 3 and press Enter).
Hold down the Shift key and with the Selector Tool, select both half
circles. Switch back to the Shape Editor Tool (F4). Drag the center
control point away from the center and then back. The cursor will
change to display a plus sign (+) to indicate the two lines are joined.
I don’t know about you, but I am exhausted. And we’re just getting
started. Take a short break and save your work.