


 The beak was hard to draw and it also involves a bit of work to color.
But this is not brain surgery. You can do it. I’m highly confident.
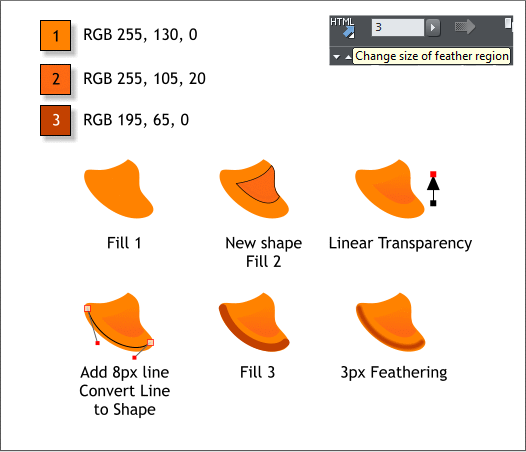
Apply a solid orange fill using color 1 to the beak shape.
Create a new shape shown in the second example and apply fill 2. I
added an outline to show you the shape. Your shape should have no
outline. Apply a vertical Linear, Mix transparency. (Click on the new
shape with the Transparency Tool (F6), then click and drag from the
bottom of the shape upwards).
Switch to the Shape Editor Tool (F4). Create a curved line to match
the shape of the bottom of the beak. Drag on the line to curve it.
Select 8px from the Width drop down list on the Infobar.
With the line selected, from the Arrange menu, select Convert Line to
Shape. Apply fill 3 to the new shape then apply 3 pixels of feathering
using the Change Size of Feather Region slider on the Infobar.
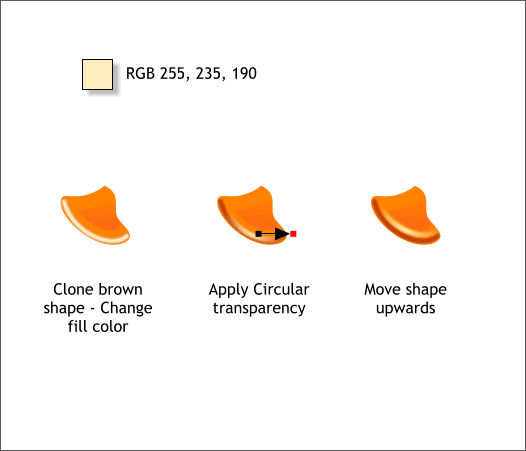
Select the brown curved shape you just created and clone it (Ctrl k).
(Clone creates a copy in the exact same position. Duplicate creates a
copy and offsets it down and to the right.)
Change the fill color to pale orange. Apply a Circular, Mix
transparency. Move the center of the transparency down and to the
right as shown above middle. Move the shape upwards a small amount.
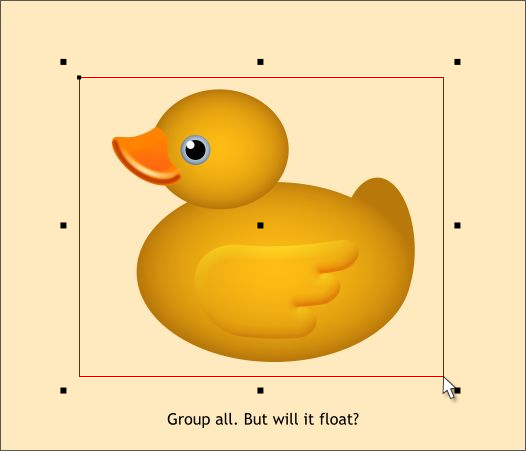
Using the Selector Tool (the arrow pointer F2), drag a selection
rectangle around the entire duck and group all the objects (Ctrl g).
Your drawing should now look like my example above.
The beak was hard to draw and it also involves a bit of work to color.
But this is not brain surgery. You can do it. I’m highly confident.
Apply a solid orange fill using color 1 to the beak shape.
Create a new shape shown in the second example and apply fill 2. I
added an outline to show you the shape. Your shape should have no
outline. Apply a vertical Linear, Mix transparency. (Click on the new
shape with the Transparency Tool (F6), then click and drag from the
bottom of the shape upwards).
Switch to the Shape Editor Tool (F4). Create a curved line to match
the shape of the bottom of the beak. Drag on the line to curve it.
Select 8px from the Width drop down list on the Infobar.
With the line selected, from the Arrange menu, select Convert Line to
Shape. Apply fill 3 to the new shape then apply 3 pixels of feathering
using the Change Size of Feather Region slider on the Infobar.
Select the brown curved shape you just created and clone it (Ctrl k).
(Clone creates a copy in the exact same position. Duplicate creates a
copy and offsets it down and to the right.)
Change the fill color to pale orange. Apply a Circular, Mix
transparency. Move the center of the transparency down and to the
right as shown above middle. Move the shape upwards a small amount.
Using the Selector Tool (the arrow pointer F2), drag a selection
rectangle around the entire duck and group all the objects (Ctrl g).
Your drawing should now look like my example above.