


 The duck shapes are complete. Now we get to color.
NOTE: Your Color Units need to be set to 0-255. Right click on
the page and select Page Options... In the Units tabbed section,
check the check box for Color Units: 0-255.
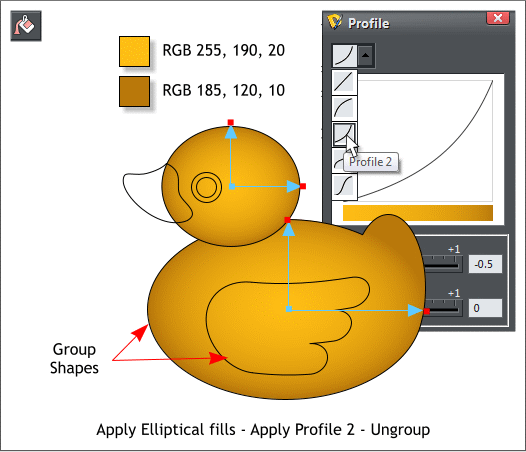
Hold down the Shift key and click on the duck body and the wing to
select both. Group the two objects (Arrange > Group or press Ctrl g).
Select the Fill Tool (F5 or g) then click on the body group to select it.
From the drop down list of Fill Types on the Infobar, select Elliptical.
Click on the small square (control handle) at the end of either of the
arrows then open the Color Editor (Ctrl e). Select RGB Color Model
from the drop down list at the bottom of the menu. Enter the three
RGB values for the dark yellow color shown above.
Click on the control handle where the two arrows come together, and
change the RGB values to the bright yellow.
Click the Profile arrow on the Infobar. From the drop down list
select Profile 2. Use the same fill settings for the head.
Select the body/wing group and Arrange > Ungroup or press Ctrl u.
The duck shapes are complete. Now we get to color.
NOTE: Your Color Units need to be set to 0-255. Right click on
the page and select Page Options... In the Units tabbed section,
check the check box for Color Units: 0-255.
Hold down the Shift key and click on the duck body and the wing to
select both. Group the two objects (Arrange > Group or press Ctrl g).
Select the Fill Tool (F5 or g) then click on the body group to select it.
From the drop down list of Fill Types on the Infobar, select Elliptical.
Click on the small square (control handle) at the end of either of the
arrows then open the Color Editor (Ctrl e). Select RGB Color Model
from the drop down list at the bottom of the menu. Enter the three
RGB values for the dark yellow color shown above.
Click on the control handle where the two arrows come together, and
change the RGB values to the bright yellow.
Click the Profile arrow on the Infobar. From the drop down list
select Profile 2. Use the same fill settings for the head.
Select the body/wing group and Arrange > Ungroup or press Ctrl u.
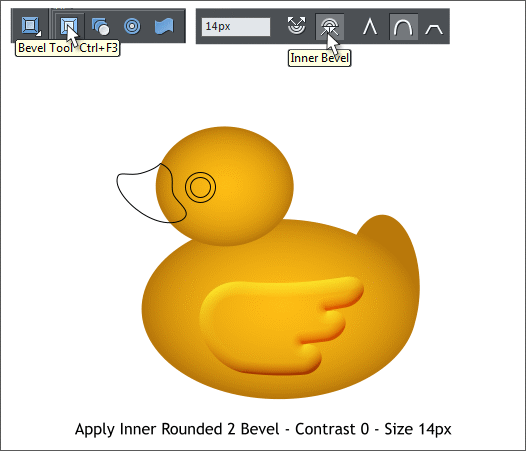
 Select the Bevel Tool (Ctrl F3) then select the wing (did you remember
to Ungroup it from the body?) From the Bevel Type drop down list,
select Rounded 2. Click the Inner Bevel icon on the Infobar.
From the Slider Type drop down select size and change the size to
14px. Press Enter to apply the change.
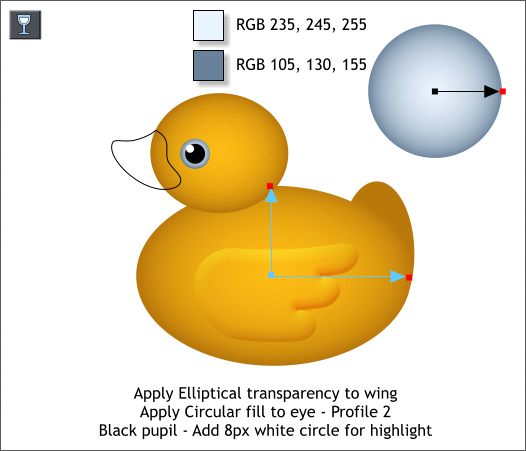
With the wing selected, switch to the Transparency Tool (F6). From
the drop down list of Transparency Shapes, select Elliptical. Drag the
ends of the fill path arrow to the height and width of the duck’s body
as shown in the illustration above. Apply a profile.
Select the larger of the two eyeball circles with the Fill Tool (g or F5).
From the drop down list of Fill Types on the Infobar, select Circular.
Edit the inside and outside colors in the Color Editor (Ctrl e). Click the
Profile arrow icon on the Infobar and select Profile 2 from the drop
down list. Apply a Flat, Black fill for the pupil. Create a small white
circle for the highlight.
TIP: If you need help with any of the tools, press F1 with the tool
selected for help with the selected tool. You can also press the
Help button in any menu for context sensitive help with the
settings and/or options in the menu. Xara’s context sensitive help
is really excellent.
Select the Bevel Tool (Ctrl F3) then select the wing (did you remember
to Ungroup it from the body?) From the Bevel Type drop down list,
select Rounded 2. Click the Inner Bevel icon on the Infobar.
From the Slider Type drop down select size and change the size to
14px. Press Enter to apply the change.
With the wing selected, switch to the Transparency Tool (F6). From
the drop down list of Transparency Shapes, select Elliptical. Drag the
ends of the fill path arrow to the height and width of the duck’s body
as shown in the illustration above. Apply a profile.
Select the larger of the two eyeball circles with the Fill Tool (g or F5).
From the drop down list of Fill Types on the Infobar, select Circular.
Edit the inside and outside colors in the Color Editor (Ctrl e). Click the
Profile arrow icon on the Infobar and select Profile 2 from the drop
down list. Apply a Flat, Black fill for the pupil. Create a small white
circle for the highlight.
TIP: If you need help with any of the tools, press F1 with the tool
selected for help with the selected tool. You can also press the
Help button in any menu for context sensitive help with the
settings and/or options in the menu. Xara’s context sensitive help
is really excellent.


