


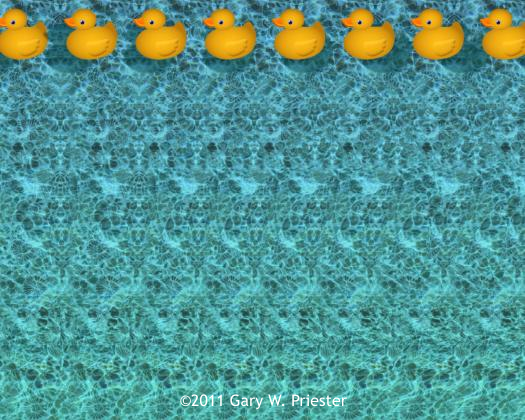
 I did a stereogram recently with a rubber ducky both as the hidden
object and as the—appropriately enough, floating objects. Rather than
use someone else’s photograph for the floating rubber ducks, and
violate their copyrights, I decided to create my own.
It was not hard at all, and as we are all getting pretty tired of shiny
high tech objects, I thought something warm and fuzzy (or soft and
rubbery), would make a fun tutorial. Most users should have no
problems with this tutorial with the possible exception of the orange
bill. But if we muddle along I think even new users can sort it all out.
As always, if you get hung up on something, just click the e button on
the navigation bar to send me an e-mail. And, if you have not already
figured it out, the Z button is to download the zipped version of the
tutorial. Enough chit chat, let’s get started.
We will be using Pixels for our units of measurement. And we will have
the screen rulers visible. So you need to set these up before we begin.
Press Ctrl L to display the screen rulers. Right click on the ruler and
select Grid and Ruler Options... Set the Major Spacing to 100px and
set the Number of Subdivisions to 10.
In the Units tabbed section select Pixels from the Page drop down list.
I did a stereogram recently with a rubber ducky both as the hidden
object and as the—appropriately enough, floating objects. Rather than
use someone else’s photograph for the floating rubber ducks, and
violate their copyrights, I decided to create my own.
It was not hard at all, and as we are all getting pretty tired of shiny
high tech objects, I thought something warm and fuzzy (or soft and
rubbery), would make a fun tutorial. Most users should have no
problems with this tutorial with the possible exception of the orange
bill. But if we muddle along I think even new users can sort it all out.
As always, if you get hung up on something, just click the e button on
the navigation bar to send me an e-mail. And, if you have not already
figured it out, the Z button is to download the zipped version of the
tutorial. Enough chit chat, let’s get started.
We will be using Pixels for our units of measurement. And we will have
the screen rulers visible. So you need to set these up before we begin.
Press Ctrl L to display the screen rulers. Right click on the ruler and
select Grid and Ruler Options... Set the Major Spacing to 100px and
set the Number of Subdivisions to 10.
In the Units tabbed section select Pixels from the Page drop down list.

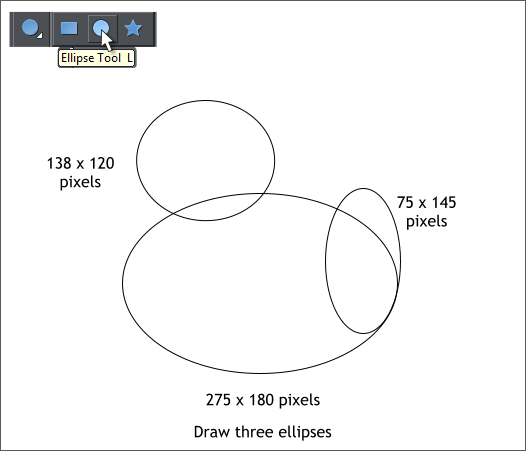
 Select the Ellipse Tool (L) and draw three ellipses to the sizes shown.
TIP: Create any size ellipse, then while the ellipse is still selected,
change the dimensions on the Infobar at the top of the screen.
Arrange the ellipses as shown above. The tall ellipse and the largest
ellipse need to align as shown with the two edges just touching.
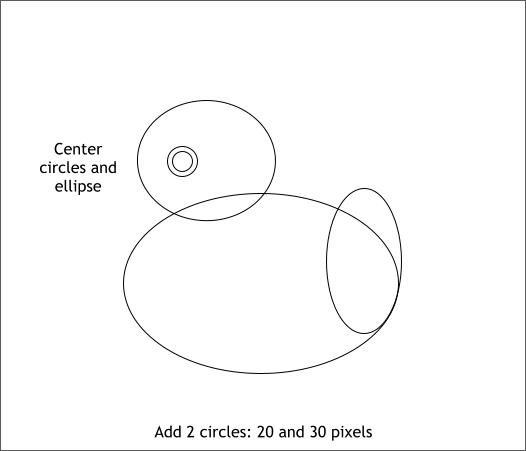
Select the Ellipse Tool, hold down the Ctrl key (to constrain the ellipse
to a circle), and draw two small centered circles, 30 and 20 pixels in
diameter.
TIP: Create the 30 pixel circle. Clone the circle (Ctrl k) and
reduce the size of the clone on the Infobar to 20px. Press Enter to
apply the change. Both circles will be centered.
If you can make it through this step, the rest of the tutorial will be a
piece of cake.
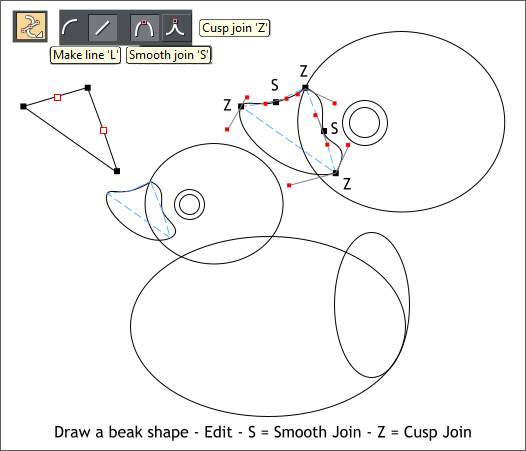
Select the Shape Editor Tool (F4). Make sure the Make Line option is
selected (the diagonal line icon). Click on the page to add an anchor
point, click again to create a line segment. Click two more times to add
two more line segments to create a triangle. Click the last point on top
of the first anchor point. This creates a closed shape. Practice this a
few times until you see how it works, then create a triangle shape
positioned as shown over the face in blue dashed outline.
Click on the outline with the Shape Editor Tool to add a new control
points shown above (the small squares with the red outlines). Repeat.
With the triangle shape selected, switch to the Shape Editor Tool. Drag
on the line segments and pull them into curves. Click on the two
control points you just added and on the Infobar, click the Smooth Join
icon.
For more control, click on the corner control points and drag the tiny
red squares (called Bezier control handles) until your final result
resembles a beak as shown above.
This is the hardest shape in the tutorial but also the most critical so
work on it until you have it perfect. We’ll wait here until you are done.
Select the Ellipse Tool (L) and draw three ellipses to the sizes shown.
TIP: Create any size ellipse, then while the ellipse is still selected,
change the dimensions on the Infobar at the top of the screen.
Arrange the ellipses as shown above. The tall ellipse and the largest
ellipse need to align as shown with the two edges just touching.
Select the Ellipse Tool, hold down the Ctrl key (to constrain the ellipse
to a circle), and draw two small centered circles, 30 and 20 pixels in
diameter.
TIP: Create the 30 pixel circle. Clone the circle (Ctrl k) and
reduce the size of the clone on the Infobar to 20px. Press Enter to
apply the change. Both circles will be centered.
If you can make it through this step, the rest of the tutorial will be a
piece of cake.
Select the Shape Editor Tool (F4). Make sure the Make Line option is
selected (the diagonal line icon). Click on the page to add an anchor
point, click again to create a line segment. Click two more times to add
two more line segments to create a triangle. Click the last point on top
of the first anchor point. This creates a closed shape. Practice this a
few times until you see how it works, then create a triangle shape
positioned as shown over the face in blue dashed outline.
Click on the outline with the Shape Editor Tool to add a new control
points shown above (the small squares with the red outlines). Repeat.
With the triangle shape selected, switch to the Shape Editor Tool. Drag
on the line segments and pull them into curves. Click on the two
control points you just added and on the Infobar, click the Smooth Join
icon.
For more control, click on the corner control points and drag the tiny
red squares (called Bezier control handles) until your final result
resembles a beak as shown above.
This is the hardest shape in the tutorial but also the most critical so
work on it until you have it perfect. We’ll wait here until you are done.